
Turn plastic into history with this legendary WWII fighter—achieve museum-quality results even as a beginner with Tamiya’s precision-engineered kit.
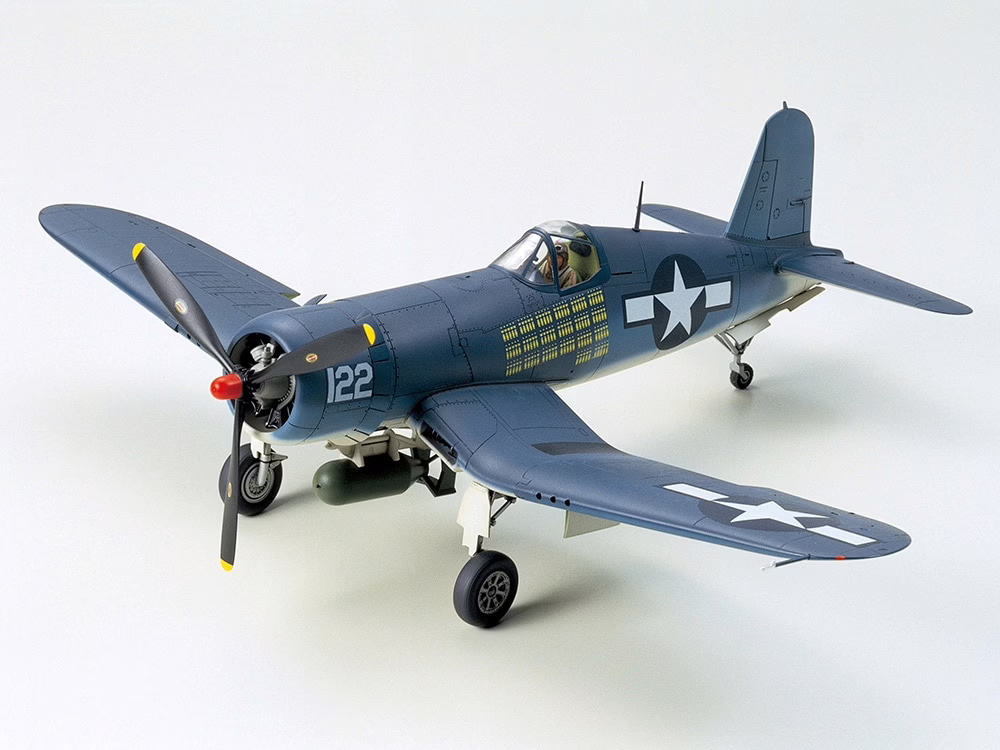
The Vought F4U-1A Corsair stands as one of WWII’s most recognizable fighters, with its distinctive inverted gull wing and massive propeller. The Tamiya 1/48 scale kit (Item 61070) is widely regarded as a benchmark in the hobby—often described as a “shake and bake” kit due to its precision engineering and superior fit, and it consistently ranks among the best model airplane kits available to modern hobbyists. This guide walks you through ten systematic steps to transform this excellent kit into a museum-quality replica. The F4U-1A features a raised cockpit for improved visibility and represents the mature production variant that saw extensive Pacific theater service. Following these steps will lead to professional results, even for modelers new to the hobby.
Step 1: Parts Inventory and Preparation
Begin by thoroughly cleaning all parts to remove mold release agents—oily silicone-based lubricants used in manufacturing. Submerge the entire sprue in warm water with mild detergent and scrub with a soft toothbrush, paying attention to recessed panel lines. This step is critical because mold release agents prevent proper paint adhesion and can cause “fisheye” defects.
Cross-reference the instruction manual with the parts. Since Tamiya uses common runners across Corsair variants, the box contains parts marked “not for use” on the F4U-1A. Organize small components in labeled containers or ziplock bags by sub-assembly—cockpit, engine, wings, landing gear—to prevent loss to the “carpet monster.”
Remove parts from the sprue using flush-cutting nippers, leaving a small nub of plastic. Never twist parts off, as this causes stress fractures. Clean up the nub with a sharp hobby knife, slicing away from the part, then smooth with graduating sanding sticks.
Before applying any glue, perform a complete dry fit using masking tape. This “tape-up” reveals the true nature of fit and highlights areas requiring modification, particularly at the wing roots where the inverted gull wing meets the fuselage.
Step 2: Cockpit Construction and Detailing
The F4U-1A cockpit demands attention as it sits high and visible in the finished model. Paint the cockpit tub Interior Green (FS 34151), though Tamiya’s instructions suggest mixing 2 parts XF-3 Flat Yellow with 1 part XF-5 Flat Green to approximate Zinc Chromate primer. Advanced modelers often use Interior Green for contrast.
Create depth through pre-shading—airbrush dark brown or black into recesses before applying the base color. This creates artificial shadows that prevent the flat, toy-like appearance of single-color cockpits. Follow with post-shading by adding a drop of white to your base color and spraying panel centers to simulate sun bleaching.
Apply a wash of heavily thinned dark brown paint to flow into recesses via capillary action, defining buttons and details. Counter this with dry brushing—wipe a flat brush nearly dry on paper towel, then flick it across raised details with light green or yellow-green paint. This contrast between dark recesses and highlighted peaks creates convincing three-dimensionality.
For the instrument panel, paint it semi-gloss black, dry brush the raised bezels silver, then apply individual instrument decals. Place a drop of watchmaker’s cement over each dial to create a domed glass lens with realistic specular highlight.
Test-fit all cockpit components before final assembly to ensure proper alignment with fuselage halves.
Step 3: Fuselage Assembly
Joining the fuselage halves relies on solvent welding. Plastic cement isn’t traditional glue—it temporarily dissolves polystyrene, allowing the plastic from both halves to mix. Hold the halves together and touch the brush to the seam. Capillary action draws the low-viscosity liquid into the joint instantly. Gentle pressure squeezes a small bead of molten plastic from the seam—this bead is crucial for gap-free joints.
For gaps that remain, use Squadron Green putty for shallow blemishes or cyanoacrylate glue for deeper voids. CA glue can be accelerated and sands to a high polish. Work through graduating grits: 320 or 400 to remove excess and shape, then 600, 1000, and finer grits to polish out scratches.
Sanding inevitably destroys panel lines crossing the seams. Restore these through scribing—use Dymo tape or flexible rulers as templates and carve new channels with a scribing tool or needle in a pin vise. Match the depth and width of existing kit panel lines so subsequent washes flow uninterrupted.
Mask the completed cockpit interior carefully before any exterior painting to prevent overspray contamination.
Step 4: Wing Assembly and Attachment
The inverted gull wing defines the Corsair’s silhouette. Tamiya breaks the wing into a center section and outer panels, mimicking the real aircraft’s folding mechanism. The critical challenge is the wing root gap where the upper wing surface meets the fuselage fillet.
Never force these gaps closed with clamps and glue, as this introduces stress that warps the dihedral or cracks joints later. Instead, use shimming—glue thin strips of styrene sheet into the gap to fill the void. Once cured, trim and sand the shim flush. This provides a stable, invisible repair maintaining correct stress-free geometry.
When attaching outer wing panels, ensure symmetrical dihedral—the upward angle from root to tip. Construct a jig from cardboard or balsa wood to hold wingtips at the correct height while glue sets. Even fractional errors become noticeable in the final stance.
Work through seams with the same putty and sanding progression used on the fuselage, taking care to preserve surface detail and panel lines.
Step 5: Engine, Cowling, and Propeller Assembly
Paint the R-2800 Double Wasp cylinders aluminum or steel, then apply a heavy black or dark brown wash that settles into recesses between cooling fins, creating artificial shadow. Dry brush the fin edges with chrome silver to accentuate relief and simulate complex metal casting.
The crankcase is typically glossy or semi-gloss grey engine gray. The cowling interior matches the underside camouflage color—Insignia White or Zinc Chromate Yellow.
For the Hamilton Standard propeller, paint the hub aluminum while blades receive flat black. The tips are yellow (FS 33538). Achieving sharp demarcation between yellow tips and black blades requires precise masking tape application, never freehand painting. Apply multiple coats of decal setting solution to melt thick Tamiya decals into the black blade surface, preventing visible carrier film.
Test-fit the engine within cowling parts to ensure proper clearance before final assembly.
Step 6: Landing Gear and Wheel Wells
For a standard tri-color F4U-1A, paint main wheel wells Insignia White to match underside camouflage, providing striking contrast to surrounding blues. The tail gear bay might retain Salmon primer. Paint landing gear struts aluminum or light gray, with the oleo shock absorber section in chrome silver.
Never paint tires pure black—this looks artificial at scale. Use dark grey-black (Rubber or NATO Black). Highlight treads with dust-colored dry brushing to simulate coral airstrip dirt.
Ensure landing gear alignment so the model sits level. The decision of when to install gear—before or after final painting—depends on your painting approach and masking confidence.
Step 7: Surface Preparation and Priming
Mask clear parts with precision-cut Tamiya tape, leaving frames exposed for painting. Stuff cockpit openings and engine faces with damp tissue to prevent overspray.
Primer serves three critical functions: it unifies multicolored plastic, putty, and photo-etch into a single neutral base; it provides chemical “tooth” for topcoats to grab; and it reveals ghost seams, scratches, and imperfections invisible on bare plastic. Use Mr. Surfacer 1000 or 1200 grade, which acts as a micro-filler while priming.
Inspect the primed model under strong light and correct any revealed flaws before proceeding to final colors.
Step 8: Painting the Exterior
The iconic US Navy tri-color scheme consists of Insignia White undersurfaces, Intermediate Blue on vertical surfaces and fuselage sides, and Non-Specular Sea Blue on upper surfaces. Paint light to dark, starting with the white belly.
For soft demarcation lines typical of this scheme, use rolls of putty (Blu-Tack) to lift masking slightly off the surface, allowing controlled overspray to create feathered transitions. Hard edges require firmly pressed Tamiya tape.
Employ pre-shading by spraying thin black lines along panel lines over primer before main colors. Translucent topcoats allow the black to show through faintly, creating panel definition. Post-shading involves adding white to your base color and spraying panel centers after the main coat to simulate sun fading.
Apply clear gloss coat over the completed camouflage to prepare for decals.
Step 9: Decal Application
Decals must be applied to glossy surfaces to prevent silvering—microscopic air bubbles trapped under the carrier film that create unwanted sheen. Cut decals close to the printed design, minimizing carrier film. Soak in warm water for 10-20 seconds.
Brush Micro Set wetting agent onto the model surface. Slide the decal into position, then brush Micro Sol solvent over it. This softens the decal film, melting it into the paint and allowing it to conform to rivets and panel lines. For thick Tamiya decals, stronger solvents like Mr. Mark Softer may be required.
Once dry, seal with another clear gloss coat to blend carrier film edges into the surface.
Step 10: Final Assembly, Weathering, and Finishing Touches
Apply a pin wash—precisely brush enamel or oil-based dark grey wash along panel lines, letting capillary action draw it into recesses. Wipe excess with mineral spirits-dampened swabs for crisp, high-contrast definition.
For operational weathering, use silver pencil or dry brushing on wing roots where pilots walk and engine cowlings to represent paint chipping. Airbrush the characteristic tri-color exhaust stain (tan/grey/black) from exhaust stacks across fuselage sides and under wing roots, as the R-2800 ran rich and dirty.
Apply matte finish over the entire model except clear parts to eliminate gloss and seal weathering. Unmask the canopy and attach using white glue for minimal visibility. Add the antenna wire from mast to vertical stabilizer using EZ Line or stretched sprue for the final delicate touch signifying completion.

Key Takeaways
- Thorough preparation prevents problems—cleaning parts removes mold release agents that compromise paint adhesion and glue bonds; dry fitting reveals fit issues before permanent assembly.
- Cockpit detailing transforms the model—pre-shading, washes, and dry brushing create three-dimensional depth that separates toy-like builds from realistic replicas.
- Strategic painting sequence matters—work light to dark colors, use proper masking for sharp demarcation lines, and always apply gloss coats before decaling to prevent silvering.
- Restrained weathering looks authentic—operational aircraft receive regular maintenance; subtle exhaust staining and wear patterns represent reality better than heavy weathering.
- Patience yields professional results—taking time at each step, from seam elimination to panel line restoration, determines the final quality of your finished Corsair.