
Master the technique that transforms flat plastic into convincing replicas by engineering artificial shadows that simulate structural depth and operational wear.
How Does “Pre-Shading” Add Realism?
The Quick Answer
Pre-shading is the application of dark, high-contrast colors along panel lines and structural recesses before applying the main camouflage coat. This underlayer creates artificial shadows that ghost through the translucent base paint, simulating the volumetric weight and accumulated grime that full-sized aircraft naturally display. The technique tricks the viewer’s eye into perceiving depth and history where only plastic exists.
The Extended Answer
Why Your Model Needs Shadows
When you finish assembling one of the best model airplane kits available and step back to admire your work, you’re looking at a collection of injection-molded polystyrene parts that share one fundamental problem: they lack volumetric weight. A real P-51 Mustang or F-4 Phantom exists in an environment where natural light interacts with its bulk, casting deep shadows in panel lines, recesses, and control surface hinges. The metal skin buckles slightly under aerodynamic stress and thermal expansion, creating a textured surface that reflects light unevenly.
At 1/48 or 1/72 scale, these natural lighting cues vanish completely. Paint your model with a single, opaque coat of the correct Federal Standard color, and it reflects light uniformly—resulting in an appearance the human eye registers as toy-like or flat. This is where pre-shading becomes essential. By artificially engineering the missing shadows and tonal variations, you overcome the fundamental limitation of scale and create the optical illusion of a heavy, operational aircraft rather than a plastic replica.
The technique also addresses what experts call the “Scale Effect”—the chromatic distortion caused by viewing objects at a distance. When you view a full-size aircraft from 100 feet away, the intervening atmosphere scatters light, causing colors to appear lighter and less saturated. A paint chip matched perfectly to the real aircraft’s skin at close range will appear too dark and intense on a 1/72 scale model. Pre-shading, combined with proper paint modulation, compensates for this effect and anchors your model in realistic visual context.
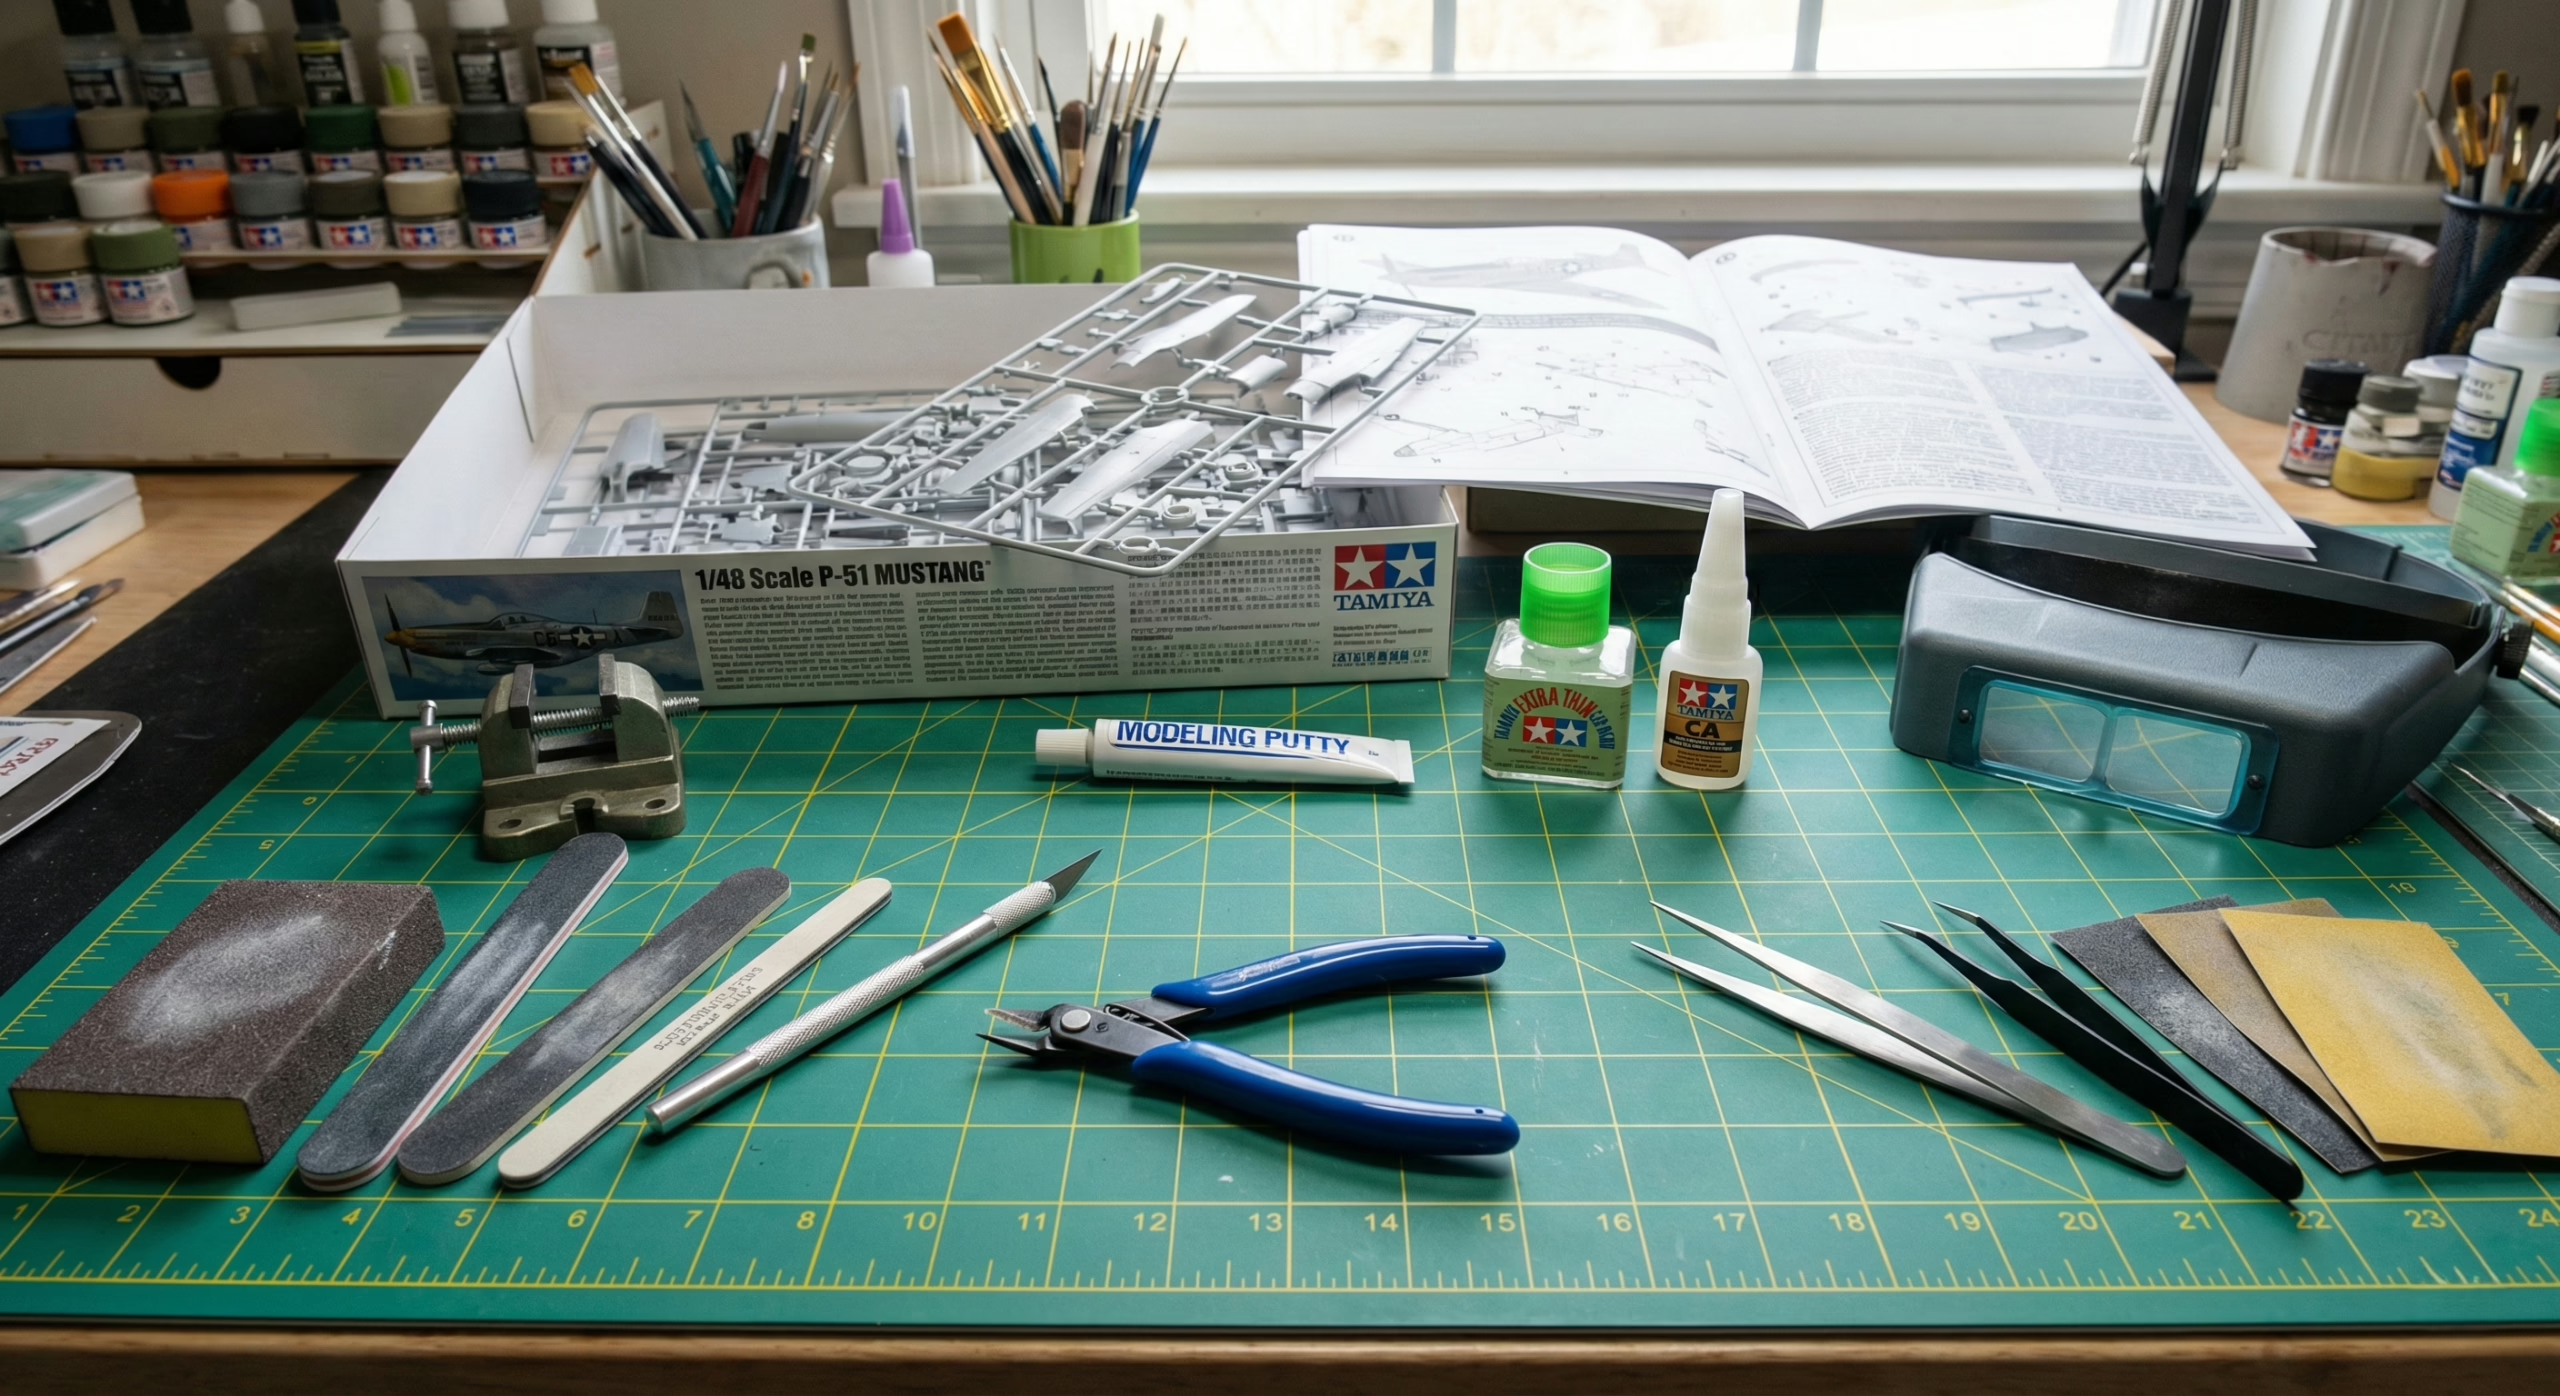 Phase 1: The Setup (Tools and Preparation)
The execution of precision pre-shading requires specific equipment capable of delivering atomized paint with microscopic control. Unlike general base-coating, which tolerates equipment variance, pre-shading demands the ability to draw lines less than 1 millimeter wide without sputtering or overspray.
The Airbrush Requirement
For professional-grade pre-shading, a dual-action, gravity-feed airbrush is the non-negotiable standard. The mechanical distinction of the dual-action trigger is critical: pressing down activates airflow, while pulling back retracts the needle to release paint. This separation of functions allows you to maintain a constant air stream—vital for drying the tip and stabilizing the surface—while feathering the paint volume from zero to microscopic amounts. Single-action airbrushes, which release air and paint simultaneously, lack the nuance required to start and stop lines cleanly, inevitably leading to splatter at the beginning of panel lines.
Gravity-feed airbrushes, with their top-mounted cups, allow paint to flow into the nozzle assembly via natural gravity. This enables operation at extremely low air pressures (10-15 PSI), essential for working close to the model surface without creating turbulence. Siphon-feed brushes require higher pressure to pull paint up from a jar, resulting in high-velocity spray that’s difficult to control for fine detail work.
For needle size, experts recommend a nozzle between 0.2mm and 0.3mm. A 0.3mm nozzle offers the best balance for 1/48 scale work—tight enough for fine lines but forgiving of paint viscosity variations. Smaller nozzles (0.15-0.2mm) are ideal for 1/72 scale but clog easily with thicker acrylic paints.
Compressor and Moisture Management
Your compressor must include a storage tank to eliminate pulsation. Without a tank, the airbrush receives air directly from the piston’s strokes, causing micro-fluctuations in pressure that manifest as stuttering lines or inconsistent atomization. The tank acts as a capacitor, smoothing the airflow into a steady stream.
Install an inline moisture trap at the compressor regulator. As air compresses, it heats and holds moisture; as it cools in the hose, this moisture condenses into liquid water. If a droplet reaches the airbrush nozzle during fine detail work, it will spit onto the model, instantly ruining the primer coat with a crater or spider-web mark.
Paint Selection
While flat black is the traditional default, sophisticated modeling often dictates subtler tones. For a hyper-realistic finish simulating hydraulic leaks and engine grime, mix 60 percent Raw Umber with 40 percent Lamp Black. This “mucky black/brown” mixture avoids the starkness of pure black, providing organic warmth that reads as oil and dirt rather than just shadow.
For grey naval aircraft, NATO Black or Tire Black—dark charcoal greys—provide contrast without harsh intensity. When pre-shading aircraft with brown or green camouflage, use dark brown or Dark Earth to create shadows that harmonize with the topcoat. For U.S. Navy blue schemes, Deep Sea Blue ensures shadows retain chromatic richness compatible with the overcoats.
Surface Preparation
Applying pre-shading directly to bare plastic guarantees failure. Injection-molded plastic is non-porous and smooth; highly thinned paint will bead up due to surface tension, failing to form clean lines. Furthermore, mold release agents can repel paint, causing fisheyes or adhesion failures.
A high-quality micro-filler primer, such as Mr. Surfacer 1500 or Tamiya Fine Surface Primer, is mandatory. The primer creates a microscopically textured surface that allows thinned paint to bite and hold its line. It also provides a neutral canvas, covering putty marks, photo-etched parts, and different colored plastics. Before priming, thoroughly degrease the model with isopropyl alcohol to remove skin oils and manufacturing residues.
Phase 2: Mastering the Mix (Paint Consistency)
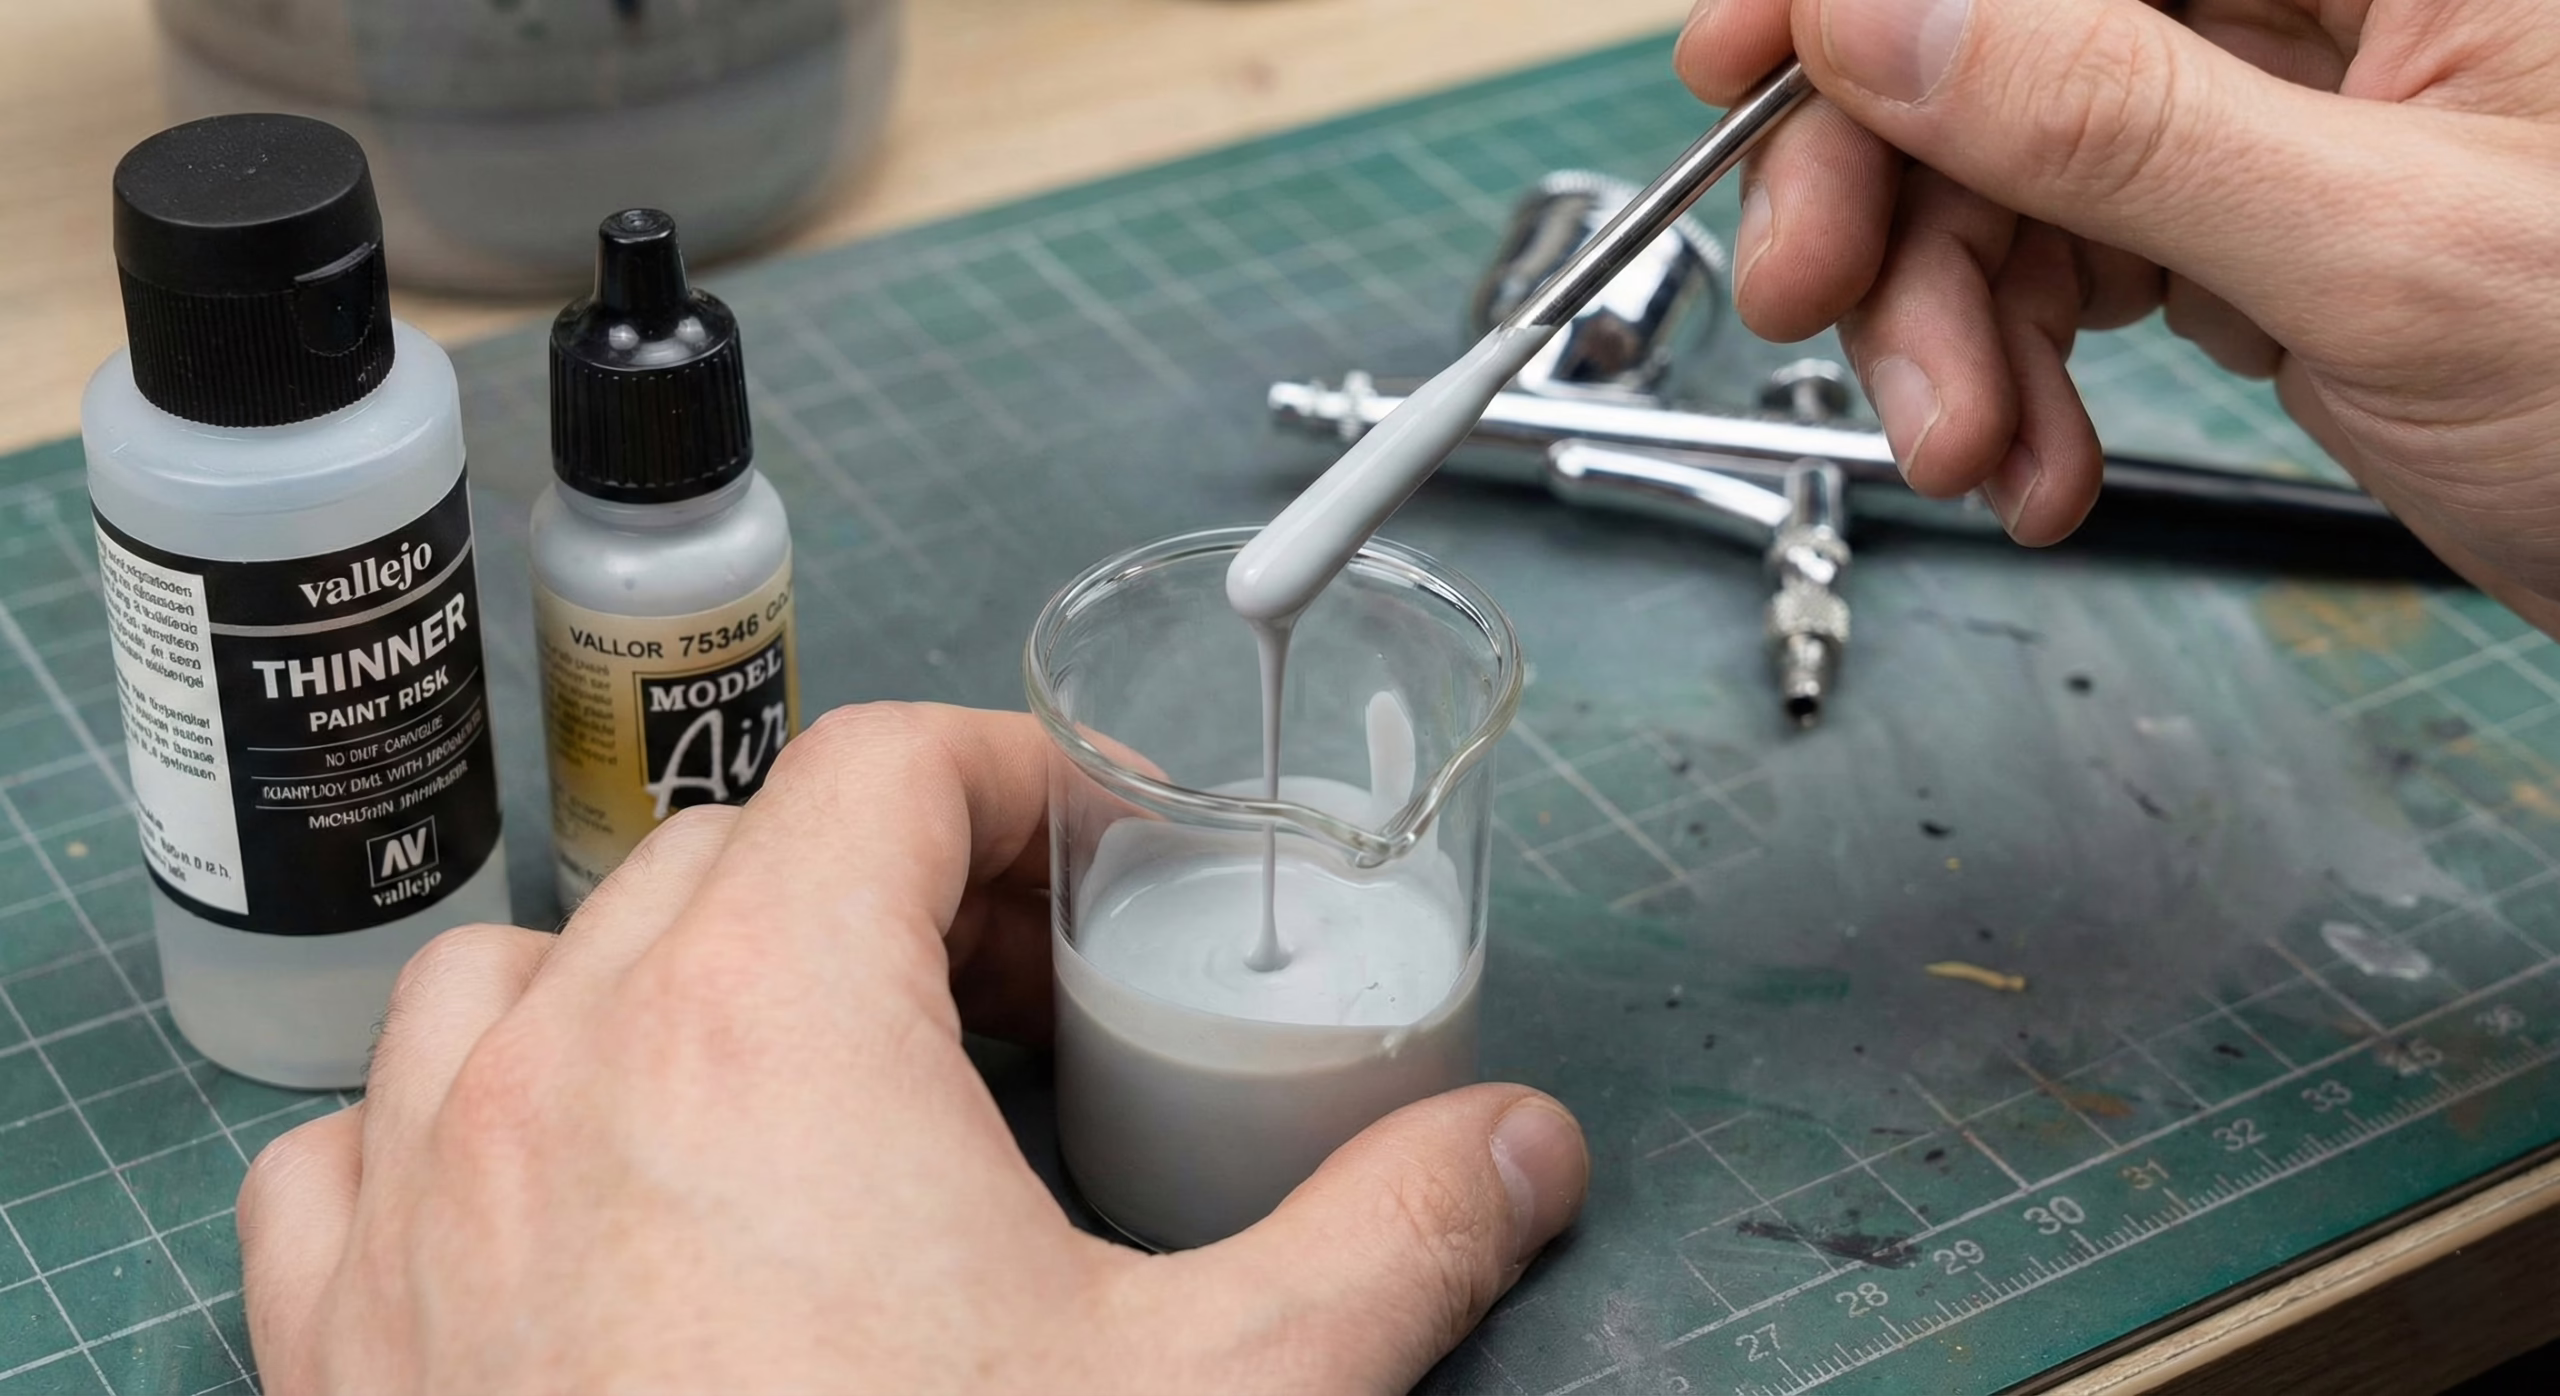
The success of pre-shading is determined less by hand stability and more by the fluid dynamics of the paint mixture. Standard model paint straight from the jar is far too viscous for delicate, low-pressure application.
The Viscosity Standard
The universal benchmark for proper airbrush viscosity is the consistency of skim milk. When swirled in a mixing cup or the airbrush gravity well, properly thinned paint should coat the sides with a semi-transparent film that slides down relatively quickly. If the paint clings heavily like cream, it’s too thick and will require high pressure to atomize, resulting in an orange peel texture. If it runs off instantly like water, it’s over-thinned and will lack pigment density to create effective shadows, likely running or spider-webbing upon contact with the surface.
Thinning Ratios
To achieve the ink-like flow required for tracing panel lines, paint must be highly diluted. While a standard base coat might use a 50/50 ratio, pre-shading requires approximately 70 percent thinner to 30 percent paint—or even 80/20 for ultra-fine modulation. This high dilution reduces surface tension, allowing atomization into microscopic droplets at very low air pressures.
Solvent Selection
For acrylics like Tamiya or Gunze, thin with high-grade Isopropyl Alcohol or brand-specific thinners (Tamiya X-20A). However, alcohol-based thinners dry rapidly. To prevent tip dry—where paint dries on the needle before spraying—add a few drops of acrylic retarder or flow improver to the paint cup. This slows the flash-off time, keeping paint fluid at the nozzle and allowing it to level smoothly on the model surface.
True lacquers or solvent-based acrylics (Mr. Color, RP Toolz) require dedicated lacquer thinners. Professional modelers favor leveling thinners, which contain built-in retarder. This solvent melts microscopic paint droplets together upon contact, resulting in a finish that’s structurally tighter and smoother than standard acrylics.
Enamels (Testors, Humbrol) thin with odorless mineral spirits or white spirits and have naturally long drying times. This makes them excellent for fine work as they rarely suffer from tip dry, but they require significantly longer curing before applying the base coat to prevent solvent interactions.
Phase 3: The Pre-Shading Process (Step-by-Step)
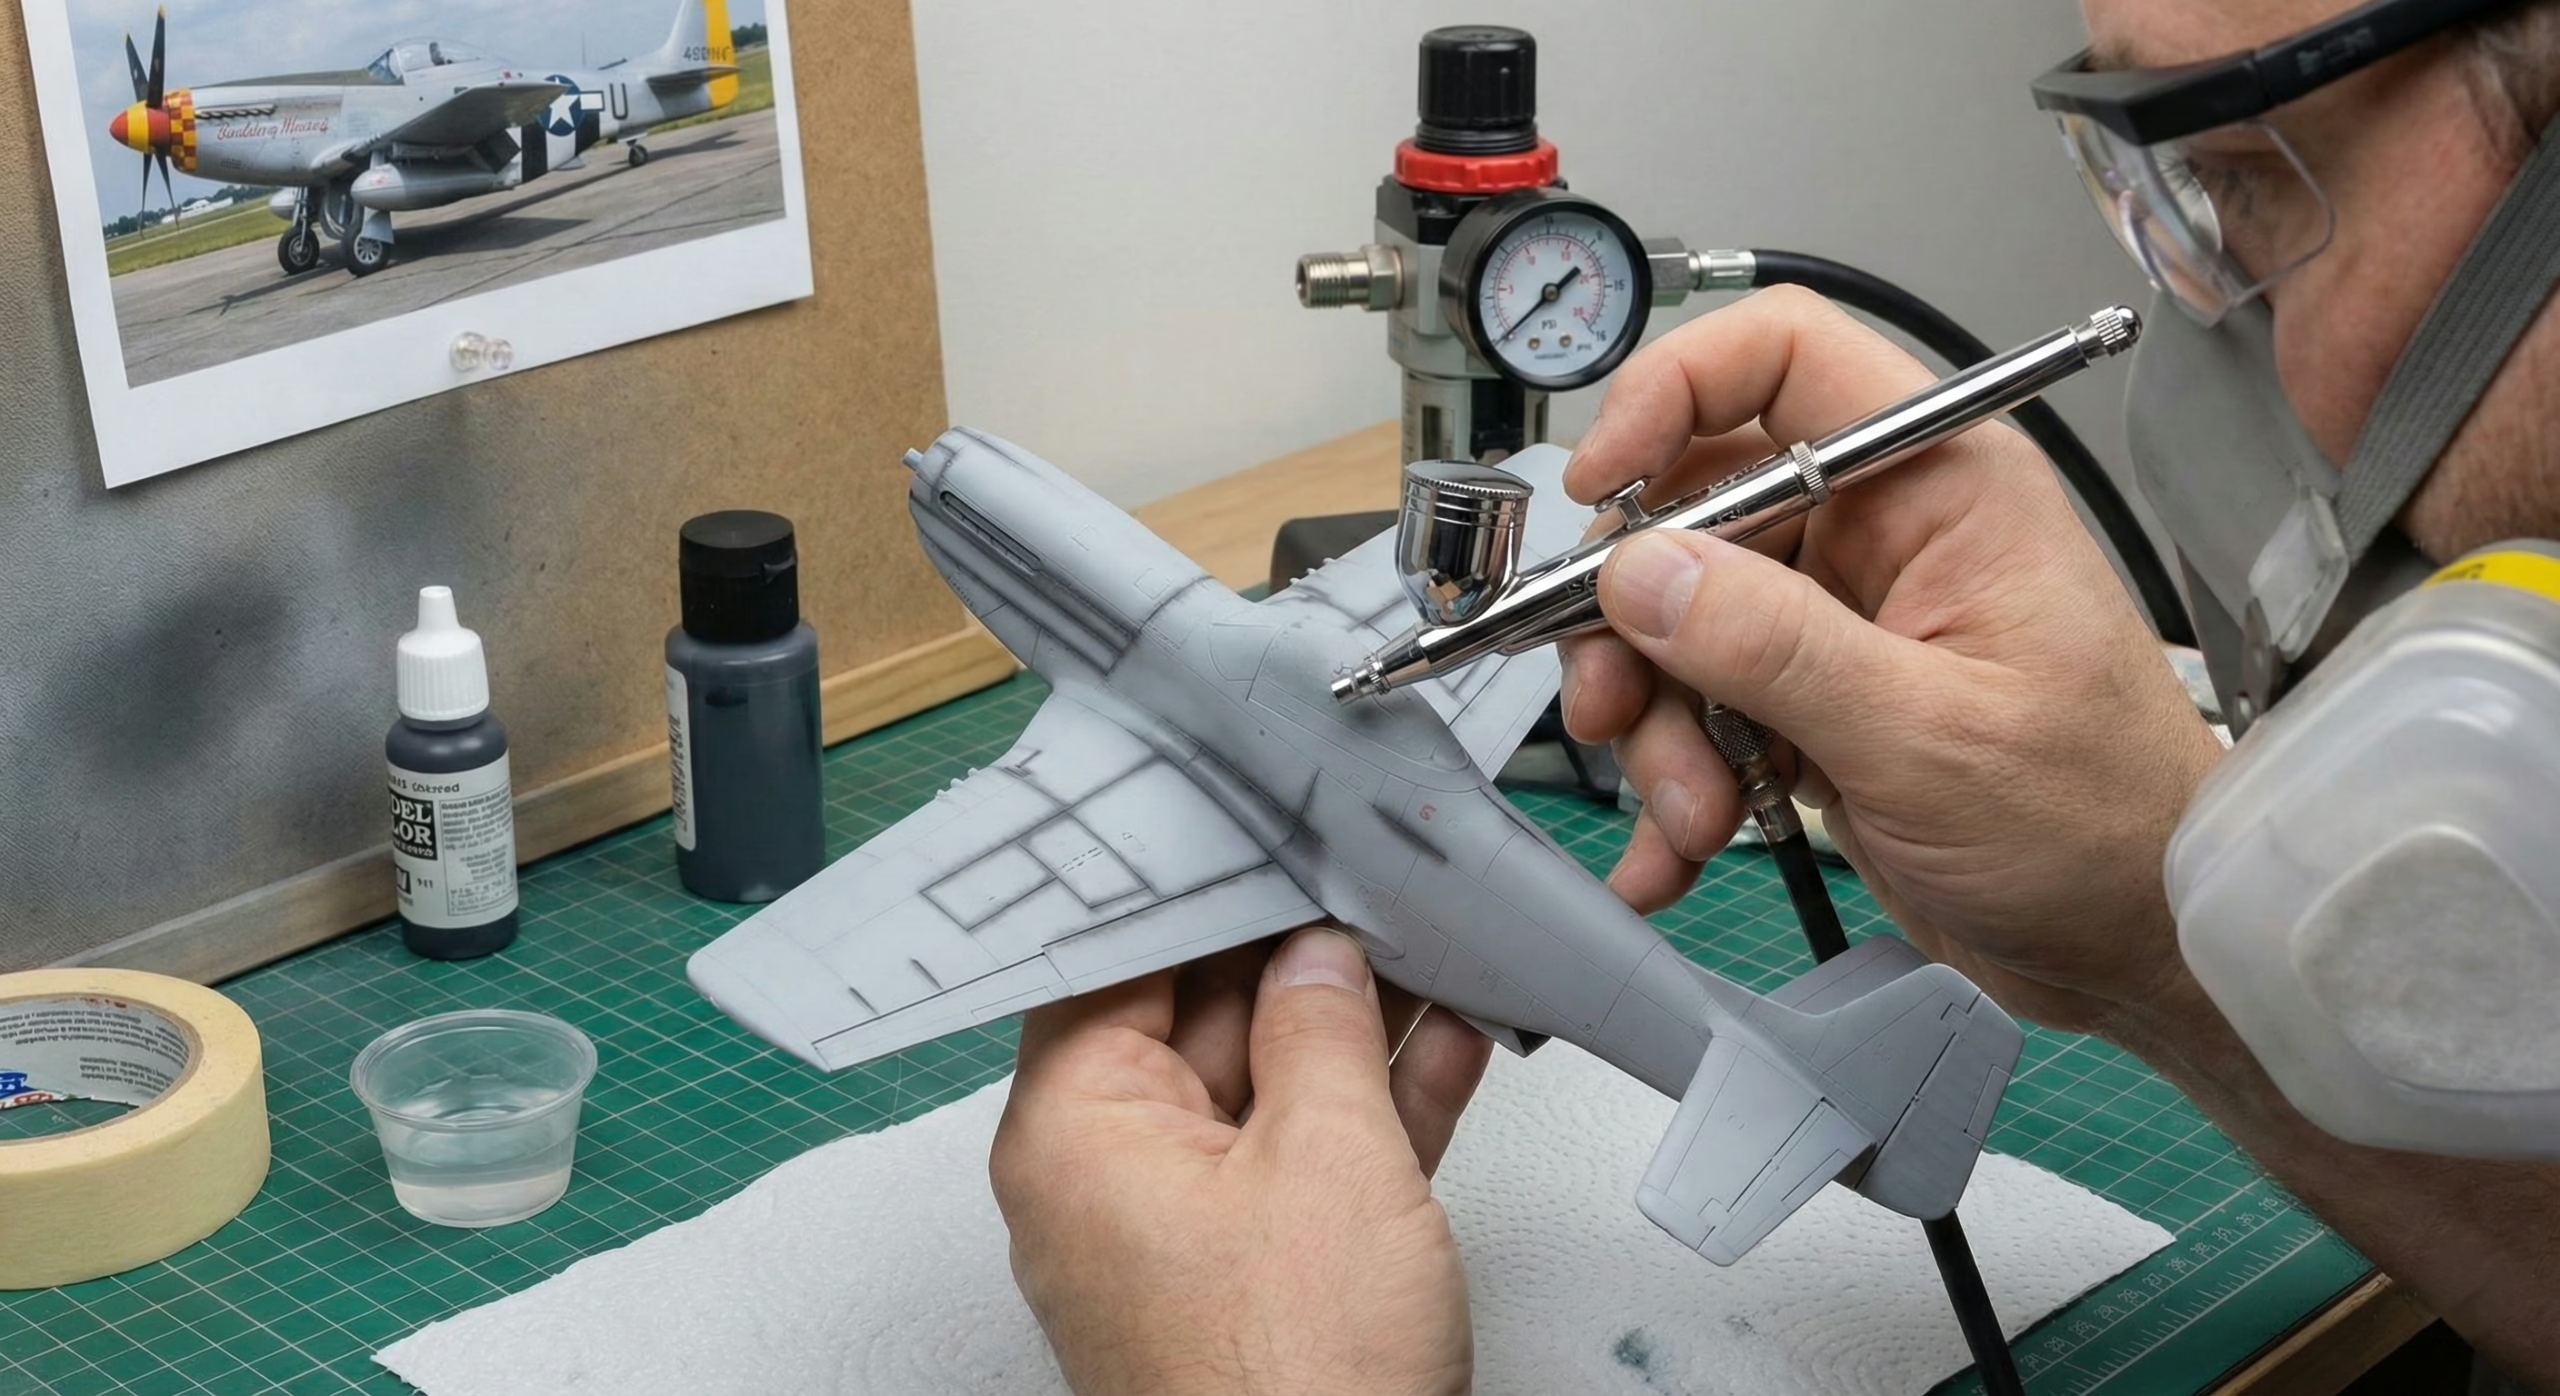
With equipment calibrated and surface prepared, the application of pre-shading begins. This phase requires synthesis of hand-eye coordination and pressure control.
Step 1: Set Your Pressure
Drop your compressor regulator to 10-15 PSI. High pressure creates turbulence. When working close to the model, high-velocity air will hit the surface and blast wet paint outward in random directions—a defect known as spider-webbing. Low pressure allows atomized paint to land softly in a tight, controlled line.
Step 2: Establish Proximity
Bring the airbrush nozzle within 1-2 inches (approximately 2.5-5 cm) of the model surface. For extremely fine panel lines in 1/72 scale, experts may close the distance to half an inch. This proximity tightens the spray cone, focusing pigment into narrow recesses of panel lines.
Step 3: Master the Movement
The hand must remain in motion. Follow this cardinal rule strictly: Start the air, start the motion, pull the trigger for paint, stop the paint, stop the motion, stop the air. Starting paint flow while the hand is stationary results in heavy blotches or splatter at the beginning of the line.
Step 4: Trace the Structural Skeleton
Create a shadow map of the aircraft’s structural framework by tracing every engraved panel line, rivet row, and maintenance hatch with dark color. Accept imperfection during this stage—messy lines are acceptable. Because pre-shading will be covered by a semi-opaque base coat, slight wobbles, variable line widths, or minor overspray will be diffused. Clinical perfection can actually be detrimental; perfectly straight, uniform lines can look artificial. A slightly shaky hand mimics the random, organic accumulation of grime and oil on operational machinery, contributing to more realistic final weathering.
Step 5: Add Volumetric Shadows
Beyond simple lines, use pre-shading to create volumetric shadows in naturally dark or dirty areas. Fill in the interiors of wheel wells, deep recesses of flap hinges, radiator intakes, and the roots where wings meet the fuselage. For these areas, pull the airbrush back slightly to 3-4 inches to create a wider, softer spray pattern suggesting a gradient of shadow rather than a sharp line.
Step 6: Build Gradually
Apply pre-shading in multiple light passes rather than one heavy coat. This allows you to assess the effect and adjust as needed. Remember that the goal is creating a foundation for the base coat to reveal, not creating a finished appearance at this stage.
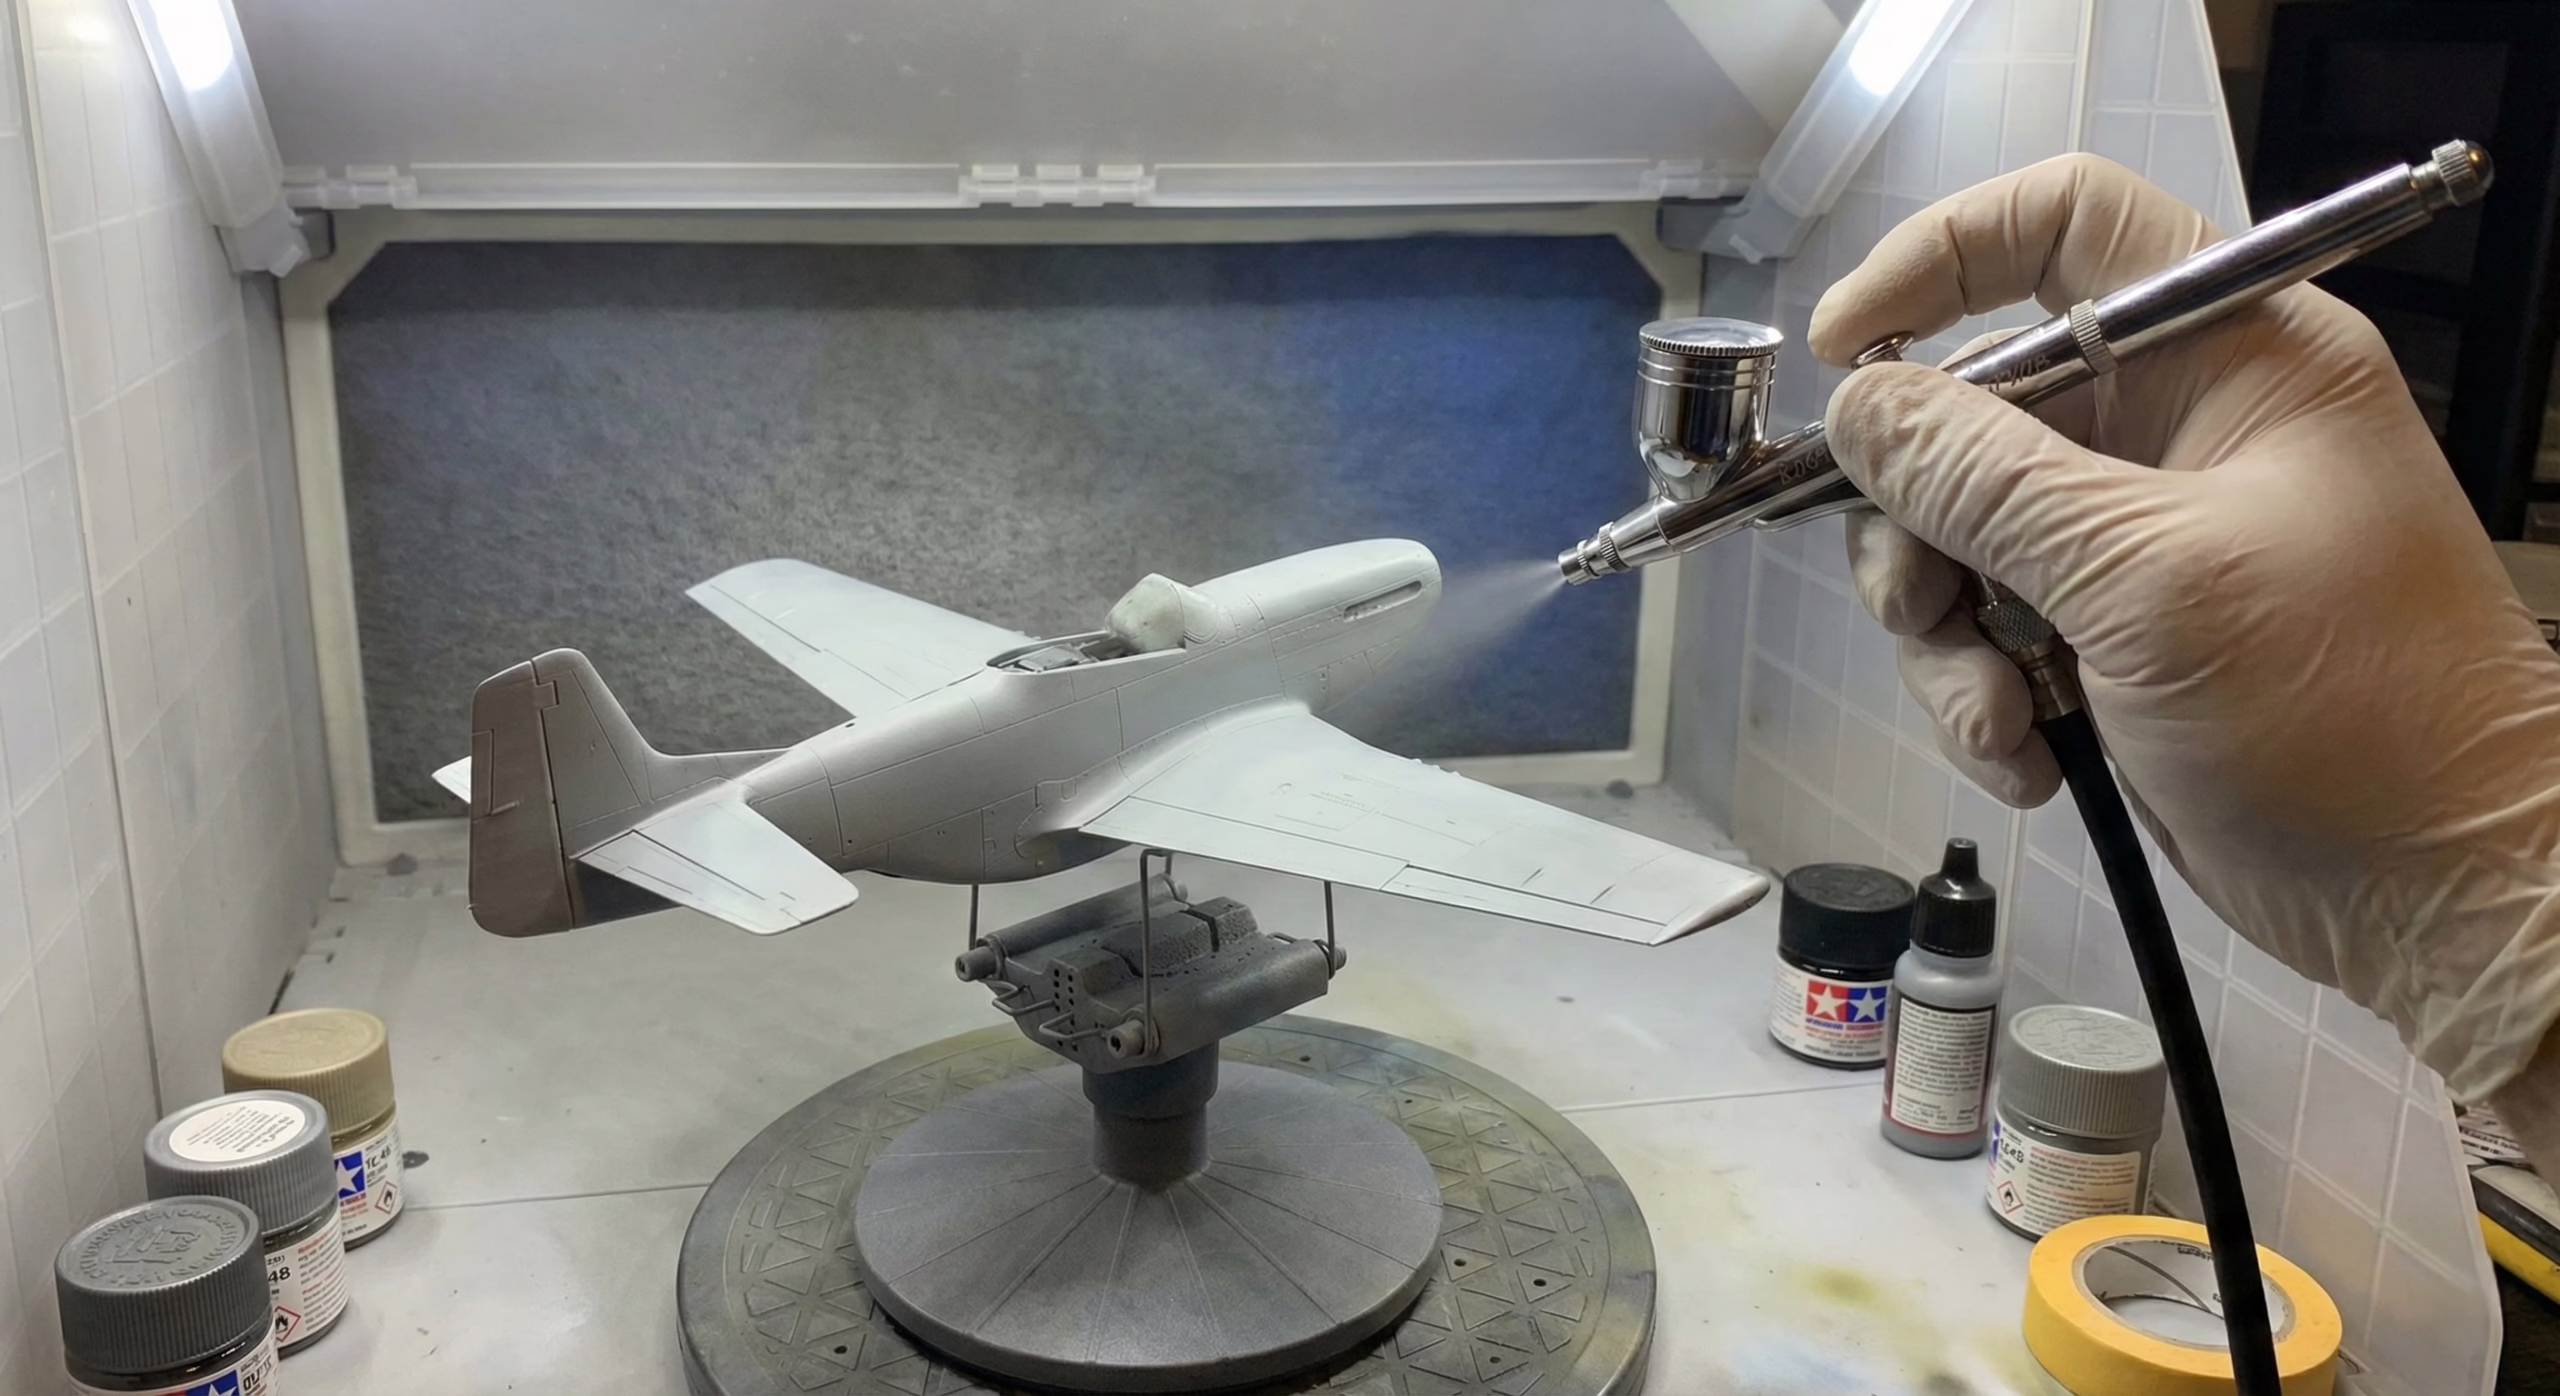 Phase 4: The Blend (Applying the Base Coat)
The application of the base coat is the most critical skill in the pre-shading process. This is a subtractive process where you’re essentially erasing the pre-shading until the perfect balance of visibility is achieved.
The Misting Technique
The base camouflage color must not be applied as a wet, heavy coat intended for instant coverage. Instead, apply it in thin, translucent layers—technically referred to as mist coats or filters. To achieve this translucency, thin base paint to approximately 50/50 or 60/40 (thinner to paint), slightly thinner than a standard coverage mix.
The Fill-the-Center Strategy
To preserve pre-shading while establishing base color, focus the airbrush on the center of panels. Spray the middle of each panel until the plastic color is fully opaque and true to the Federal Standard. From this center point, gently feather the spray outward toward pre-shaded panel lines. This technique ensures the panel center represents the area of highest illumination (sun-bleaching or cleanliness), while edges near panel lines remain darker, simulating accumulated grime and shadow of the gap.
Knowing When to Stop
The primary failure mode in this phase is over-coverage. The human eye adapts quickly to contrast, leading you to believe pre-shading is still too prominent even when it’s perfect. Stop painting when the pre-shading is just barely visible. This is the rule of subtlety that separates amateur work from professional results.
Remember the wet paint trap: wet paint often appears more transparent than dry paint. As solvent evaporates and paint cures and flattens, pigment density increases and the layer becomes more opaque. Therefore, stop while pre-shading looks slightly too prominent. If you completely cover the pre-shading, the entire process becomes moot and the model returns to a flat, toy-like appearance.
Building the Effect
Apply multiple thin mist coats, allowing each to flash dry before applying the next. This typically requires 3-5 passes over the model. Between passes, step back and evaluate from normal viewing distance (3-4 feet). The effect that looks perfect at arm’s length may be too subtle or too strong from typical display distance.
Troubleshooting and Pitfalls (The “Plan B”)
Even with precise preparation, the variable nature of fluid dynamics and atmospheric conditions can lead to application failures. Professional recovery strategies are essential for salvaging a finish.
Spider-Webbing
When paint hits the surface and instantly shoots outward in spindly legs or branches, you’re experiencing spider-webbing. This ruins fine lines immediately.
Causes: Air pressure is too high for working distance, or paint is too thin and lacks surface tension to hold its shape against airflow.
Solutions: Drop PSI to 10-12 immediately. Back the airbrush away from the surface slightly to allow the air blast to dissipate. Thicken the paint mix by adding a drop of unthinned paint to the cup.
Tip Dry
The airbrush sprays fine, then stops, then spits a coarse blob of paint when the trigger is pulled again, creating a speckled, messy line. This is acrylic paint drying on the needle tip before it can be atomized.
Solutions: Keep a cotton swab or cosmetic sponge soaked in thinner nearby. Periodically (every minute or so) pinch the exposed needle tip with the sponge to wipe away semi-dried paint skin. Add a few drops of acrylic retarder or flow improver to the paint cup to slow drying time and keep paint liquid at the nozzle.
Orange Peel
Paint dries with a rough, sandpaper-like texture rather than a smooth satin finish.
Causes: Paint is drying in mid-air before hitting the model (distance too great) or paint is too thick and cannot self-level.
Solutions: Move the airbrush closer to the subject. Increase the thinning ratio or use a leveling thinner containing retarder, which allows paint to flow out microscopically before setting.
The “Plan B”: Recovery Options
If you accidentally cover the pre-shading completely during the blending phase, the model is not ruined. Advanced techniques allow for re-introduction of shadows on top of the base coat.
Post-shading involves mixing a highly thinned (90 percent thinner/10 percent paint) version of Smoke (Tamiya X-19) or a darkened version of the base color. With extremely low pressure, trace panel lines over the base coat. This requires a steadier hand than pre-shading, as errors are harder to hide.
Oil washes are the preferred recovery method for many professionals. Apply a gloss clear coat (Tamiya X-22 or Future/Pledge) to the model to protect the acrylic base coat and assist capillary action. Mix an oil wash using artist oils (Raw Umber/Lamp Black) and odorless mineral spirits. Apply the wash to panel lines—the surface tension of the gloss coat will carry the wash along recessed lines via capillary action in a pin wash technique. Wipe away excess with a clean sponge or cloth dampened with mineral spirits. This restores definition lost by over-painting and adds a filter of grime.
Conclusion
Pre-shading represents a pivotal threshold in the journey from novice to expert scale modeler. By creating a translucent, layered finish, pre-shading imbues a static plastic form with the illusion of mass, history, and operation. It breaks the visual monotony of solid color, tricking the eye into seeing the heavy metal structure of a P-47 Thunderbolt or the composite skin of an F-18 Hornet.
The technique requires specific investment in tooling and a learning curve regarding paint dilution, but the result is transformative. Furthermore, it serves as the foundational layer for all subsequent weathering—washes, chipping, and filters all rely on the chromatic depth established by the pre-shade to look grounded and realistic.
Whether executed with the mucky black/brown mix for a gritty WWII fighter or a crisp NATO Black for a modern jet, pre-shading is the primary mechanism by which you overcome the limitations of scale. Practice on scrap plastic or old kits before applying the technique to your prized builds. The mastery of this technique—and the ability to recover from its pitfalls via post-shading and oils—is the hallmark of the advanced aviation modeler.

Key Takeaways
- Pre-shading creates artificial depth by applying dark colors along panel lines before the main camouflage coat, allowing shadows to ghost through translucent paint layers and simulate volumetric weight.
- Success requires low air pressure (10-15 PSI), highly thinned paint (70/30 thinner to paint ratio), and a dual-action gravity-feed airbrush for microscopic control.
- Messy lines are acceptable during pre-shading as the base coat will soften and blend the effect—clinical perfection can actually appear artificial.
- The most critical skill is knowing when to stop during base coat application; pre-shading should be just barely visible under the final color to maintain subtle realism.
- If pre-shading is accidentally covered, recovery options include post-shading with thinned dark paint or applying oil washes over a gloss coat to restore panel line definition.