
Wing-root gap filling. Ballast engineering. Camouflage masking. This single kit covers every intermediate skill that separates a competent modeler from a casual assembler. Here’s how it does it.
Scale modeling has undergone a quiet revolution. Over the past two decades, CAD-driven tooling and slide-molding technology have raised the bar so dramatically that today’s premium releases practically assemble themselves, with components registering in tolerances measured in fractions of a millimeter. Yet, amid this wave of precision engineering, legacy kits from earlier tooling eras hold their ground on hobby shop shelves and Amazon listings alike—often marketed to beginners precisely because of their familiar brand names and accessible price points.
Evaluating those heritage products honestly demands a different framework than simply reviewing a manufacturer’s specification sheet. The real question is never what the box promises—it’s what actually happens when liquid cement meets the styrene at your workbench. For enthusiasts sifting through the best model airplane kits currently on the market, that distinction between a rewarding project and a trial-by-frustration is everything. This review subjects the Revell 1/48 A-10 Thunderbolt II to exactly that kind of Real-World Utility Test: an unvarnished look at the plastic, the fit, and the total builder experience—from the moment the box is opened to the final coat of flat clear.
Brief Overview
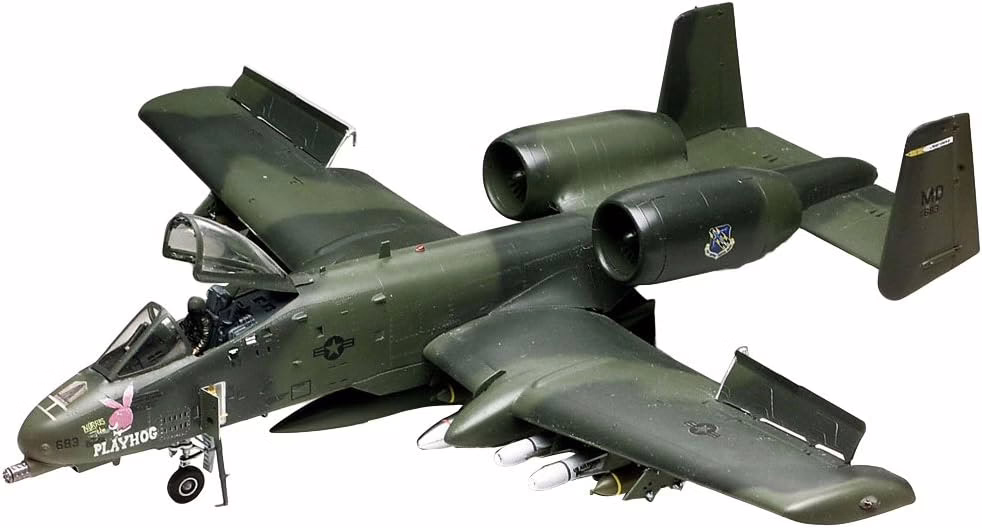
The Revell 1/48 A-10 Thunderbolt II (Product No. 85-5521) is an injection-molded polystyrene kit representing the U.S. Air Force’s dedicated close air support (CAS) aircraft. The real-world Warthog was developed by Fairchild Republic in the 1970s under the AX program, built entirely around the massive 30mm GAU-8 Avenger rotary cannon. Engineered for extreme survivability, the actual aircraft features a 1,200-pound titanium “bathtub” protecting the pilot, redundant manual flight controls, and twin General Electric TF34-GE-100 turbofan engines shielded from ground fire by the broad empennage. The A-10 cemented its combat legacy by flying over 8,100 sorties during Operation Desert Storm and seeing extensive action in Afghanistan and Operation Iraqi Freedom.
The Revell kit attempts to capture that rugged, industrial presence in quarter-scale. Finished, the model measures 13.0 inches in length with a wingspan of 14.625 inches—a genuinely imposing physical footprint on any display shelf. The package comprises 165 individual parts molded in light gray and clear styrene, carries a Skill Level 4 designation, and is recommended for builders ages 12 and older.
What makes the kit stand out from an empty box perspective:
- Comprehensive ordnance payload. Rather than leaving the builder to source expensive aftermarket weapons, the kit ships with cluster bombs, napalm tanks, a centerline drop tank, an ALQ-119 Electronic Countermeasures (ECM) pod, and six AGM-65 Maverick air-to-ground missiles for a fully loaded, combat-ready configuration.
- Two historically documented markings options. Premium waterslide decals cover the “LET’S ROLL” scheme of the 355th Wing/12th Air Force West Coast A-10 Demo Team (2003) and the “NORRIS THE PLAYHOG” markings of the 104th Tactical Fighter Squadron, Maryland Air National Guard (1989).
- Built-in vignette elements. A seated pilot figure with detailed uniform and a posable boarding ladder are included, immediately providing human scale to the finished model without any aftermarket expenditure.

Ready to add the Warthog to your bench? Check Current Price & Availability on Amazon
The Real-World Build Experience: Performance vs. Promises
Marketing copy emphasizes part counts and colorful decal choices. The workbench tells a different story. Revell’s 1/48 A-10 is a product of its era—its molds originate from a period characterized by raised surface detail and fit tolerances that fall measurably short of what contemporary tooling delivers. What follows is an honest accounting of what the builder actually encounters.
Structural Integrity and the Nose-Weight Problem
The most immediate and consequential challenge is center of gravity. On the real aircraft, the massive 30mm cannon in the forward fuselage counterbalances the heavy twin engines and tail surfaces at the rear. On the Revell kit, those rear components—solid styrene horizontal stabilizers, twin vertical fins, and dense engine nacelles—create a severe tail-heavy condition, while the forward fuselage is largely hollow.
The instruction sheet acknowledges that nose weight is required but offers no specific mass guidance, leaving builders to experiment. Bench experience reveals that standard 1/2-ounce (14-gram) lead fishing sinkers are woefully inadequate—the model rocks onto its tail with the slightest vibration. Achieving a stable tricycle stance requires 80–90 g (around 3 oz) of ballast, carefully distributed among the extreme nose tip, beneath the cockpit floor, and directly behind the cockpit rear bulkhead using lead shot, dense tungsten putty, or adhesive radio-control stickum weights. Revell does include a clear plastic support strut to prop the rear fuselage, but relying on that transparent crutch defeats any pretense of realism. Builders who fully load the wing pylons with the AGM-65 Maverick clusters—mounted aft of the main gear fulcrum point—shift the CG further rearward, requiring even more forward ballast. Filing a flat spot onto the bottom of each main tire increases the contact patch and meaningfully improves stability.
Fuselage Assembly and Seam Work
The cockpit interior is rudimentary by modern standards, though the raised instrument panel details respond well to dry-brushing and read adequately beneath the large clear canopy. The fuselage halves themselves frequently exhibit minor warpage, and the mating surfaces lack the self-aligning precision of newer tooling. Joining them requires slow, methodical liquid polystyrene cement application in small sections—nose to tail—with clamping and tape tension until the solvent weld cures fully.
The kit’s most notorious fit problem emerges at the wing root: a significant gap runs the entire length of the wing-to-fuselage joint and demands solvent-based putties (Vallejo Plastic Putty or Tamiya Basic Type work well here) or cyanoacrylate acting as a structural filler. This leads directly to the kit’s most anachronistic limitation: raised panel lines. Any abrasive action applied during seam cleanup immediately eradicates the delicate raised rivets surrounding those joints. Recovering that lost surface detail requires either stretching sprue over a flame to fabricate microscopic replacement lines or sanding the affected area smooth and rescribing entire panel runs with a specialized cutting tool guided by Dymo tape strips—techniques that firmly disqualify this as a beginner-level project despite the accessible price point.
Engine Nacelles
For many builders, the TF34 nacelle assembly is among the highest barriers in the build. The design relies on a shallow, imprecise mounting groove that provides minimal structural rigidity. Nacelle halves frequently exhibit a visible step or misalignment at the join, requiring sanding to restore cylindrical profiles, and the assembled nacelles routinely pop out of their fuselage grooves under even slight handling pressure—cyanoacrylate reinforcement is mandatory.
Additionally, the internal engine fan blades sit too close to the nacelle intake lip. On the real aircraft, the fan face is recessed deep within the cowling; achieving that correct depth requires fabricating a 1/4-inch cylindrical spacer from aftermarket sheet styrene. The APU exhaust on the port side, the ECS exhaust on the starboard side, and the bleed air pre-cooler intakes between the engines are all molded as solid bumps or shallow depressions—drilling them out with a micro-drill and pin vise is the standard corrective approach.
Decelerons and the GAU-8 Cannon
The A-10’s unique split-aileron speed brakes—called “decelerons”—are molded exclusively in the fully deployed, open position. Builders wanting to depict the aircraft in a parked or taxiing configuration must perform significant plastic surgery, cutting and filling to force them closed, or source discontinued aftermarket resin replacements. Accepting the open-brake display posture is the practical choice for most builders.
The GAU-8 cannon muzzle halves are occasionally molded at slightly different lengths, requiring careful trimming and filing to achieve a flush face. Hollowing out the individual solid rotary-cannon barrels with a micro-drill is a recommended enhancement that pays significant visual dividends.
Painting and Decals
The “Europe I” three-tone camouflage (dark green, medium green, and dark gray) demands sophisticated masking over the A-10’s complex geometry. Rolled worms of poster putty or modeling clay define the soft, overspray-style demarcation lines characteristic of the real aircraft. The decal sheet itself earns genuine praise—opacity, registration, and maintenance stencil coverage are all strong. However, the large faux canopy decal on the fuselage underside resists conforming over compound curves even with repeated Micro Sol and Micro Set applications, causing wrinkling and silvering; many experienced builders mask and paint this element by hand. One important finishing note: the ALQ-119 ECM pod must not be painted Olive Drab—historical accuracy requires white with black radomes.
Quick-Reference Build Challenges
| Component | Technical Challenge | Recommended Solution |
| Nose Weight | Severe tail-sitter; requires 84g (3 oz) of ballast | Pack lead shot or tungsten putty in nose and behind cockpit tub |
| Engine Nacelles | Shallow grooves; fan blades too close to intake lip | Fabricate 1/4-in. styrene spacer; use cyanoacrylate and clamps |
| Wing Roots | Significant gap along entire wing-to-fuselage joint | Apply Vallejo or Tamiya putty; sand cautiously to protect raised panel lines |
| Decelerons | Molded exclusively in open (deployed) position | Accept the dynamic display pose or perform extensive cutting and filling |
Pros & Cons
Pros
- Comprehensive ordnance package. The kit eliminates the need for expensive aftermarket weapons, providing an accurate array of Mk 82 bombs, AGM-65 Mavericks, napalm tanks, and an ECM pod straight from the box.
- Accurate overall airframe proportions. Despite its vintage tooling, the kit captures the complex, brutalist silhouette of the early A-10A with high fidelity—making it an excellent foundation for weathering and diorama work.
- Premium decal sheet. Markings for two historically significant airframes, complete with extensive maintenance stenciling, are among the most detailed elements in the package.
- Low barrier to entry. The kit provides the physical presence of a large 1/48-scale twin-engine jet at a fraction of the cost of current new-tool equivalents.
Cons
- Severe balance engineering flaw. Up to 84 grams of creatively hidden ballast is required simply to achieve a stable tricycle stance—an unreasonable burden that the instructions fail to adequately address.
- Antiquated raised surface detail. The 1980s-era raised panel lines and rivets are easily destroyed during routine seam sanding, forcing advanced rescribing techniques that exceed beginner capabilities.
- Poor fit tolerances at critical joints. The engine nacelle mounts and wing-to-fuselage junction demand heavy putty work and structural reinforcement—not minor finishing steps.
- Fixed decelerons. The open-position speed brakes cannot be posed closed without substantial surgery, limiting the builder’s display options.
Where the Revell 1/48 A-10 Warthog Really Shines
There is a specific satisfaction in wrestling an older, demanding kit into submission—and the Revell A-10 offers that experience in abundance. When the final layer of flat clear coat blends the dark greens and grays of the Europe I camouflage into a cohesive, matte finish, the physical presence of the completed model is genuinely commanding. With a wingspan approaching 15 inches, the finished Warthog dominates a display shelf in a way few 1/48-scale subjects can match.
The kit also functions as an exceptionally effective skills laboratory. Because the plastic demands active problem-solving at every stage, the builder develops a deep, tactile connection to the craft. Successfully engineering a hidden 84-gram ballast system that places the model cleanly on its nose gear is a legitimate achievement. Filling and sanding a major wing-root gap to invisibility is exactly the kind of fundamental skill that separates competent modelers from casual assemblers. The ordnance loadout amplifies this reward: assembling, painting, and weathering the Maverick missiles, cluster munitions, and ECM pod tells a complete story of a heavily laden aircraft returning from a low-level sortie, all without a single aftermarket purchase.
The boarding ladder and pilot figure further elevate the finished piece from static plastic to an operational vignette, humanizing the display in an immediate and compelling way. The raised surface details—fragile during construction—ultimately work in the builder’s favor during the finishing phase, catching oil washes and dry-brushed highlights with a depth and character that rewards careful application.
For builders considering their first aftermarket upgrade—a resin cockpit, photo-etched seat belts, or a vacuform canopy—the Revell A-10 is the ideal host kit. The relatively modest investment removes the anxiety of modifying an expensive premium release, inviting experimentation and genuine learning.
Revell 1/48 A-10 Thunderbolt II (No. 85-5521) The classic “tank buster” in 1/48 scale—165 parts, comprehensive weapons load, and two iconic USAF marking options. View on Amazon →
Who Should Buy It (And Who Should Skip It)
Who Should Buy It
This kit belongs on the bench of the intermediate modeler looking to develop core techniques without the financial risk of a premium release. Seam filling, gap management, ballast engineering, and camouflage masking are all represented here in demanding form—and mastering them on an affordable kit is precisely the right approach. Experienced scratch-builders will also find it a well-proportioned, accurate A-10A foundation for diorama construction and extensive aftermarket detailing. Budget-conscious enthusiasts and nostalgia builders drawn to classic tooling are the natural audience.
Who Should Skip It
Absolute beginners should look elsewhere. The Skill Level 4 designation is accurate, and the kit’s recurring demands—nacelle fit, wing-root gaps, the 84-gram nose-weight problem—will quickly overwhelm a builder who lacks putty technique, sanding discipline, and patience. Modelers specifically seeking an A-10C variant with modern GPS domes, dual MFD displays, and updated antenna suites will find this kit unsuitable, as the tooling represents the early A-10A exclusively.
The Competitive Landscape
| Manufacturer | Tooling Era | Strengths | Weaknesses | Market Position |
| Revell | 1980s | Accurate early A-10A shape; full weapons loadout | Raised panel lines; poor nacelle fit; severe tail-sitting | Best budget option; ideal for fundamentals and dioramas |
| Tamiya | 1991 | Familiar brand | Based on pre-production prototype; shape inaccuracies | Generally considered obsolete |
| HobbyBoss | 2000s | Recessed surface detail; easier A-10C variants | Notable nose profile and shape inaccuracies | Mid-tier option; easier build, less accurate shape |
| Academy | 2023 | Strong engineering; gear-up option; accurate A-10C parts | No pilot figure; slightly more expensive | Modern standard for most builders |
| Great Wall Hobby | 2024/2025 | Museum-quality detail; flawless fit; accurate A-10A and A-10C | Extremely expensive; high part count | Premium luxury tier for expert builders |
The Verdict: Value-to-Performance Ratio
Honestly assessing the Revell 1/48 A-10 requires separating what it costs in dollars from what it costs in bench time—and acknowledging that the second figure is substantial. In an era where comparable 1/48-scale twin-engine subjects regularly command premium, luxury-tier pricing, the Revell kit occupies a fiercely competitive position at the low end of the market. The builder’s primary investment here is paid in sandpaper, putty, and patience rather than currency.
On a return-on-investment basis, the package delivers genuine value to the right builder. The comprehensive ordnance suite, the detailed pilot figure and boarding ladder, and the highly accurate, modern-printed decal sheet are collectively worth more than the kit’s purchase price if sourced as individual aftermarket items. That is a meaningful argument for the budget-conscious builder.
Against that, the raised panel lines, the chronic engine nacelle fit problems, and the 84-gram nose-weight requirement are not minor inconveniences—they are structural limitations of the tooling that demand skilled, time-consuming intervention at every stage of the build. No amount of enthusiasm compensates for that reality if the builder lacks the technique to address them.
The kit earns its market position by delivering the most accurately shaped early A-10A silhouette available at its price point, providing dozens of hours of engaged, skill-building construction, and culminating in a massive, imposing display piece that is unequivocally the Warthog. For the builder who accepts it on those terms, the verdict is clearly positive.

Key Takeaways
- Budget wisely on bench time. The 84 grams of nose ballast required to prevent tail-sitting must be strategically distributed before the fuselage halves are closed.
- Prepare for traditional seam work. Raised panel lines and significant wing-root and nacelle gaps demand putty, sanding, and patience—the Skill Level 4 rating is not a formality.
- The ordnance and decals are genuine strengths. The kit’s weapons loadout and high-resolution markings deliver excellent value that would cost substantially more to replicate through aftermarket purchases.
- It is an A-10A, not an A-10C. Builders seeking a modern glass-cockpit variant need to look to Academy or Great Wall Hobby instead.
- The right kit for the right builder. In the hands of an intermediate modeler or experienced scratch-builder, the Revell A-10 rewards effort with a commanding, shelf-dominating result.