From Box to Battle-Ready: Build Your Own Legendary F4U-1D Corsair – No Experience Required. Confused by plastic runners and model jargon? Don’t sweat it. Our hands-on walkthrough demystifies tools, paints, and every assembly trick – helping you create a jaw-dropping model even if you’ve never touched a kit before.
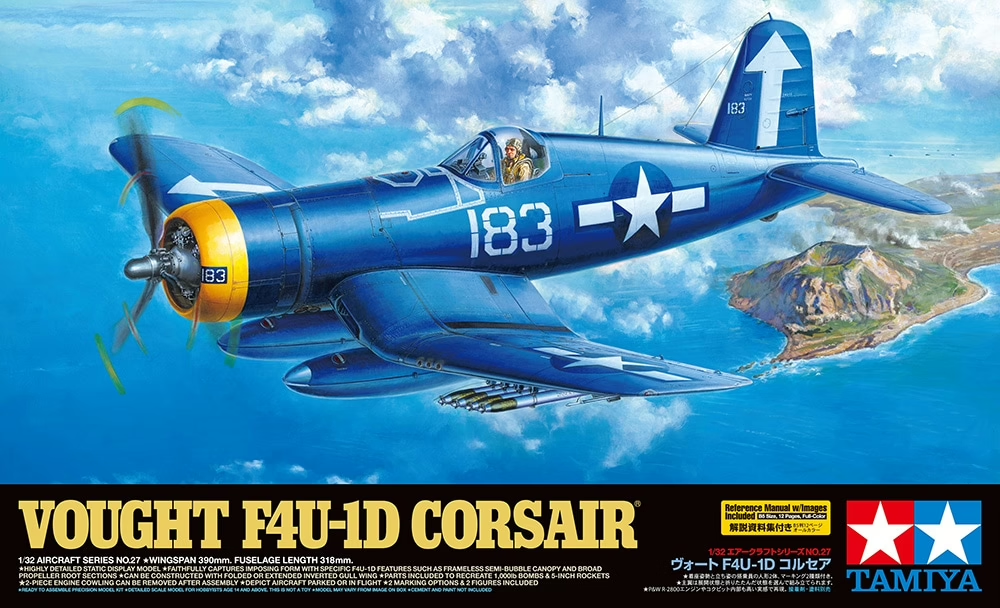
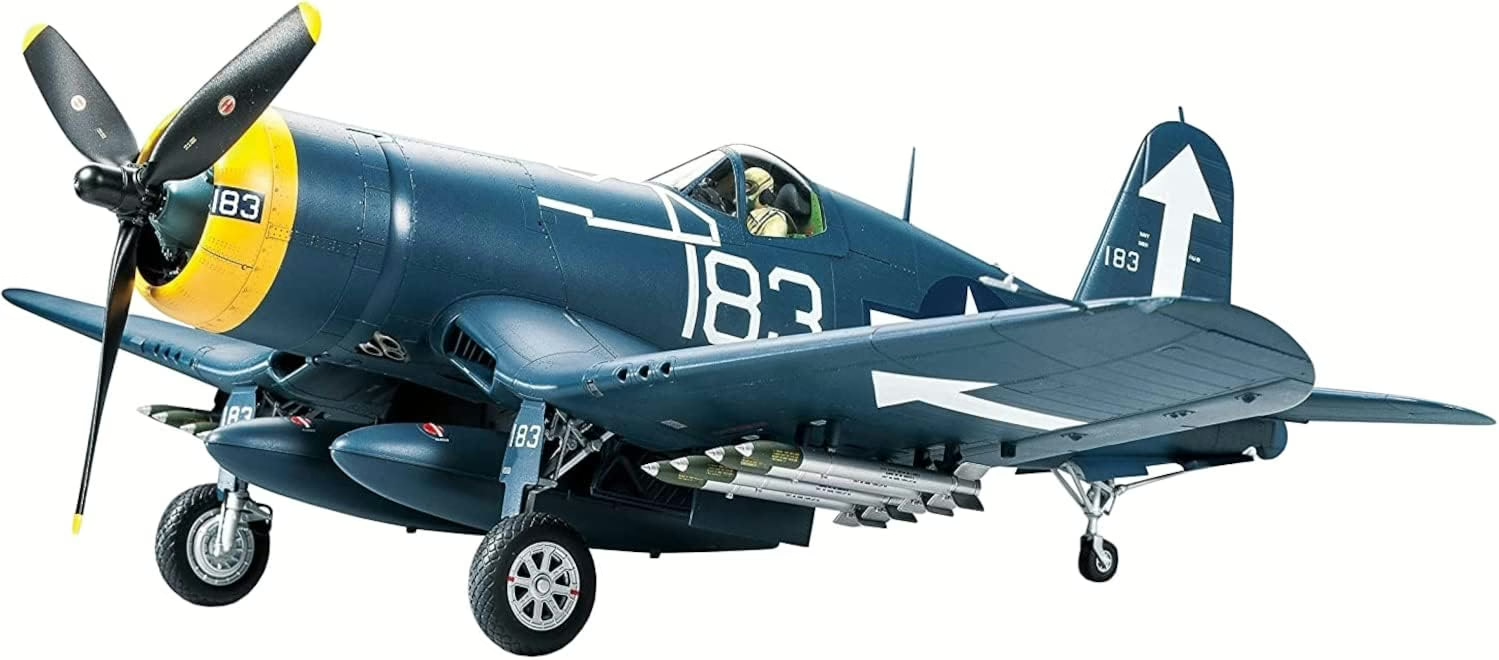
Welcome to the world of scale modeling with Tamiya’s flagship 1/32 scale Vought F4U-1D Corsair! This comprehensive guide is designed for complete beginners, taking you from zero experience to a finished “hero” model. The Tamiya Corsair is an ideal first big project – it’s a highly detailed kit known for excellent fit and quality, which means fewer frustrations for newcomers.
In the next ten steps, we’ll walk through everything from opening the box to proudly displaying your completed WWII aircraft. You’ll learn all essential modeling fundamentals: reading instruction diagrams, cutting and prepping parts, proper gluing techniques, painting and weathering, and applying decals like a pro.
We’ll follow a “Zero-to-Hero” approach – starting with absolute basics and gradually introducing advanced techniques in a beginner-friendly manner. Don’t worry if you’ve never built a model before; we’ll explain every term and technique assuming no prior knowledge. By the end, you’ll have invested several enjoyable sessions into this build – a worthwhile commitment that develops skills and confidence. Let’s get started turning that box of plastic into a museum-worthy Corsair model!
Step 1: Kit Inspection and Workspace Setup
What You’ll Learn: Before any glue meets plastic, you’ll get familiar with your kit’s contents, gather the right tools, and set up a safe, comfortable workspace.
Understanding Your Kit Contents
Open the Corsair box and take inventory. Inside you’ll find several plastic part sprues (runners with parts attached), a decal sheet, and detailed instruction booklet. Tamiya’s 1/32 Corsair includes extras like photo-etched metal detail parts and canopy masking material.
Spread everything out and verify all sprues are present (labeled with letters A, B, C). Locate the decals for markings and any poly-caps or metal parts. The instruction booklet’s first pages show sprue diagrams identifying each part number. Every part has a number on the sprue, corresponding to assembly steps in the manual.
Essential Tool Selection
Beginners need just some basics from any hobby shop:
- Side Cutters: Invest in flush-cut plastic nippers (Xuron brand recommended) for clean cuts with minimal part stress
- Hobby Knife: X-Acto with #11 blade for trimming remnants and cleanup
- Sanding Tools: Various grits (150-400 for shaping, 800-1000+ for smoothing)
- Plastic Cement: Tamiya Extra Thin Cement highly recommended for ease of use and strong bonds
Workspace Organization
Find a well-lit, well-ventilated area. Good lighting prevents eye strain and helps catch imperfections. Ventilation is crucial for glue and paint fumes. Use small trays or egg cartons to sort parts by step. Work on a cutting mat to protect your table.
Step 2: Parts Preparation and Cleanup
What You’ll Learn: Professional parts preparation techniques that ensure clean assembly and superior paint adhesion.
Removing Parts from Sprues
Never twist or snap parts – this causes irreparable damage. Position side cutters with flat edge flush against the part and gently squeeze. Cut slightly away initially, leaving a small nub, then trim closer with a second cut. This prevents stress cracks and ensures clean separation.
Use your hobby knife to carefully pare away remaining nubs, working slowly with blade angled away from your body. Follow with fine sanding stick to smooth the area flush.
Sanding and Filing
Eliminate any visible mold lines for professional results. Use progressively finer grits – start with 220-grit, then 400-grit, finishing with 800-grit for glass-smooth surfaces. Sand in long, even strokes following the part’s natural curves.
Dry-Fitting and Organization
Always test-fit parts before applying cement. This reveals alignment issues and tight spots needing adjustment. If parts don’t slide together smoothly, resist forcing them – identify interference points and sand lightly until proper fit is achieved.
Wash all parts in warm, soapy water using mild dish detergent to remove mold release oils that prevent proper paint and glue adhesion. Use compartmentalized containers or labeled bags to sort parts by assembly sequence.
Step 3: Cockpit Interior Assembly and Detailing
What You’ll Learn: Interior detailing and precision assembly techniques for creating a convincingly realistic cockpit.
Cockpit Tub Preparation
Locate the cockpit floor, bulkheads, and sidewall pieces. The cockpit tub consists of floor pan, rear bulkhead, instrument panel, and side consoles. Clean molding seams and test fit to the floor. Tamiya’s engineering is so precise it holds together without glue during test fits.
Paint many cockpit parts before final assembly since the Corsair’s cockpit has numerous nooks and crannies. Use plastic cement sparingly – apply with small brush around edges to wick into joints cleanly.
Instrument Panel Assembly
The Corsair’s instrument panel is a cockpit focal point. Tamiya provides molded panel with dial bezels and decals for instrument faces. The kit likely features clear plastic lenses or sandwich system for authentic glass appearance.
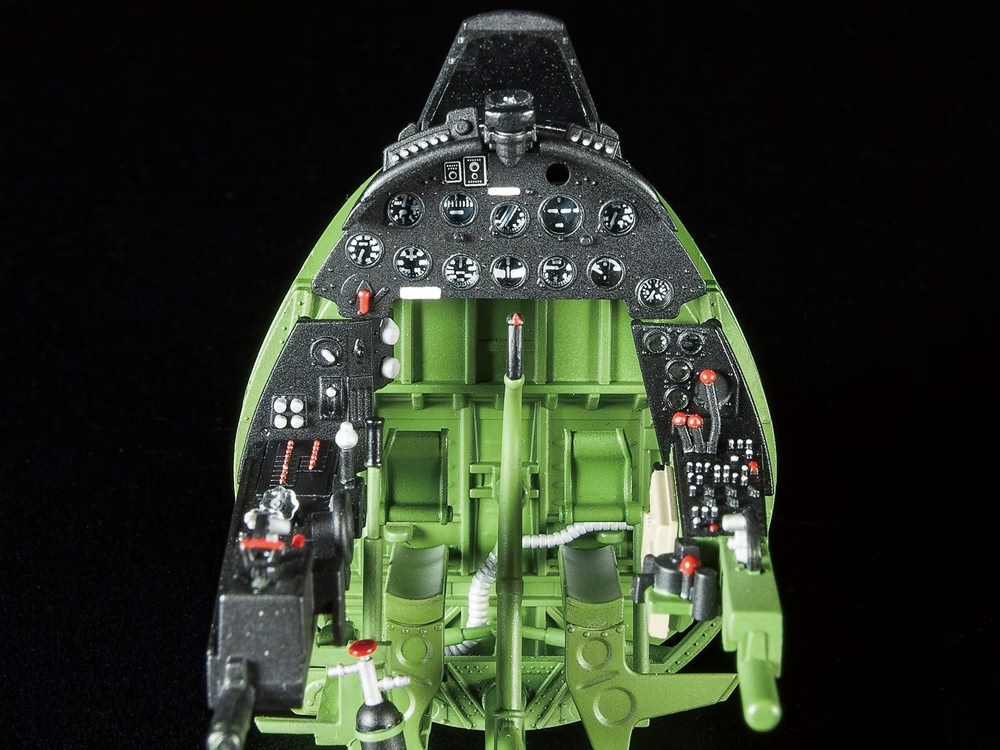 Paint the instrument panel flat black (WWII Navy panels were black to reduce glare). Carefully cut and apply instrument decals using warm water and tweezers. Decal setting solution helps conform to recessed faces. Install clear lenses once decals dry for realistic depth.
Seat and Control Installation
Remove seam lines from the pilot’s seat and paint Interior Green (standard WWII Navy color). Install photo-etched seatbelts for superior realism. Cut PE belts from fret, paint fabric color (beige/khaki), and buckles steel/silver. Bend and drape naturally over seat, securing with tiny CA glue drops.
Mount seat ensuring proper alignment with control stick centered in front. Paint stick grip black, rudder pedals steel with black footrests.
Interior Color Schemes and Quality Control
Paint cockpit in Interior Green (ANA 611 equivalent) – entire tub interior, sidewalls, floor, and seat. Instrument panel should be flat black. Add detail colors: red or yellow knobs as appropriate.
Test-fit completed cockpit tub into one fuselage half, then check if other half closes without gaps. Ensure no parts interfere and instrument panel aligns properly with coaming for windscreen installation.
Step 4: Fuselage Assembly and Seam Management
What You’ll Learn: Major assembly techniques and seamwork that transform separate plastic shells into solid, realistic aircraft structure.
Fuselage Preparation and Cement Application
Perform critical dry-fit test with completed cockpit installed in one fuselage half. Check for proper closure – Tamiya’s precision engineering should result in near-perfect alignment. Ensure all interior components are secure and won’t shift during assembly.
Use liquid cement’s capillary action – hold fuselage halves in perfect alignment and touch small brush loaded with cement to seam line. Capillary attraction draws cement into joint, flowing along entire seam and creating molecular bond. Work in small sections every inch. Properly cemented joints may show slight plastic extrusion, indicating complete filling.
Seam Line Elimination
After overnight curing, address visible seam lines. Start with medium-grit sanding sticks to remove extruded plastic. For persistent gaps, apply gap-filling super glue using toothpick for precise placement. Super glue accelerator creates instant cure for immediate sanding.
Wet-sanding with fine-grit sticks prevents dust clogging while achieving glass-smooth results. Sand until seam completely disappears, checking under strong lighting.
Weight Addition and Structural Integrity
The F4U-1D’s taildragger configuration typically requires nose weight to prevent tail-sitting. Install lead shot or fishing weights in forward fuselage cavity, securing with epoxy before closure. Test balance at main gear points for realistic ground stance.
Verify joint strength by gently flexing completed assemblies. Properly cemented joints should feel solid and unified.
Step 5: Wing Assembly and Attachment
What You’ll Learn: Complex multi-part assembly and alignment techniques for the Corsair’s distinctive gull wings.
Wing Construction
The F4U’s inverted gull wing design is both its most recognizable feature and biggest assembly challenge. Decide between extended or folded wings – most first-timers choose extended for classic look and simpler construction.
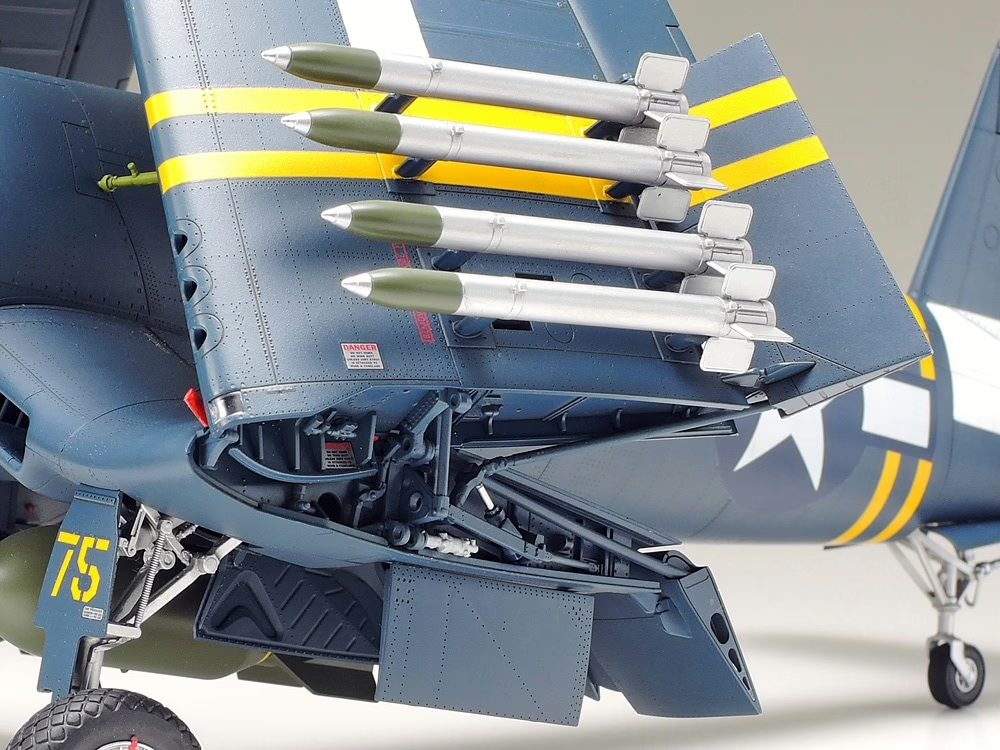 Start with inner wing sections housing landing gear bays. Clean all mating surfaces, then dry-fit upper and lower halves. The kit’s engineering ensures correct dihedral angle is built into parts. Apply plastic cement and carefully align halves, using tape or clamps while adhesive cures overnight.
For outer panels, follow same process. When joining outer to inner sections, maintain symmetrical dihedral. Use books or foam blocks to support wings at equal heights during assembly.
Control Surface Options and Wing Attachment
Corsair kit provides separate flaps and ailerons positionable up or down. For realistic parked aircraft, consider flaps down – common for carrier aircraft and adds visual interest. Ailerons typically remain neutral unless depicting specific flight conditions.
Test-fit each completed wing to fuselage before cementing. Wings should slide onto central spar with minimal force. If resistance occurs, lightly sand attachment points rather than forcing fit.
Apply cement to both wing root and fuselage mounting points, press firmly into position. Check alignment from multiple angles – wings should appear perpendicular to fuselage centerline with equal dihedral angles.
Small gaps at wing roots can be filled with super glue or modeling putty, then sanded smooth. Focus on achieving proper structural alignment first – cosmetic gaps are addressed during finishing.
Step 6: Engine and Propeller Assembly
What You’ll Learn: Detailed mechanical assembly and painting techniques for the Pratt & Whitney R-2800 engine and Hamilton Standard propeller.
R-2800 Engine Assembly and Painting
Tamiya’s 1/32 engine replicates the real twin-row radial with 18 cylinders. Remove all engine parts carefully, cleaning mold lines between cooling fins. Dry-fit cylinders into crankcase before cementing.
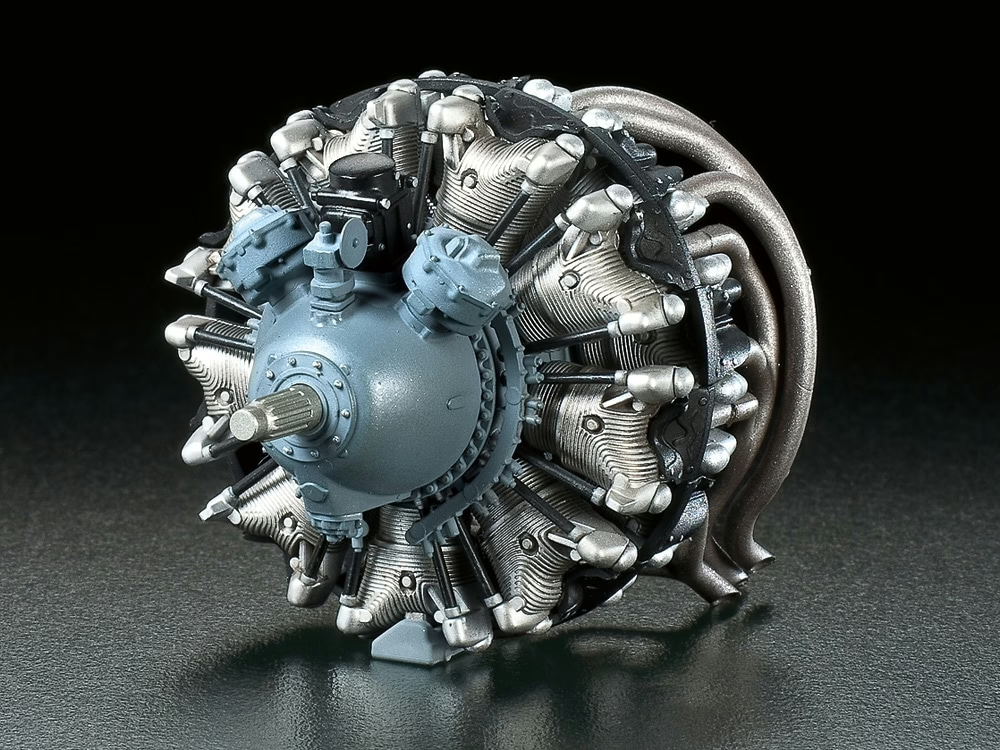 Assemble two cylinder rows around crankcase, ensuring correct orientation (rear row offset from front). Use plastic cement sparingly but adequately for strength.
Paint cylinders steel or dark grey with black pushrod tubes, crankcase medium grey. Effective approach: spray entire engine black basecoat, then dry-brush steel/silver on cylinder fins. Paint crankcase contrasting grey, pushrods black. Apply thin brownish-black wash in recesses to simulate oil and grime.
Engine Mount and Propeller Installation
Mount engine to airframe using circular firewall or engine mount ring. Dry-fit first – engine should sit straight with propeller shaft centered. Before finalizing attachment, test-fit cowling parts around engine. Adjust engine position by trimming mounting pins if cowling panels don’t meet properly.
F4U-1D used distinctive 4-blade Hamilton Standard propeller. Assemble hub and blades ensuring equal pitch angles and 90-degree spacing. Paint blades flat black with yellow tips (last 4 inches). Apply Hamilton Standard logo decals if provided.
Test-fit completed propeller on engine shaft – should sit snugly and clear fuselage. Can attach now or save for final assembly to prevent handling damage.
Step 7: Landing Gear and External Details
What You’ll Learn: Fine detail work and mechanical assembly requiring precision and patience.
Main Landing Gear Assembly
F4U-1D’s distinctive gear requires careful attention for proper stance. Test-fit main struts in wing sockets – should slide easily without forcing. If tight, scrape plastic from mounting points until proper alignment achieved.
When cementing struts, apply cement inside socket rather than on strut to prevent excess squeezing out. Immediately sight along model from front and side views ensuring perpendicular alignment and identical forward rake. Use books to support wings while cement cures overnight.
Tail Wheel and External Details
Install tail wheel assembly ensuring perfect vertical positioning when viewed from behind. Should be straight and properly centered to maintain characteristic stance.
For antenna rigging, drill tiny holes using #78 or #79 drill bit at attachment points. Use inked nylon sewing thread or stretched clear sprue for wires, securing each end with minute super glue drop. Keep wires taut by temporarily taping one end while positioning other.
Replace fragile plastic pitot tubes with syringe needles for superior durability and realism.
Pre-Paint Assembly Check
Conduct final inspection of all joints and alignments. Ensure landing gear doors fit properly and all small details are securely attached. Last opportunity to correct fit issues before painting stage.
Step 8: Surface Preparation and Priming
What You’ll Learn: Professional finishing preparation ensuring smooth, durable paint results.
Final Sanding and Cleaning
Examine all surfaces under good light for rough spots, sprue marks, or unflushed filler. Use fine-grit sanding stick (800-1000) for final touches. Ensure puttied areas blend perfectly into surrounding plastic.
Clean thoroughly – blow off loose dust with soft brush or compressed air. Wash model in warm, soapy water to remove mold release residue and skin oils. Rinse thoroughly and air-dry completely. Alternatively, wipe with isopropyl alcohol for fast degreasing.
Primer Selection and Application
Primer provides paint adhesion, color uniformity, and reveals surface flaws. Tamiya Fine Surface Primer in spray can is excellent for beginners – smooth, thin coats revealing detail nicely. Gray primer works well under Corsair’s navy blue scheme.
Work in well-ventilated area wearing mask. Shake can vigorously 2 minutes. Spray in light, even passes 6-8 inches away. Start spray off model, sweep across, and finish off the other side – this avoids drips. Use multiple thin coats rather than one heavy coat. Let first coat dry few minutes, then apply second coat for uniform coverage.
Surface Inspection and Masking
Once primer is dry, inspect under good light. The uniform color highlights missed imperfections. Look for seam lines, scratches, or pits. If found, spot-fill with putty, sand smooth when dry, and re-prime that area.
Now mask areas you want to protect: clear canopy parts with thin strips of Tamiya masking tape, cockpit opening with tissue or tape, and any pre-painted details like landing gear or wheel wells. Use quality masking tape and ensure edges are firmly pressed down.
Step 9: Painting and Color Application
What You’ll Learn: Scale aircraft painting techniques that transform your plastic assembly into a convincing warbird replica.
F4U-1D Color Schemes
The Vought F4U-1D represents a late-war fighter that typically wore the Overall Glossy Sea Blue scheme adopted by the U.S. Navy in mid-1944. This simplified earlier tri-color camouflage into a single, striking dark blue perfect for beginners since it eliminates complex masking requirements.
For authenticity, your Corsair should feature Glossy Sea Blue (Federal Standard 15042) on all exterior surfaces. Some aircraft retained white or light gray undersides, creating the “Navy Blue over Light Gray” configuration. Check your kit’s markings options – Tamiya typically provides historically accurate schemes with clear paint callouts.
Paint Selection and Base Color Application
For your F4U-1D, Tamiya AS-8 Navy Blue spray paint offers the most convenient and accurate match for Glossy Sea Blue. Tamiya’s spray cans provide excellent coverage and authentic color matching perfected over decades of research.
If using bottled paints, Tamiya acrylics remain the gold standard for beginners. Their alcohol-based formula flows beautifully, levels well, and creates durable finishes. Avoid mixing paint brands in the same coat – stick with one manufacturer’s system for predictable results.
Success comes from patience and proper technique. Whether using spray cans or airbrush, multiple thin coats beat one thick coat every time.
Spray Can Technique: Warm can in lukewarm water 5 minutes to improve atomization. Shake vigorously 2 minutes. Hold can 6-8 inches from model. Start spraying off model, sweep across in steady passes, finish off model. Apply first coat as light “tack” coat, then build coverage with subsequent passes. Allow 15-20 minutes between coats.
Detail Painting and Weathering
With base coat cured, shift to detail work. Use high-quality brushes – worn brushes guarantee poor results. Paint gear struts the same Glossy Sea Blue as fuselage. Use fine brush to pick out hydraulic lines in silver or steel colors.
For subtle weathering, mix small amount of burnt umber oil paint with mineral spirits to create thin wash. Flow into panel lines using fine brush – capillary action draws it into recesses naturally. Remove excess with clean, damp cotton swab.
Apply Tamiya X-22 Clear Gloss thinned 20% for decal preparation. The surface should develop smooth, glass-like finish that makes decals appear painted on rather than applied. Allow clear coat to cure overnight before handling.
Step 10: Decaling, Final Assembly, and Display
What You’ll Learn: Professional finishing and presentation techniques that transform your painted Corsair into a finished masterpiece.
Decal Application and Setting Solutions
Your Tamiya kit includes high-quality waterslide decals for national insignia, numbers, and maintenance stencils. Cut each decal close to edges using sharp scissors, leaving minimal clear film. Soak decals in warm water 10-15 seconds until they slide freely on backing paper.
Before applying decals, brush Micro Set setting solution onto model surface. This helps position decals and prevents air bubbles. Slide decal into position using soft brush, then gently press out water and air bubbles with damp cotton swab. Work from center outward to avoid trapping air underneath.
Once positioned, apply Micro Sol softening solution over each decal. This stronger solution makes decals conform to surface details and eliminates silvering. Don’t panic if decals wrinkle temporarily – this is normal as they conform to surface texture.
National Insignia and Final Assembly
The F4U-1D carries white star-and-bar insignia on wings and fuselage sides. Position wing insignia centered between wing fold line and tip, ensuring both sides are symmetrical. Fuselage markings typically sit just aft of cockpit area. Use kit’s placement guide for historical accuracy.
With decaling complete, attach landing gear assemblies using strong plastic cement. Ensure proper stance – all three contact points should touch work surface evenly. Install four-blade propeller on engine shaft, checking that blades are evenly spaced and prop spins freely if designed to rotate.
Add delicate final details: antenna masts behind cockpit, pitot tubes under wing, and any external equipment. Use tweezers and super glue for these small parts, taking care not to damage surrounding paint.
Touch-Up and Display
Inspect for any paint chips from handling and touch up with fine brush. Apply final clear coat to protect decals and unify finish. Choose between gloss, satin, or flat depending on desired appearance – late-war Corsairs often showed weathered, semi-gloss finishes.
Position your completed Corsair on simple base or stand that complements without overwhelming the model. For photography, use soft, even lighting from multiple angles and neutral background to showcase your craftsmanship. Document your achievement – you’ve successfully completed a complex scale modeling project and learned essential techniques for future builds.
Conclusion and Next Steps
Celebrating Your Completed F4U-1D Corsair
Congratulations! You’ve just transformed a box of plastic parts into a detailed replica of one of World War II’s most iconic fighter aircraft. Your completed Tamiya F4U-1D Corsair represents far more than an assembled model – it’s proof that you’ve mastered the fundamental skills of scale aircraft modeling.
Skills Acquired and Techniques Mastered
Through this build, you’ve developed essential modeling competencies: precise parts preparation, dry-fitting techniques, seamwork and filling, interior detailing, multi-part assembly alignment, painting preparation and application, decal work, and weathering basics. These core skills form what experienced modelers call the “triangle of success” – assembly, painting, and decaling – that applies to any scale modeling subject.
Recommendations for Your Next Modeling Project
Consider tackling a 1/48 scale kit next, which offers excellent detail in a more manageable size. Alternatively, try a different aircraft type like a P-51 Mustang or Spitfire to practice your newfound skills with different color schemes and markings.
Resources for Continued Learning and Skill Development
Join online communities like ScaleModelAddict.com and Britmodeller.com for technique sharing and inspiration. Aviation magazines and reference books will help you achieve greater historical accuracy in future builds. Remember: model building is about patience and gradual improvement – focus on mastering one new technique per project.


