
Tamiya’s 1/32 Corsair still sets the standard—flawless engineering, zero gap-filling, and a build experience that rewards patience with a museum-worthy result.

Stepping up to 1/32 scale is a commitment. The parts count climbs, the investment rises, and the margin for error shrinks—which is precisely why kit choice matters more at this scale than any other. For American modelers eyeing the Vought F4U Corsair, arguably the most iconic silhouette of World War II naval aviation, Tamiya’s 1/32 F4U-1D (TAM60327) has occupied the top position in the conversation for years. The question heading into 2026 isn’t whether it was once the best—it’s whether it still earns that designation on a crowded shelf.
The Corsair’s history lends the subject real weight. Known to its pilots as the “Whistling Death,” the F4U earned its reputation over the brutal Pacific campaigns, powered by the massive Pratt & Whitney R-2800 Double Wasp radial engine and characterized by those unmistakable inverted gull wings. The F4U-1D variant carries specific historical significance: it was the first Corsair cleared for full carrier deployment by the U.S. Navy in April 1944, going on to deliver close air support across the Philippines, and Okinawa. Tamiya chose this variant deliberately, and the tooling reflects that decision at every level.
For modelers researching where this kit sits among the best model airplane kits currently available, this review cuts through the marketing and examines what it actually delivers on the workbench.
Brief Overview
The Tamiya 1/32 Vought F4U-1D Corsair is a premium injection-molded kit aimed at builders who want historical accuracy and a frustration-free construction experience in the same box. It is not a beginner kit in the traditional sense, but its engineering philosophy actively compensates for the complexity of the subject.
Four features define the kit’s value proposition for the builder:
- Poka-Yoke error-proofing. Internal bulkheads, cockpit components, and structural mounts are keyed with asymmetrical tabs and unique slots, making it physically difficult to install critical parts incorrectly. For a complex 450-plus-part kit, this is a meaningful design decision.
- Variant-specific tooling. Tamiya didn’t simply swap decals. Five new gray sprues and one new clear sprue were developed specifically for the -1D, including revised upper wing panels (Sprue A), a fuselage that correctly omits the lower cockpit window found on earlier marks (Sprue B), and reinforced underwing twin-pylon ordnance rack provisions (Sprues B1 and W). The wider-chord, thicker-root Hamilton Standard propeller blades and the revised tail wheel fairing — both unique to the -1D — round out a tooling package that goes well beyond a simple variant reissue.
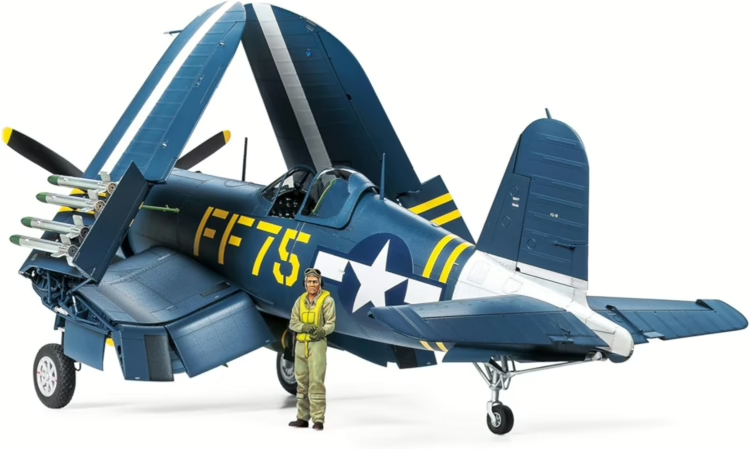
- Flexible display configurations. Wings can be posed folded or extended, flaps and elevators can be set in multiple positions, and the undercarriage deploys or retracts. The inverted gull wing’s complex internal structure is faithfully represented in either configuration.
- Comprehensive ordnance. The box includes two 1,000 lb general-purpose bombs, twin 150-gallon drop tanks, and eight 5-inch HVAR rockets on underwing stubs—the full close-support payload of the late-war -1D.
→ Check Current Availability on Amazon
Design, Build Quality, and Engineering
Open the box and the volume of plastic alone signals that this is a serious kit. The contents include over 450 parts in Tamiya’s characteristic medium-gray polystyrene, 27 clear parts, four black-plastic engine mount components, two photo-etched metal frets, vinyl rubber tires, metal rods, securing screws, a self-adhesive canopy masking sheet, and a 12-page full-color historical reference booklet. The sprue layout is dense but orderly.
The plastic quality is precisely what long-time Tamiya builders expect: not brittle, not soft, holding crisp edges through sanding. More telling is the complete absence of flash across every sprue—evidence of well-maintained tooling. Ejector pin marks, the unavoidable byproduct of injection molding, have been positioned in recesses that will never be visible on the finished model. That kind of thoughtful placement saves hours of remedial work.
Surface detail on the exterior is exceptional. Panel lines are uniformly recessed at a depth that accepts an oil pin-wash cleanly without looking artificially deep. Rivet detail shows genuine restraint—flush rivets of varying sizes that read as realistic under primer rather than the exaggerated dimpling that plagues some competing releases. The fabric-covered outer wing panels and control surfaces carry convincing ribbing and texture that accurately represents the doped-linen construction of the original 1940s aircraft.
Structurally, the kit addresses the most common large-scale aircraft problem—wing droop and dihedral misalignment—with a screw-secured internal spar framework that mechanically locks the inner wing sections to the fuselage at the correct aerodynamic angle. On a model with the Corsair’s heavy, complex gull wing geometry, this isn’t a luxury; it’s a necessity for long-term display integrity.
The Poka-Yoke philosophy extends to the engine mounts, cockpit tub, and major sub-assemblies. Irregular tab shapes and asymmetrical slot arrangements mean that most structural components have only one physically possible orientation. For builders working in large scale for the first time, this engineering safety net is genuinely valuable.
Rather than simply repackaging existing sprues under new box art, Tamiya retooled significant portions of the kit to reflect the -1D’s specific production configuration. Five entirely new gray sprues and one new clear sprue were developed for this release. Sprue A delivers newly molded upper wing panels; Sprue B provides a subtly revised fuselage that correctly omits the lower cockpit visibility window eliminated on the -1D production line; Sprues B1 and W introduce a lower mid-wing section with reinforced provisions for the twin-pylon underwing ordnance racks. Beyond the structural changes, the kit includes the wider-chord, thicker-root Hamilton Standard Hydromatic propeller blades specific to the -1D’s uprated powerplant installation, and a correctly profiled tail wheel fairing that distinguishes this variant from the earlier Birdcage and -1A toolings. For builders who have lived with the Trumpeter release long enough to memorize its compromises, these distinctions are immediately legible — and they carry weight precisely because Tamiya executed them in plastic rather than leaving them to the aftermarket.
The Build Experience: Ease of Use & Challenges
Cockpit
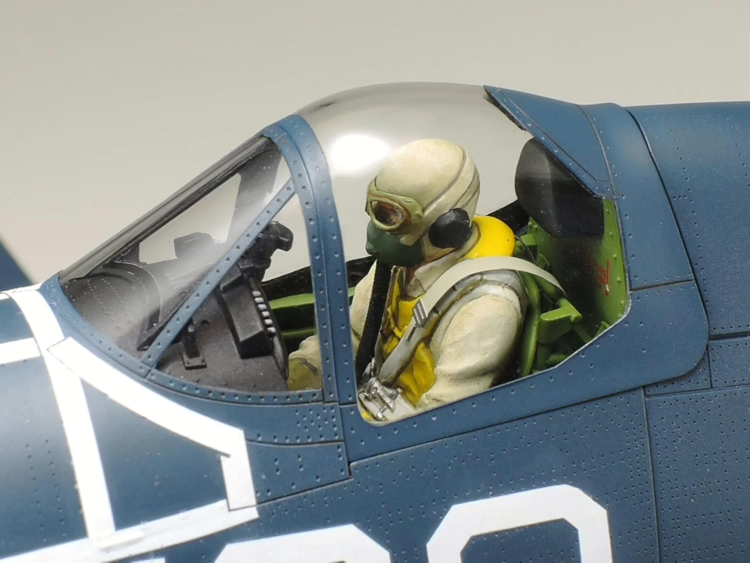
Construction begins in the cockpit, and Tamiya gives the builder a lot to work with. The kit correctly replicates the Corsair’s unusual “bottomless” cockpit—the pilot sat in an armored seat attached to the rear bulkhead, with narrow foot troughs rather than a solid floor beneath his feet. The -1D variant omits the lower fuselage visibility window present on earlier marks, and Tamiya captures that distinction accurately.
The instrument panel uses a multi-layer sandwich: a clear part behind a printed decal representing individual dials, finished with a matte-gray plastic bezel. Adding a small drop of clear gloss varnish over each dial opening enhances the glass-like effect considerably.
The one genuine friction point in the cockpit involves the photo-etched seatbelt harnesses. Tamiya stamped these from stainless steel rather than the softer brass more commonly used by aftermarket suppliers. Stainless steel is springy and resists natural draping over the seat contours. Annealing with a controlled flame helps slightly, but many experienced builders find it easier to substitute aftermarket fabric belts for cleaner results.
The R-2800 Engine
Tamiya’s representation of the Pratt & Whitney R-2800 Double Wasp is the kit’s most impressive single achievement. Nearly 80 individual parts build up two banks of 9 cylinders, pushrod assemblies, cooling fins, and pre-drilled exhaust manifolds. Seam lines are minimal to the point of being nearly irrelevant. The engine is designed to be removable for display, which gives the finished model a compelling presentation option.
The one omission is the ignition wiring harness that runs across the front of the real engine. Builders who want to address it can drill 0.015-inch holes into the cylinder heads with a pin vise and route fine lead or copper wire to simulate the ignition leads—a time-consuming but visually impactful upgrade.
The Cowling Assembly Tip
Every experienced modeler who has built this kit knows about the cowling issue, and every new builder needs to be warned about it before they pick up the glue.
Tamiya designed the forward cowling as a multi-piece, removable assembly to showcase the engine. The instruction manual’s sequencing—engine to firewall, rear cowl flaps, then individual cowling panels—creates severe, trench-like gaps between the exterior panels when followed as printed. The tight clearances between the inner cowling surface and the engine’s rocker box covers are the root cause.
The fix is straightforward but counterintuitive: ignore the manual for this specific sequence. Assemble the side, top, and bottom cowling panels into a single unified cylinder off the engine, letting the cement cure fully before approaching the airframe. Carefully shaving down the internal mounting pins on part G5 allows the completed cowl ring to sit fractionally closer to the firewall, closing the tolerance gap. Once solid, slide the cowl over the engine assembly. The gap disappears. Follow the manual here, and you’ll be filling and sanding a prominent seam on one of the most visible parts of the finished model.
Airframe and Final Assembly
Past the cowling, the rest of the airframe assembles with the kind of speed and confidence that large-scale kits rarely allow. The fuselage halves join with minimal seam work—thin cement applied by capillary action, a light pass with a fine sanding stick, and the center line is gone. Tamiya’s use of separate panel inserts on specific fuselage sections preserves the surface rivets that would otherwise be lost to heavy sanding.
Wing configuration—folded or extended—must be decided early. The folded option exposes the internal structural ribs, hydraulic actuator lines, and locking pins of the actual fold mechanism, making for a compelling carrier-deck diorama subject. The extended option uses structural inserts that provide complete rigidity, eliminating any risk of wing droop.
The undercarriage uses metal rods inside the plastic oleo struts, an essential design choice given the physical weight of the finished 1/32 model. Plastic legs alone would not support it long-term.
Instructions
The manual is comprehensive but demands pre-build study. The frequent branching paths for different configuration options—drop tanks, rocket loadouts, windshield types, flap positions—can easily trap an inattentive builder into gluing incorrect sub-assemblies. Highlighting your chosen build path through the entire manual before cutting any plastic is strongly recommended.
Value-to-Performance Ratio
The Tamiya F4U-1D carries a premium price relative to the Trumpeter and Revell 1/32 alternatives. Whether that premium is justified depends on how you calculate the real cost of a build.
The Trumpeter kit is priced lower at retail, but its historical inaccuracies—most significantly a fictional solid cockpit floor instead of the correct open-frame architecture—and its documented fitment problems around the wing folds and gun doors typically require aftermarket resin cockpit sets and significant corrective bodywork to resolve. The savings at purchase erode quickly. The Revell 1/32 kit is a legacy tooling that predates modern molding standards; raised panel lines, basic interior detail, and overall fit that belongs to a different era make it suitable for nostalgic builds but not for any modeler seeking competitive accuracy.
Against both alternatives, Tamiya’s engineering investment directly translates into builder time saved. Poor-fitting kits redirect effort toward structural correction—filling, sanding, re-scribing lost surface detail—rather than the painting, detailing, and weathering phases where skill is actually visible. The Tamiya kit inverts that ratio. Almost all of a builder’s working hours go toward the parts of the hobby that produce results.
For modelers planning any meaningful investment in the finished piece—aftermarket detail sets, quality paint, weathering products—it makes little financial sense to start with a base kit that requires expensive remediation before those investments pay off.
Pros & Cons
Pros
- Poka-Yoke engineering makes complex structural assemblies nearly foolproof, preserving surface detail by eliminating heavy gap-filling
- The R-2800 engine assembly, comprising nearly 80 parts, is a showpiece on its own—accurate, detailed, and designed for display with cowlings removed
- Surface textures are among the most restrained and realistic in this scale class, with correctly scaled flush rivets and convincing fabric-panel simulation
- Wide range of in-box configuration options—folded or extended wings, deployed flaps, full ordnance loadout—enable genuine display storytelling without extra purchases
Cons
- The instruction manual’s cowling assembly sequence produces large, difficult-to-correct gaps; builders must deviate from the printed steps to avoid this
- Photo-etched seatbelts are stainless steel rather than soft brass, making natural draping over the seat contours frustrating
- The dense manual and frequent option branches require careful pre-build study; inattentive builders risk installing incorrect sub-assemblies
Where the Tamiya 1/32 Vought F4U-1D Corsair Really Shines
The quality of a model kit is ultimately measured at the workbench, in the quiet accumulation of small satisfactions that either build enthusiasm or erode it. The Tamiya Corsair builds enthusiasm.
It performs best during complex sub-assembly work—exactly the phase where large-scale kits most often punish the builder. The wing fold mechanism is a specific example: what could be a source of deep frustration instead reveals itself as an engineering exercise in its own right, the internal ribs and hydraulic actuator lines aligning cleanly and locking into place with the kind of tactile feedback that tells you the engineering was thought through from the beginning. The R-2800 engine is another. Nearly 80 parts that could reasonably be expected to produce alignment headaches instead form a convincing powerplant that earns its own display moment before the cowling goes on.
The nearly 15⅜-inch wingspan of the completed model commands attention in any display case. Whether finished in overall Gloss Sea Blue—mixed from Tamiya XF-17, XF-8, and XF-2 in a 5:2:1 ratio to replicate the fading effect of Pacific sun exposure—or weathered to represent a combat-worn carrier veteran, the scale surface absorbs advanced techniques effectively. Chipping around the Dzus fasteners and wing root walkways reads convincingly at this size. Exhaust staining from the R-2800’s side vents, airbrushed in thin translucent layers of flat black, dark brown, and light gray, renders with the kind of tonal complexity that smaller scales simply can’t support.
The folded-wing configuration adds a narrative dimension that separates this kit from a purely static display subject. Combined with the stripped cowlings and a full rocket and bomb loadout, a completed Tamiya Corsair doesn’t just occupy shelf space—it occupies the viewer’s attention.
→ View the Tamiya 1/32 F4U-1D Corsair on Amazon
Who Should Buy It
- The intermediate to advanced builder stepping up from 1/48 or 1/72 scale will find this the most logical choice for a first 1/32 project. Tamiya’s error-proofing reduces the penalty for scale-transition mistakes while leaving the painting and weathering canvas fully intact. If your goal is a contest-quality or competition-level result, this is the only 1/32 Corsair in the market that delivers it without mandatory aftermarket investment.
- The experienced modeler who wants a demanding but reliably rewarding project—one that rewards research into historical configuration details and sophisticated finishing techniques—will find the -1D tooling holds up to close scrutiny and advanced weathering equally well.
The budget-conscious beginner looking for a weekend build or a first aircraft kit should look elsewhere. The parts count, the photo-etched metal, the microscopic engine components, and the instruction complexity all demand a patient, methodical approach. This kit is not designed to be rushed. Modelers in this category are better served by a 1/48 kit that builds confidence before committing to this level of investment.

Key Takeaways
- Near-perfect fit: Poka-Yoke engineering across 450-plus parts nearly eliminates gap-filling and preserves surface detail throughout the build.
- Assembly warning: Do not follow the manual’s cowling sequence—assemble the cowl off the engine first to avoid pronounced gaps on the nose.
- Benchmark detail: The R-2800 engine, correct “bottomless” cockpit floor, and variant-specific tooling deliver historical accuracy that the Trumpeter and Revell alternatives cannot match without expensive corrections.
- Best value at this scale: The premium price reflects a friction-free build experience; competing kits cost less at purchase but more in aftermarket remediation.