
This Cold War icon assembles into an 18.5-inch shelf dominator—but its aged Monogram tooling hides fit problems, raised panel lines, and one glaring historical myth you need to know before you buy.
Scale model reviews should do one thing above all else: protect your time and money. This evaluation of the Revell 1/72 SR-71 Blackbird (Kit No. 85-5810) was conducted as a complete, out-of-the-box assembly, documented from first sprue cut to final clear coat. Every stage was tested: the capillary action of liquid plastic cement along the kit’s lengthy fuselage seams, the necessity for cyanoacrylate (CA) glue and solvent-based putties, the optical clarity of the canopies, and the dimensional fidelity of the polystyrene against historical SR-71 blueprints.
To contextualize where this kit sits, the evaluation benchmarks it against the standards that define the best model airplane kits in the contemporary market—kits defined by precise CNC molding, accurate scale representation free of flash, and instructions that don’t leave builders guessing. The Revell SR-71 is measured against those exact parameters. The verdict isn’t simple.
Brief Overview
The Lockheed SR-71 Blackbird remains the most extraordinary strategic reconnaissance aircraft ever built. Developed by Clarence “Kelly” Johnson and Lockheed’s Skunk Works, the aircraft cruised at 85,000 feet and sustained speeds exceeding Mach 3.2—fast enough to simply outrun any threat launched against it. Revell’s 85-5810 attempts to honor that legacy in 1/72 scale.
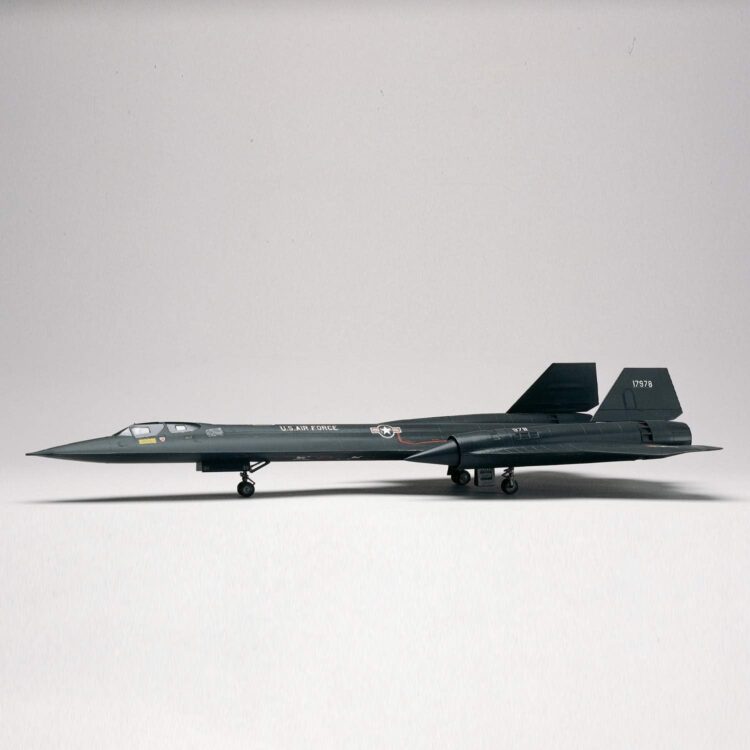
The kit comprises 66 parts molded primarily in black and clear polystyrene, assembling to an imposing 18.5-inch length with a 9.25-inch wingspan. The tooling traces its origins to classic Monogram molds from the latter half of the 20th century. That heritage is simultaneously the kit’s greatest asset and its most significant liability.
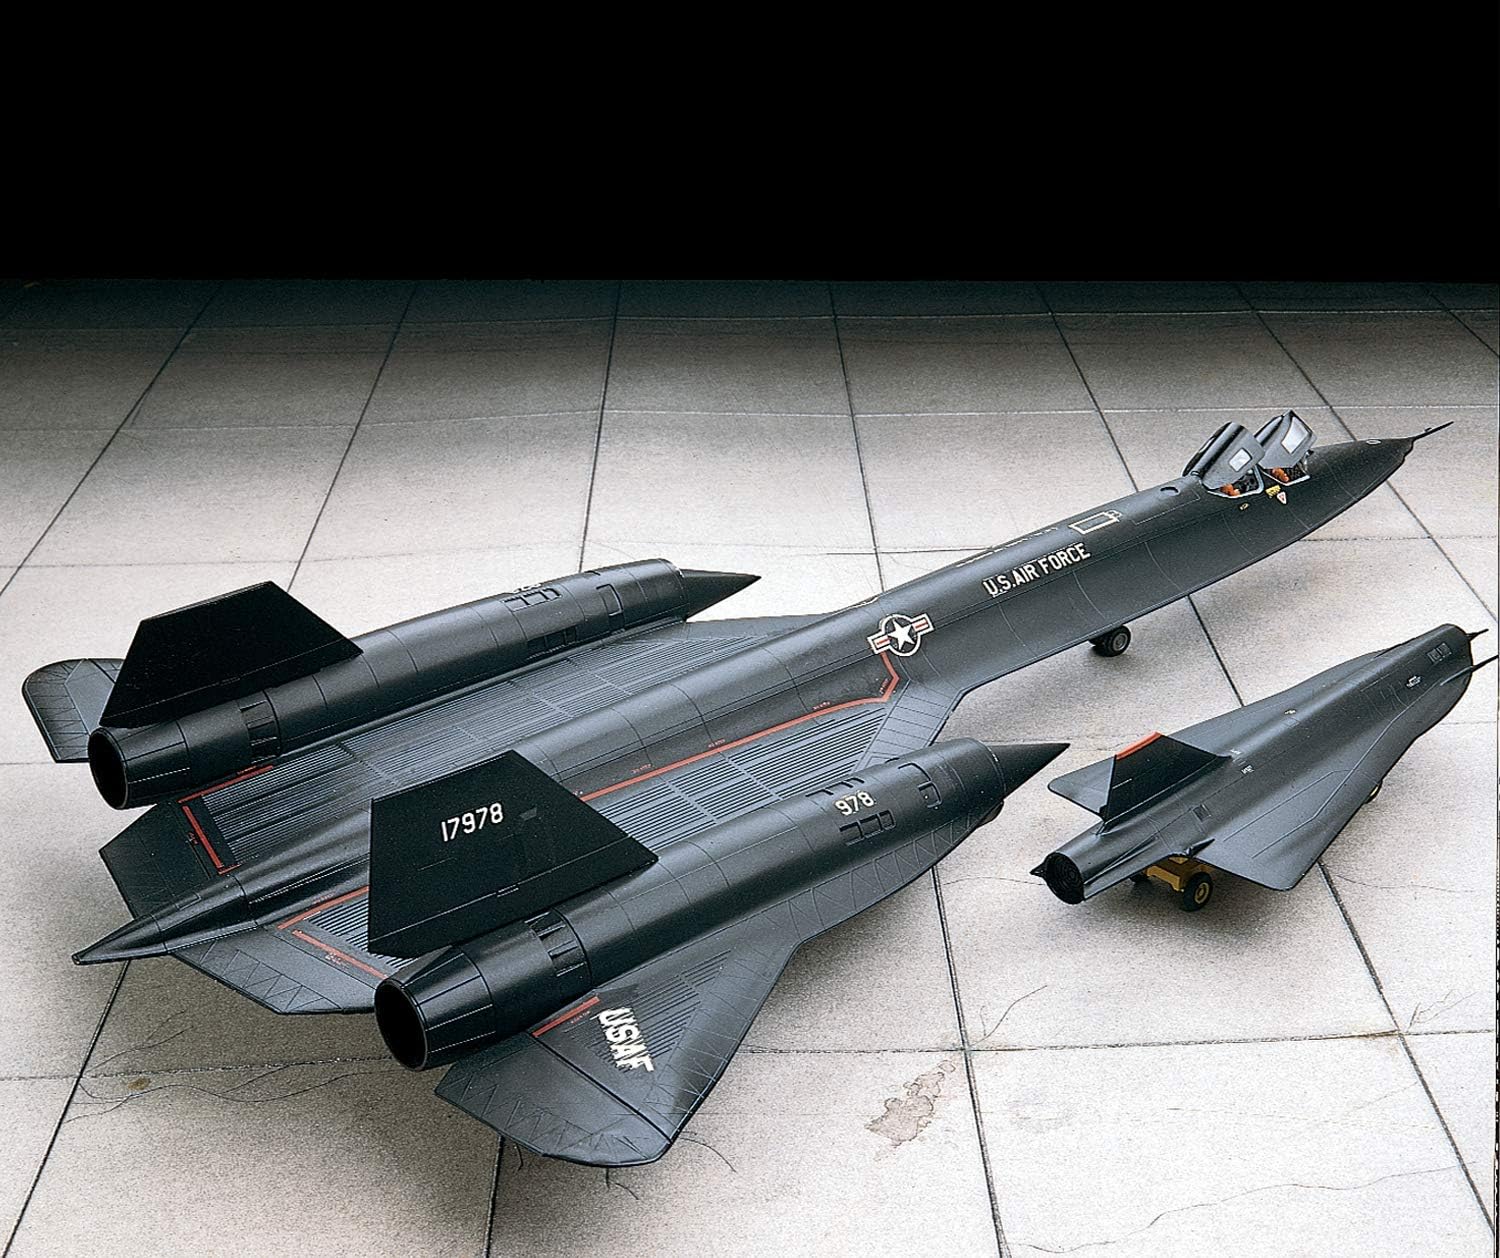
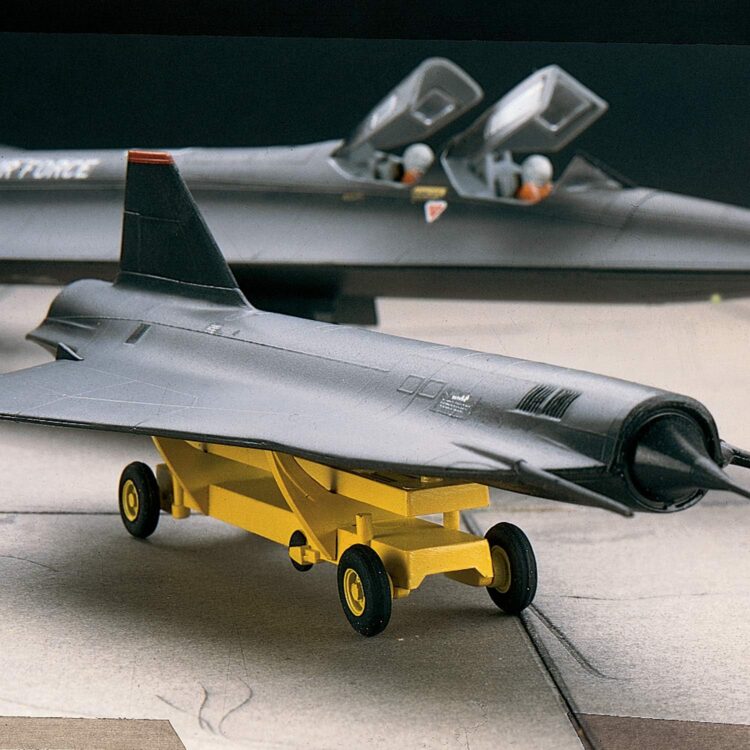
Four features set this boxing apart from the competition. First, the nose gear well is the most detailed and accurate in the entire 1/72 scale Blackbird category—a standout achievement that both Italeri and Academy fail to match. Second, the kit includes two seated crew figures accurately sculpted in their David Clark S1030 full-pressure suits, lending the finished model a human scale that sterile, empty cockpits simply cannot replicate. Third, the corrugated wing panels faithfully reproduce the real aircraft’s structural skin, which was engineered to flex and expand under Mach 3 aerodynamic heating. Fourth, the package includes the GTD-21 surveillance drone with a dedicated ground handling cart—a secondary build that substantially raises the display value of the finished piece.
The designated skill level is generally marketed as Skill Level 2 in the U.S., though European releases sometimes carry a Skill Level 4 designation.
→ Check Current Price & Availability on Amazon
The Build Experience: Hype vs. Reality
The packaging promises “accurate surface details” across 66 parts. The reality of assembling those parts is a sustained exercise in gap filling, seam sanding, and structural problem-solving across a nearly 18.5-inch polystyrene airframe.
Fuselage Assembly
The SR-71’s blended delta-wing and chine structure demands that Revell split the aircraft into massive upper and lower fuselage halves spanning nearly the entire model length. Mating those halves is where the build gets genuinely difficult. The lower fuselage half measures slightly undersized relative to the upper cavity it must fill, producing a pronounced step and a gaping seam running the full circumference of the aircraft. Correcting this requires aggressive clamping, liberal liquid cement application to maximize capillary penetration, and follow-up fills with CA glue or sprue goo—a homemade filler made by dissolving scrap polystyrene in liquid cement.
Sanding these seams flush demands a systematic progression through abrasive grits, from 400-grit down to 3000-grit micro-mesh. Warping along the razor-thin forward chines and engine nacelles compounds the problem. Solvent-based putties like Squadron Green or Tamiya Basic Putty are not optional finishing touches here—they are fundamental consumables. This is not a modern snap-together build. It is a traditional builder’s kit that rewards patience and penalizes shortcuts.
The Raised Panel Line Problem
The most debated aspect of the 85-5810 tooling is its surface detail: every panel line is raised rather than recessed. This predates CNC milling, and it creates a hard choice. The heavy sanding required to eliminate fuselage seams will inevitably obliterate raised lines along leading edges and chines. The builder must then either commit to preserving those lines through extremely selective sanding—limiting weathering to drybrushing, pastel chalks, and graphite pencil techniques—or sand the entire 18.5-inch airframe smooth and undertake a complete rescribing operation.
Rescribing means plotting every line with rigid Dymo labeling tape as a guide and dragging a steel scriber or pin vise needle across the plastic to carve new recessed channels. It is painstaking work, but it unlocks modern capillary-action panel line washes and delivers a dramatically sharper result. Experienced builders have documented one useful trick during this phase: a light mist of CA accelerator over the sanded surface reacts with stress fractures left where raised lines once existed, causing faint “ghosts” to reappear—providing a ready-made map for the scriber.
Cockpit and Crew Figures
The cockpit tub provides an honest mix of achievement and compromise. Subject matter experts widely acknowledge that the Monogram-derived fuselage cross-section is too shallow for its width, resulting in a cockpit interior that reads as noticeably wider than the claustrophobically packed real flight deck. The geometry is simply off.
Against that, the crew figures are exceptional. The pilot and Reconnaissance Systems Officer (RSO) are sculpted with genuine accuracy in their David Clark 1031 pressure suits. Painting these figures communicates the aircraft’s sheer scale in a way no empty seat ever could. The canopies can be posed open to display the interior, though the clear polystyrene is thick enough to introduce slight optical distortion, and clean canopy framing requires careful masking with Bare Metal Foil or precision-cut kabuki tape.
Engine Nacelles and Landing Gear
The Pratt & Whitney J58 engines receive basic forward compressor faces and rear turbine blades. An error shared across all 1/72 SR-71 kits affects this boxing as well: the afterburner flame ring sits too deep inside the exhaust nozzle—approximately six scale feet further aft than the real aircraft. Additionally, triangular radar deflection panels are molded onto the outer nacelle chines. These details are historically fictional and must be sanded flush before painting.
The landing gear represents the kit’s clearest engineering win. The nose gear well—universally praised by aerospace experts—surpasses every competitor in the 1/72 class. The main gear struts support the elongated airframe without issue, and the multi-wheel main bogies accurately capture the SR-71’s characteristic forward-leaning ground stance.
The D-21 Drone: A Historical Caution
The kit includes the GTD-21 drone and ground cart, and the box art depicts the drone mounted dorsally on the SR-71. That configuration never existed operationally. The D-21 was carried exclusively by the M-21, a heavily modified A-12 Oxcart variant with distinctly different forward and aft fuselage structures. Mounting the drone on the SR-71 creates a visually spectacular model—and an immediate disqualification at any historically judged competition. Display it on the included cart if accuracy matters to you.
Where the Revell 1/72 SR-71 Blackbird Really Shines
Finishing this kit is its own reward. After the hours of gap filling and seam elimination, the 18.5-inch airframe that emerges commands attention in a way few 1/72 subjects can match. The real payoff, though, arrives during the painting phase.
The SR-71’s “Iron Ball” radar-absorbent coating was not standard flat black—historical documentation identifies it as an extremely dark indigo blue (Federal Standard FS35402) that appeared black under most lighting. Capturing this correctly on plastic requires abandoning pure black entirely. Paints like Tamiya NATO Black (XF-69), Rubber Black, or custom mixtures blending black with dark blue or hull red, applied over a pure black primer base, produce a finish with genuine visual depth. Selectively airbrushing lighter tones across the centers of corrugated wing panels while keeping recesses darker creates the forced perspective that makes a massive black airframe look like a precision instrument rather than a painted toy.
The weathering possibilities are equally compelling. Because the SR-71’s titanium panels fit loosely at ambient temperatures—expanding under aerodynamic friction to seal in flight—the real aircraft leaked JP-7 jet fuel profusely on the ground. Simulating those fuel streaks across the underside using heavily thinned Raw Umber or Burnt Sienna oil paints is both historically accurate and visually dramatic. The aluminum-powder-infused tires present another distinctive detail: painted metallic silver or dark metallic grey, they stand in sharp contrast against the dark airframe and signal deep subject knowledge to anyone who notices them. Decal application completes the picture—the kit’s red walkway markings and USAF insignia against a perfectly glossed, then matte-sealed black airframe produce a finish that justifies every hour of labor that preceded it.
→ See the Revell SR-71 Blackbird on Amazon
Pros & Cons
Pros
- Nose gear well: The most accurate and detailed in the 1/72 scale class—Italeri and Academy are not in the same category.
- Crew figures: Pilot and RSO in David Clark 1031 pressure suits are beautifully sculpted and add critical human scale.
- Display presence: The finished 18.5-inch model captures the SR-71’s predatory silhouette with genuine authority.
- Bonus drone: The GTD-21 with ground cart adds a complete secondary display element no competing kit offers.
Cons
- Raised panel lines: Outdated surface detail limits weathering options and demands full rescribing for modern wash techniques.
- Fuselage fit: Significant gaps at the chine seams require CA glue, sprue goo, putty, and aggressive sanding to correct.
- Dimensional inaccuracy: The fuselage cross-section is too shallow, producing a cockpit that is noticeably wider than scale.
- Inaccurate surface details: Fictitious triangular radar panels on the nacelle chines must be manually sanded flush.
The Value-to-Performance Ratio
Three kits compete in 1/72 Blackbird: Revell (from Monogram tooling), Academy (often reboxed by Hasegawa), and Italeri (often reboxed by Testors). Understanding where the Revell 85-5810 sits in that matrix is essential before spending money.
| Kit | Shape & Accuracy | Buildability | Unique Features |
| Revell (Monogram) | Shallow cross-section, too-wide cockpit, fictitious nacelle panels. Best nose gear well in class. | Poor chine fit; raised panel lines require rescribing or restrict weathering. | Pressure-suited crew figures; D-21 drone and ground cart. |
| Academy (Hasegawa) | Generally accurate; lacks some sensor details present in the Italeri kit. | Best overall fit. Recessed panel lines accommodate wash techniques out of the box. | Option to display open cockpit; includes D-21 drone. |
| Italeri (Testors) | Most accurate fuselage cross-section. Correctly includes RWR bulges and OBC window. | Abysmal fit—gaping seams under the forward fuselage. No nose gear well detail whatsoever. | Accurate D-21 drone shape; strong decal sheets. |
The Academy kit offers the most accessible build path. Recessed panel lines, better fit, and competitive accuracy make it the right choice for modelers who want a modern-quality result without exceptional effort. Italeri wins on pure cross-sectional accuracy and subject fidelity, but punishes builders with its fit quality and strips out landing gear detail entirely.
Revell occupies an awkward middle position. It loses to Academy on buildability. It loses to Italeri on shape accuracy. But it comprehensively beats both on nose gear bay fidelity and crew figure inclusion. For modelers who want to develop advanced seam-filling and scale-black painting skills without risking a premium modern kit, the Revell 85-5810 represents genuine value as a foundational platform. The aftermarket ecosystem further reinforces this: Eduard photo-etch sets (72257, 72376), Wolfpack resin cockpit and exhaust upgrades (WP72066, WP72081), ResKit 3D-printed weighted wheels (RS72-0355), and a Master Model turned-brass pitot tube (AM-72-119) can elevate this aging tooling to display-quality results—though that upgrade path easily doubles or triples the total investment.
At its accessible price point, the Revell kit delivers an extraordinary volume of polystyrene and hours of engaging construction. For what it costs, the ROI is defensible—provided the buyer goes in with realistic expectations.
Who Should Buy It
This kit is ideally suited to intermediate-level U.S. modelers who have moved past snap-together builds and are ready to tackle traditional gap-filling and seam-sanding disciplines. It is an excellent acquisition for airbrush users looking to master “scale black” painting, post-shading over large flat surfaces, and the mandatory gloss-coat/decal-setting process needed to defeat silvering on dark finishes. Builders interested in learning or practicing rescribing panel lines with Dymo tape and a pin vise will find the SR-71’s vast, relatively flat surfaces an ideal training ground.
Beginners expecting a stress-free weekend assembly should look elsewhere—the Academy/Hasegawa tooling is a far more forgiving starting point. The same applies to time-constrained builders and anyone who prioritizes maximum dimensional accuracy above everything else, for whom Italeri’s cross-section fidelity may justify its notoriously difficult fit. This is a project for the patient craftsman who wants to build skill as much as a model.

Key Takeaways
- Severe fuselage fit issues require CA glue, putty, and extensive sanding—beginners should approach with caution.
- Raised panel lines demand full rescribing for modern wash techniques or restrict finishing to drybrushing and pastels.
- Best-in-class nose gear well and accurate pressure-suited crew figures outperform every competing 1/72 Blackbird kit in those specific areas.
- The massive 18.5-inch airframe is an exceptional canvas for mastering scale-black airbrushing and JP-7 fuel-leak weathering.
- The included GTD-21 drone is a display asset, but mounting it on the SR-71 is historically inaccurate—display it on the cart.