
If a Tamiya shake-and-bake build is your comfort zone, walk away now. The Revell F-4J demands gap-filling, re-scribing, and patience—then pays back every hour you invest.
The McDonnell Douglas F-4 Phantom II needs no introduction in American aviation circles. A brutalist triumph of thrust over aerodynamics that defined Western air power across the Cold War, the tandem two-seat, twin-engine interceptor made its maiden flight on May 27, 1958. By the time production ceased in 1981, an astonishing 5,195 airframes had been built—making it the most-produced American supersonic military aircraft in history. Capable of Mach 2.23 (1,485 mph) at altitude and carrying over 18,000 pounds of ordnance across nine external hardpoints, the Phantom was adopted by the U.S. Navy, the U.S. Marine Corps, the U.S. Air Force, and numerous allied nations.
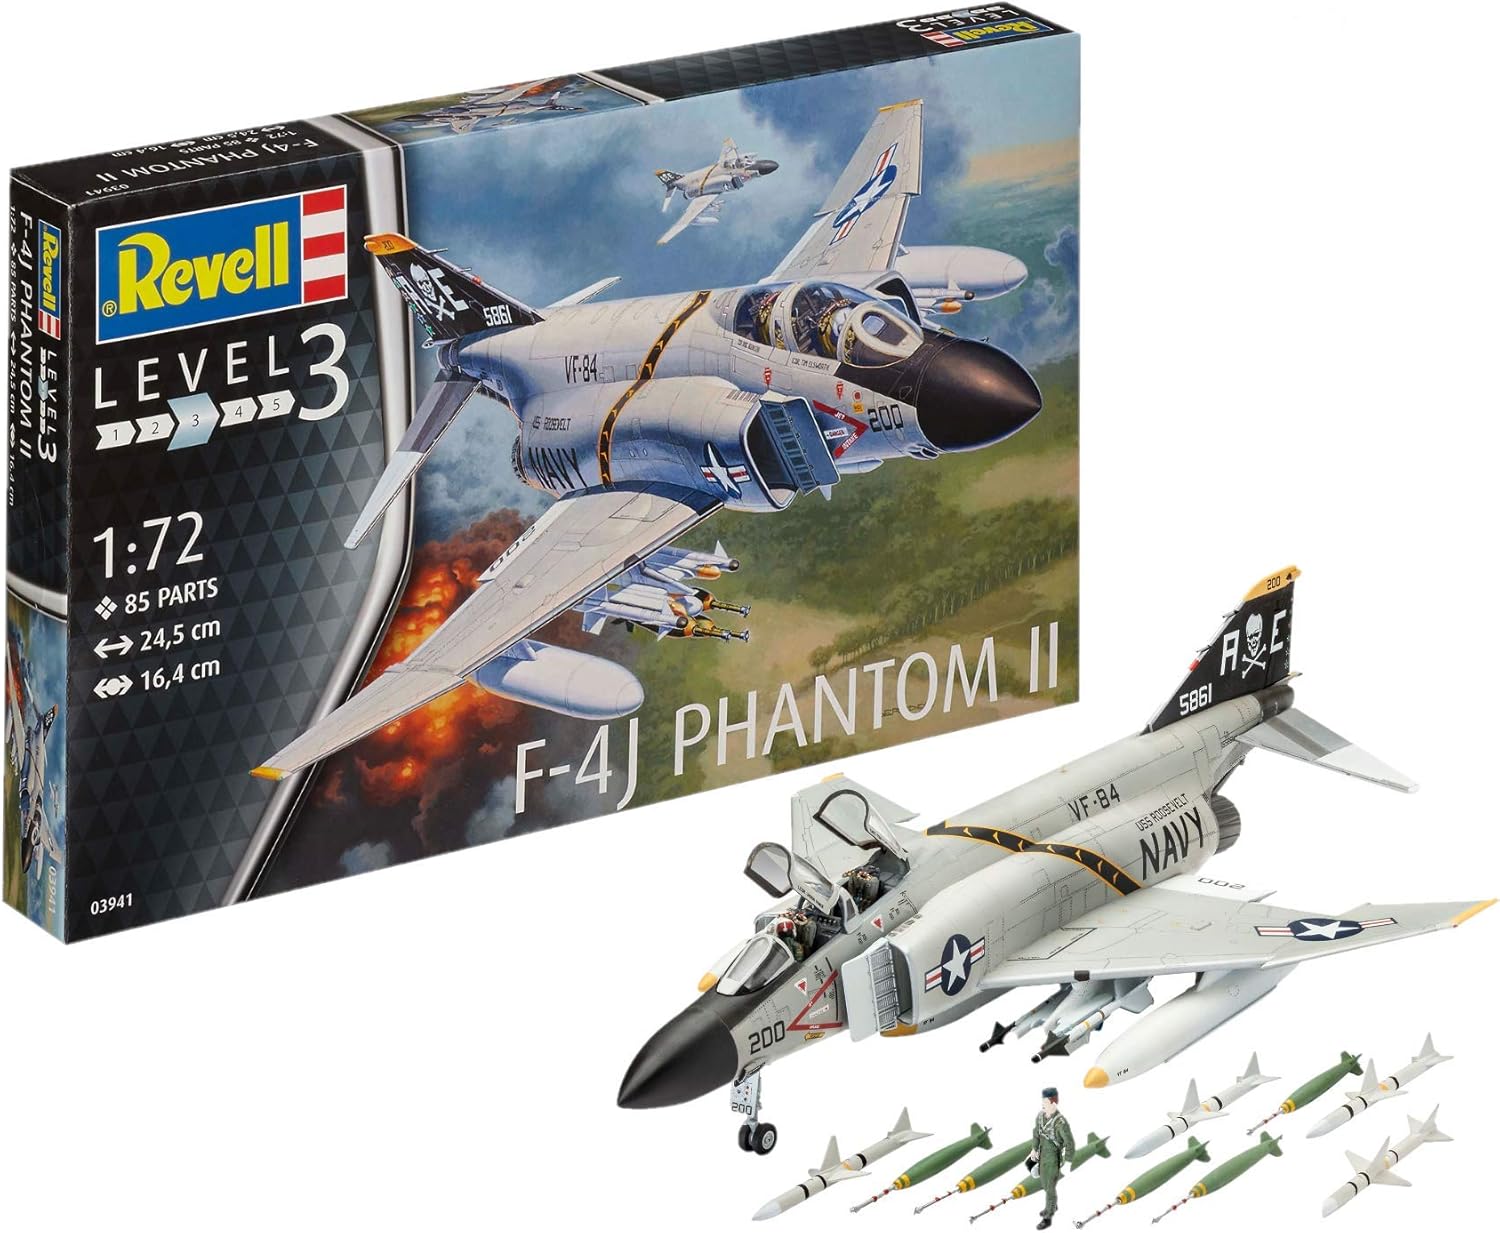
In the 1/72 scale market, the “Phabulous Phantom” is as contested a subject as it gets. Vintage 1970s molds compete for shelf space against cutting-edge, slide-molded masterpieces of the modern era—and squarely in the middle of that spectrum sits the Revell 1/72 F-4J Phantom II (Kit #03941). Released in its current packaging in 2016 but tracing its tooling lineage to a Monogram mold cut in 1979, this kit forces a direct confrontation between the nostalgia of classic modeling and the expectations of the 2026 workbench.
Brief Overview
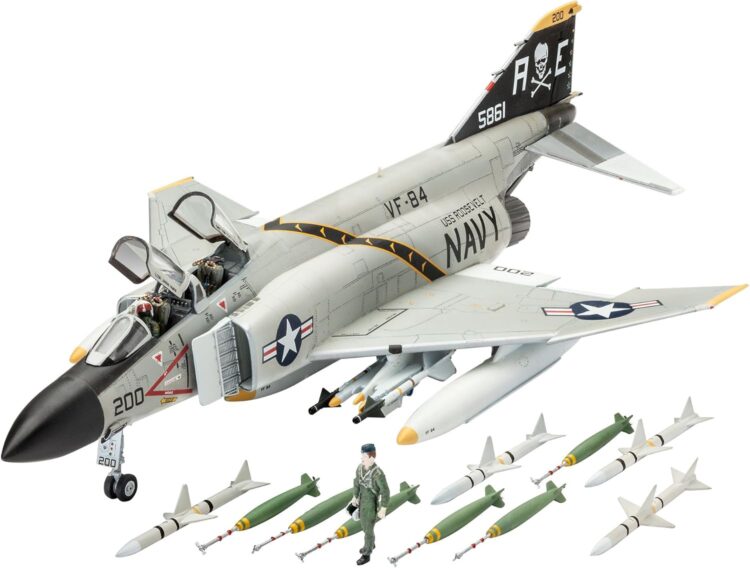
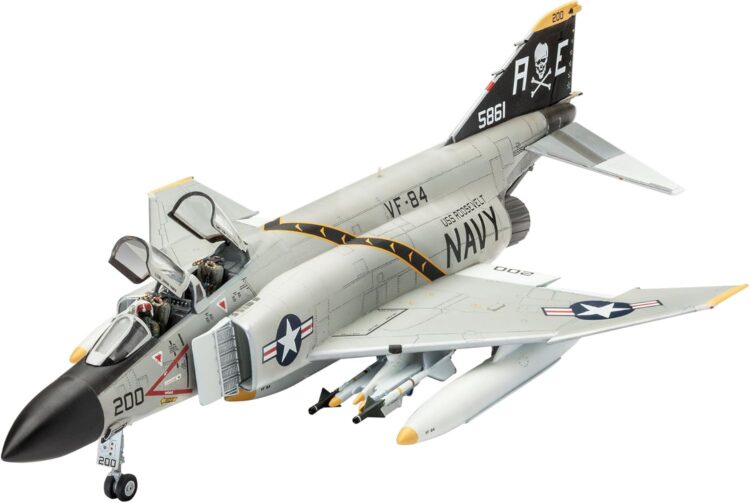
The Revell 1/72 F-4J Phantom II (Kit #03941) is a static injection-molded polystyrene kit replicating the definitive naval variant of the Phantom—the version that operated extensively during the later stages of the Vietnam War. The F-4J was a pivotal evolutionary step for the aircraft, introducing the pulse-Doppler AWG-10 radar system for look-down/shoot-down capability, upgraded J79-GE-10 engines producing 17,844 pounds of thrust each, and key aerodynamic refinements including a slatted tailplane and drooping ailerons to reduce carrier approach speed. Revell’s rendering assembles from 85 injection-molded polystyrene parts, producing a completed model measuring 245 mm in length with a wingspan of 164 mm.
Below is a quick-reference technical breakdown of the real aircraft:
| F-4J Technical Specification | Real-World Data |
| Primary Role | Carrier-Borne Interceptor / Fighter-Bomber |
| Powerplant | 2 × General Electric J79-GE-10 afterburning turbojets |
| Thrust (each engine) | 17,844 lbf (79.37 kN) with afterburner |
| Dimensions | Length: 58 ft 3 in (17.75 m) / Wingspan: 38 ft 5 in (11.71 m) |
| Maximum Speed | Mach 2.23 (1,485 mph / 2,390 km/h) at 40,000 ft |
| Service Ceiling | 71,000 ft (21,640 m) |
| Payload Capacity | Over 18,000 lbs (18,650 lbs max) on 9 external hardpoints |
| Primary Armament | 4 × AIM-7 Sparrow / 4 × AIM-9 Sidewinder |
Who Is This Kit For?
Designated “Level 3” in Revell’s internal difficulty system and marketed to builders ages 10 and up, this release targets the beginner-to-intermediate U.S. hobbyist—modelers returning after a hiatus, younger builders tackling their first serious military jet, or budget-conscious enthusiasts who want the iconic Phantom silhouette without the premium price tag of modern slide-molded alternatives.
Cool Features Worth Knowing
- Full Ordnance Suite, Out of the Box: The Revell 03941 includes a 600-gallon centerline drop tank, two 370-gallon underwing tanks, four AIM-7 Sparrow semi-active radar homing missiles, four AIM-9 Sidewinder infrared missiles, and multiple Mk.82 iron bombs. Purchasing equivalent weapons as separate aftermarket sets would easily exceed the cost of the base kit itself.
- World-Class Cartograf Decals: The 2016 reboxing’s standout upgrade: a full-color decal sheet from Cartograf of Italy covering the legendary VF-84 “Jolly Rogers” scheme (BuNo 155861, USS Franklin D. Roosevelt, Mediterranean, August 1970), featuring the iconic skull-and-crossbones tail art.
- Forgiving, Heavy-Gauge Polystyrene: The robust thickness of the parts—particularly landing gear struts and main wing assemblies—provides a highly forgiving canvas for novices still mastering solvent-based plastic cements and CA glues.
- Beginner-Friendly Cockpit Canvas: Raised instrument panel bezels and textured ejection seats create an accessible platform for practicing fundamental techniques such as dry brushing and localized pin washes, without the intimidation of microscopic pre-painted photo-etch (PE) parts.
→ Check Current Price & Availability on Amazon
The Value-to-Performance Ratio (The Build Experience)
Strip away the box art and the iconic subject matter, and the Revell 1/72 F-4J reveals a profoundly honest—and occasionally grueling—story of aged tooling confronting modern expectations. Evaluating the value-to-performance ratio demands a systematic deconstruction of the kit’s engineering, fit tolerances, surface detailing, and the specific construction challenges universally absent from the manufacturer’s marketing materials.
Tooling Age and the Reality of Flash
The molds for Kit #03941 were originally cut in 1979 under the Monogram label—an era defined by robust, thick plastic and dramatic surface texturing. Minor retools in the mid-1980s and eventual absorption into the Revell catalog in the 1990s never altered the fundamental architecture. After nearly half a century of high-pressure injection cycles, the steel tooling has degraded, and the evidence is visible the moment the box opens.
Flash is present on almost every component: the thin, unintended films of excess polystyrene that seep between mold halves during injection. Missile fins, wing trailing edges, and landing gear tire circumferences all carry it. Cleanup demands flush-cutting sprue nippers, an X-Acto #11 blade, and sanding sticks running from 400 to 1,000 grit—across every single part before any gluing begins. Ejector pin marks scar several visible surfaces, notably the interior faces of landing gear doors and missile pylons. Rectifying them requires solvent-based putties or two-part epoxy fillers followed by contour sanding. For the newcomer, this preparation volume is a steep, immediate learning curve. For the veteran, it is an expected but tiresome feature of legacy toolings.
The Scribing Challenge: Raised Panel Lines
Nothing divides opinion on this kit more sharply than its surface detailing. The entire airframe is covered in raised panel lines—the 1970s-era approach of engraving lines into the mold steel, which produces raised ridges on the plastic. Modern kits invert the process entirely: raised ridges in the steel yield realistic recessed channels on the model. The consequence for the finishing stage is significant.
Contemporary weathering relies on the pin-wash technique, where thinned enamel or oil paint is drawn by capillary action through recessed panel lines to simulate the accumulation of grime and hydraulic fluid. Raised lines cannot hold a wash; the pigment pools on either side of the ridge, creating an unnatural, sloppy appearance. Builders face a firm choice:
- Preserve and Dry Brush: Retain the raised lines and use a nearly dry brush loaded with a lighter shade of the base color to catch the tops of the ridges, simulating paint fading and structural panel highlighting. Seam sanding during assembly will obliterate raised detail along the fuselage spine and belly regardless, requiring targeted spot re-scribing.
- Full Re-Scribing: A master-level undertaking. Sand the entire airframe until the raised lines are reduced to faint ghost lines, then use Dymo tape as a straight-edge and a specialized scribing tool—such as the UMM SCR-01—to carve fresh recessed channels into the polystyrene. Errant scribe cuts must be filled with CA glue mixed with talc or sprue goo, sanded flush, and re-scribed. Riveting tools (pounce wheels) must then restore the thousands of structural fastener details lost during sanding.
For the beginner, raised panel lines represent a meaningful limitation on finishing options. For the apprentice looking to master surface modification, the thick, cheap polystyrene provides an unparalleled, low-risk training canvas.
Cockpit Layout and Forward Fuselage Assembly
The cockpit tub is adequately deep, with side consoles and rudder pedals molded directly into the floor. Instrument decals are included but bridge over raised bezels rather than conforming to them, guaranteeing silvering without aggressive Micro Sol application to chemically melt and shrink the carrier film. The Martin-Baker Mk.H-7 ejection seats are the cockpit’s most glaring omission: rudimentary renditions lacking survival harnesses, lap belts, and the iconic yellow-and-black face-curtain pull rings. Without intervention—aftermarket resin replacement seats, PE brass seatbelts, or scratchbuilt harnesses from masking tape and fine copper wire—the cockpit reads distinctly toy-like.
Alignment pins inside the fuselage halves are overly thick and prone to mold shift; relying on them produces a stepped seam. The standard solution is to amputate them cleanly with a hobby knife and rely on hand-alignment with thin plastic cement applied via capillary action. The clear styrene canopy is molded thick enough to cause optical distortion when posed closed, and fitting the forward windscreen gaplessly to the fuselage requires meticulous filling and sanding—with PVA canopy glue (such as Micro Kristal Klear) used exclusively to prevent solvent clouding of the clear parts.
Intakes, Wing Dihedral, and the Fuselage Join
The Phantom’s defining aerodynamic signature is its massive, angular engine intakes with boundary layer splitter plates and the pronounced 12-degree upward dihedral of the outer wing panels. This is where the Revell tooling shows its most severe limitations.
The intake splitter plates are virtually featureless and gap visibly against the forward fuselage—gaps that are both prominent and awkward to reach with standard sanding tools. More critically, the intake ducting terminates in a flat, blank wall of plastic barely an inch deep. The deep, cavernous trunking that should lead to visible J79 compressor fan faces is entirely absent. Correcting this requires either expensive aftermarket resin intake replacements—involving major surgical cuts to the fuselage—or scratchbuilt Foreign Object Damage (FOD) covers from styrene sheet or lead foil.
The most frustrating structural moment in the entire build arrives at the lower wing-to-fuselage join. Revell engineers the lower wing as a single massive piece spanning the full width of the aircraft. When the completed wing sub-assembly is offered to the fuselage, a massive stepped canyon appears along the ventral surface. Eliminating it demands plastic card shims, liberal applications of solvent putty or two-part epoxy filler (such as Milliput), and sustained, vigorous sanding—which obliterates all underlying raised detail and mandates extensive re-scribing to restore the surface. The separate outer wing panels, which represent the 12-degree dihedral, attach via vague connection points; cardboard or styrene jigs are required to hold the correct geometric angle while the cement cures.
Undercarriage, Exhausts, and Ordnance Suite
Wheel bays feature respectable molded-in structural ribbing but are compromised by deep ejector pin marks requiring careful filling in tight, confined spaces. The landing gear struts are thick and sturdy but lack the delicate refinements of modern kits—no distinct oleo scissors, hydraulic brake lines, or tie-down rings—driving advanced modelers to superdetail using fine lead wire or stretched sprue. The J79-GE-10 exhaust nozzles capture the general flared shape but lack the intricate overlapping internal petal detailing of the real engines. They are also molded in halves, generating a prominent seam bisecting the corrugated exhaust cylinder; removing it without destroying the surrounding texture is one of the build’s more tedious challenges, often prompting the purchase of aftermarket resin replacements.
Where the kit emphatically earns its keep is the ordnance provision. The full loadout—600-gallon centerline tank, two 370-gallon underwing tanks, four AIM-7 Sparrows fitting the recessed belly slots, four AIM-9 Sidewinders for the inboard pylons, and multiple Mk.82 iron bombs—represents genuine, substantial cost savings. Purchasing equivalent weapons from aftermarket resin or plastic manufacturers would easily exceed the price of the base kit. The mold seams on missile bodies and overly thick aerodynamic fins on the Sidewinders require scraping and sanding, but the weapons are usable out of the box.
Decals, Finishing, and the Weathering Process
The undeniable triumph of the 2016 Revell reboxing is the inclusion of a world-class, full-color Cartograf decal sheet. Cartograf is globally recognized as the premier decal manufacturer, known for perfect color registration, extremely thin carrier film, and dense color opacity. The sheet covers the markings for VF-84 “Jolly Rogers” (BuNo 155861) during its August 1970 deployment aboard the USS Franklin D. Roosevelt (CVA-42) in the Mediterranean—the striking yellow-and-black skull-and-crossbones tail art, high-contrast fuselage sashes, and an exhaustive array of microscopic maintenance stencils. The opacity of the Cartograf decals ensures the stark white national insignias do not bleed through when applied over the Light Gull Gray (FS 36440) camouflage.
Applying those premium decals over raised panel lines is, however, technically demanding. The model must first be sealed with a glass-smooth, impeccably even clear gloss coat—Future/Pledge floor polish or a dedicated modeling gloss lacquer—to prevent silvering. Once positioned over raised ridges, copious amounts of Micro Sol (or equivalent aggressive decal setting solution) must be applied to chemically melt the carrier film so it wraps tightly around the lines without tearing the intricate designs.
Weathering a raised-line Phantom inverts modern technique. Traditional pin washes pool unnaturally alongside raised ridges, so the primary weathering method is dry brushing: loading a wide, flat brush with a lighter shade of the base color, wiping nearly all the paint off on a paper towel, then dusting the airframe so pigment catches only on the raised lines, simulating paint wear and panel fading. For the underside—where operational carrier-based Phantoms accumulated heavy staining from hydraulic leaks, unburned JP-4 soot, and engine oil—advanced airbrushing techniques such as post-shading and dot filtering with artist’s oils must be employed to achieve a convincing, grimy appearance.
Pros & Cons
An objective evaluation of the Revell 1/72 F-4J Phantom II reveals a distinct division between its high economic value and its archaic technical execution:
| ✅ PROS (Builder Solutions) | ⚠️ CONS (Potential Dealbreakers) |
| World-Class Cartograf Decals: Flawlessly registered, highly opaque VF-84 “Jolly Rogers” markings—the standout quality upgrade in the 2016 reboxing. | Raised Panel Lines: Archaic surface detailing limits modern pin-wash weathering; forces dry brushing or a labor-intensive full re-scribing project. |
| Comprehensive Ordnance Suite: Sparrows, Sidewinders, drop tanks, and Mk.82 bombs all included—a major cost saving versus separate aftermarket weapons sets. | Severe Fit Gaps: The lower wing-to-fuselage join produces a massive stepped gap; intake splitter plates fit poorly against the forward fuselage. |
| Exceptional Budget Value: The lowest-cost entry into 1/72 Cold War interceptors; financial risk on a skill-building mistake is minimal. | Excessive Flash & Mold Wear: Decades of cycling mean heavy flash on nearly every part and prominent ejector pin marks in gear bays—inflating prep time significantly. |
| Ideal Scratchbuilding Canvas: Thick, cheap polystyrene makes it the perfect, forgiving platform for practicing scribing, gap filling, and modification techniques. | Featureless Intake Trunking: Engine intakes end in a blank wall barely an inch deep—no J79 compressor faces—requiring resin replacements or scratchbuilt FOD covers. |
Where the Revell 1/72 F-4J Phantom II Really Shines
Despite the raw volume of its engineering limitations, the Revell F-4J possesses a distinct, tactile appeal that resonates deeply with a specific ethos of the scale modeling community. This is not a kit you passively assemble. It demands engagement—grinding sanding sticks against the fuselage spine, troweling putty into the wing-root canyon, coaxing the massive Cartograf decals to melt over raised ridges. That struggle is precisely the point.
When a builder successfully closes those cavernous gaps with cyanoacrylate, perfectly blends the thick canopy to the fuselage using PVA glue, coaxes the Cartograf Jolly Rogers scheme to melt down over raised panel lines, and seals the airframe with a flawless matte clear coat, the resulting model is genuinely impressive. The skull-and-crossbones of VF-84 pops against the Light Gull Gray airframe with unmistakable visual authority. The imposing 245 mm Phantom—that characteristic drooping slab wing, four AIM-7 Sparrows nestled in the belly recesses, the massive engine intakes dominating the forward fuselage—commands a display shelf in a way that a smaller, cleaner kit never quite replicates. The satisfaction is earned, not handed over by modern slide-mold technology.
The Competitive Landscape: Benchmarking the 1/72 F-4J Market
To place the Revell kit accurately, it must be measured directly against its most formidable alternatives:
| Kit | Engineering Era | Surface Detail | Strengths | Weaknesses |
| FineMolds (FP43) | Modern (2021+) | Microscopic Recessed | Gold standard—perfect fit, full intake trunking, modular design, pilot figures | Highly expensive; zero ordnance included |
| Academy (F-4J) | Modern (2015+) | Crisp Recessed | Snap-fit tolerances, multi-color plastic, full ordnance included | Closed canopy only; large gear door attachment points; lacks fine seat harnesses |
| Hasegawa (P1) | Classic (1990s) | Fine Recessed | Highly accurate external shape, good overall fit, extensive variant coverage | Shallow cockpit tub; incorrect late J79 exhaust petals; hard to source; zero ordnance included |
| Revell (03941) | Vintage (1979/2016) | Raised Lines | Outstanding Cartograf decals, full ordnance, budget-friendly | Severe fit gaps, blank-wall intakes, heavy flash, raised panel lines |
In this ecosystem, the Revell kit cannot compete on precision, surface detail, or ease of assembly—it is outclassed by FineMolds in engineering, by Academy in buildability, and by Hasegawa in scale fidelity. Where it successfully defends its territory is purely within its value proposition: it is the only kit that packages raw plastic, a comprehensive weapons payload, and world-class Cartograf decals in a single, budget-friendly box. For specific buyer profiles, that combination remains unmatched.
→ View the Revell 1/72 F-4J Phantom II on Amazon
Who Should Buy It
Matching the right buyer to this kit requires candor. Because the Revell F-4J demands a specific, old-school modeling mindset, self-identification before checkout is essential.
The Skills-Building Apprentice
If you’ve successfully completed modern engineered snap-kits and want to cross the threshold into serious advanced modeling without committing significant funds to a premium slide-mold, this is your mandatory training ground. The Revell F-4J teaches panel-line scribing, large-gap elimination with CA glue and chemical accelerators, and silvering control with aggressive decal setting solutions—all on cheap, forgiving polystyrene where a catastrophic mistake carries minimal financial consequence.
The Nostalgic Veteran
If you grew up building Monogram kits in the 1980s and carry a deep fondness for the tactile, problem-solving nature of classic modeling, this kit provides a magnificent trip down memory lane. It heavily rewards traditional skills—gap filling, aggressive sanding, and dry brushing—and the outstanding 2016 Cartograf decals guarantee a finished result that looks vastly superior to anything achievable building this same tooling three decades ago.
The Budget Diorama Builder
Because the kit includes a massive array of Mk.82 bombs, Sparrow and Sidewinder missiles, and external tanks right out of the box, it provides immense value for builders constructing a heavily loaded Vietnam-era carrier deck diorama on a strict budget—without purchasing multiple expensive resin weapons sets.
Who Should Absolutely Avoid It
- The Rivet Counter (Advanced Modeler): If you demand microscopic recessed panel lines, seamless intake trunking, and accurately detailed J79 exhaust petals straight out of the box, this kit will frustrate in direct proportion to your standards. The money spent on aftermarket resin and photo-etch corrections will likely exceed the cost of simply purchasing the FineMolds FP43 at the outset.
- The Weekend Builder: If your goal is a relaxing, shake-and-bake project with Tamiya-like precision, look elsewhere. The sheer volume of flash removal, seam filling, and part preparation will send this kit directly to the Shelf of Doom.

Key Takeaways
- Exceptional Decals, Archaic Plastic: The 2016 reboxing pairs world-class, perfectly registered Cartograf decals for the legendary VF-84 “Jolly Rogers” with 1970s-era plastic burdened by raised panel lines, heavy flash, and ejector pin marks.
- High Effort Required: Achieving a competition-worthy finish demands intensive sanding, solvent-putty gap filling, and potentially a full re-scribing of the entire airframe.
- Full Ordnance Included: Unlike premium competitors FineMolds and Hasegawa, this kit ships with a complete payload of missiles, bombs, and drop tanks—a genuine, tangible cost advantage.
- Training Canvas, Not a Shake-and-Bake: Comprehensively outclassed in engineering by Academy and FineMolds, it serves as an unparalleled, budget-friendly platform for beginners to practice heavy modifications, scribing, and gap elimination.
- Beware the Intake and Wing Gaps: The blank-wall engine intakes (absent J79 compressor fan faces) and the massive stepped gap at the lower wing-to-fuselage join are the kit’s most severe structural challenges—and must be budgeted for in both time and materials.