
Precision locking tabs, self-locating subassembly points, and Tamiya’s legendary tolerances make this Wild Weasel the single smartest step-up kit for any beginner tackling a modern USAF jet.
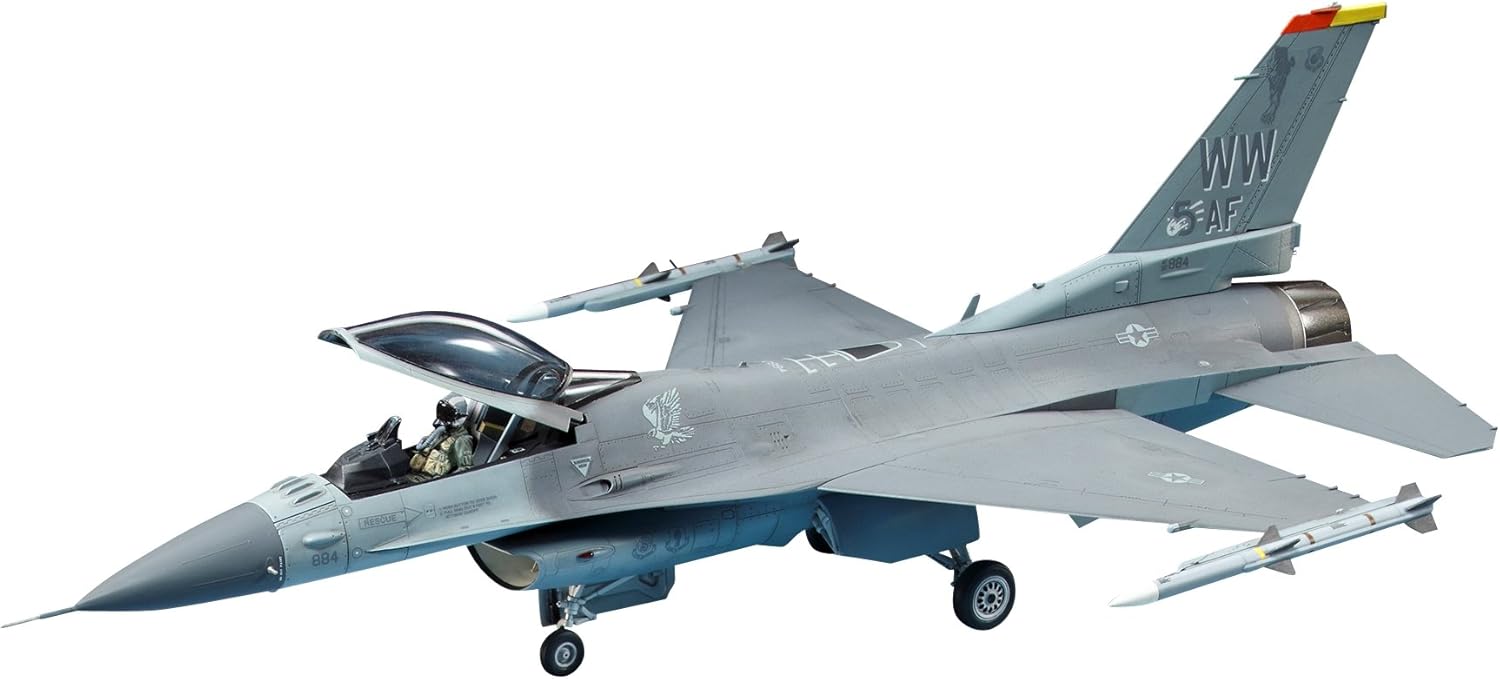
The F-16CJ Block 50 is the United States Air Force’s dedicated Wild Weasel aircraft, carrying the SEAD (Suppression of Enemy Air Defenses) mission that transferred from the F-4G Phantom II when that airframe retired in 1996. Armed with the AGM-88 HARM missile and guided by the AN/ASQ-213 HARM Targeting System pod mounted on the starboard intake trunk, the CJ variant flies into defended airspace ahead of the strike package to hunt and destroy enemy radar installations. For modelers navigating the crowded field of the best model airplane kits in this category, Tamiya’s 2014 TAM60786 release is the definitive 1/72 answer. It applies the same slide-molding technology used in the manufacturer’s acclaimed 1/72 F-35 Lightning II releases to produce a Wild Weasel replica of remarkable miniature fidelity.
Who Is It For?
This kit sits at a productive crossroads. For builders making the step up from snap-together starter sets, Tamiya’s precision-engineered tolerances act as a structural safety net. Experienced 1/72 scale collectors and dedicated F-16 enthusiasts will find the Block 50 airframe accuracy fully satisfying — specifically the post-CCIP upgrade details, including the four AIFF antenna blades forward of the canopy.
Key Features That Solve Real Problems
Full-length structural locking tabs at the wing root eliminate dihedral anxiety entirely — one of the most common failure points at this scale. The CCIP AIFF antennas (“bird slicers”) are rendered with crisp self-locating attachment points that remove all guesswork from fitting these delicate blades.
Check current availability and pricing on Amazon
Pros & Cons
Pros
- Hair-fine recessed panel lines and rivets rivaling those of many 1/48 scale kits — ideal for oil and enamel panel-line washes.
- Full-length structural locking tabs eliminate dihedral sag at the wing root, a common failure point at this scale.
- Slide-molded clear canopy accurately captures the F-16’s complex omega-profile curvature with no aerodynamic compromise.
- ACES II ejection seat rendered with genuine structural depth; raised instrument panel bezels respond cleanly to dry-brushing.
Cons
- Landing gear struts must be installed deep inside the wheel bays early in construction and locked permanently — creating a tedious masking challenge for the painter.
- Paint callouts in the instruction booklet reference only Tamiya proprietary sprays, requiring manual cross-referencing for modelers using other brands.
- Thick decal carrier film demands a pre-glossed surface and aggressive chemical setting solutions to prevent silvering and visible edge stepping.
- Unavoidable raised seam down the canopy’s longitudinal centerline requires scraping, wet-sanding, and polishing before installation.
In the Box & On the Bench
What’s in the Box: First Impressions
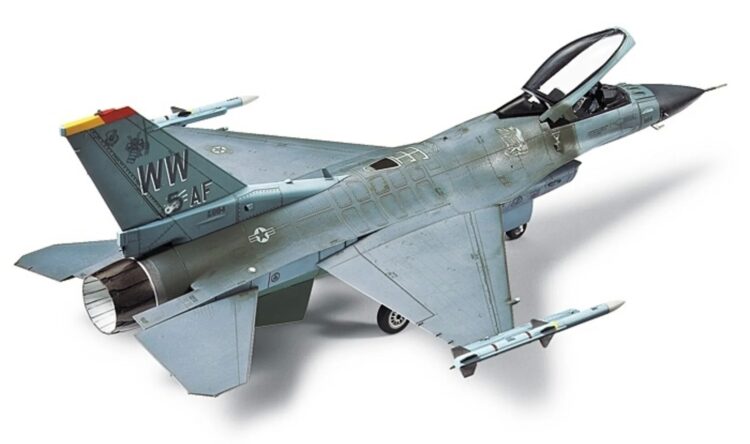
Opening the lid reveals five sprues of medium gray styrene and a sixth of water-clear plastic, delivering just under 100 parts in total. Flash is effectively absent. The sprue gates are a thoughtful detail in themselves — routed to hidden mating surfaces throughout, reducing the risk of marring the exterior during removal. The surface texture is immediately striking: crisp, consistent recessed panel lines track across every fuselage panel and wing bay. The decal sheet covers three distinct USAF tactical schemes: the 5th Air Force Commander aircraft at Misawa Air Base (tail code “WW”), the 52nd Fighter Wing Commander at Spangdahlem Air Base (“SP”), and the 20th Fighter Wing’s 79th Fighter Squadron Tiger Meet 2001 aircraft from Shaw Air Force Base (“SW”). A pilot figure in full high-altitude flight gear and a sheet of canopy masks round out the package. The masks, however, require manual cutting with a hobby knife before they are usable — a minor but real task that beginners should anticipate.
Cockpit, Airframe & Canopy Assembly
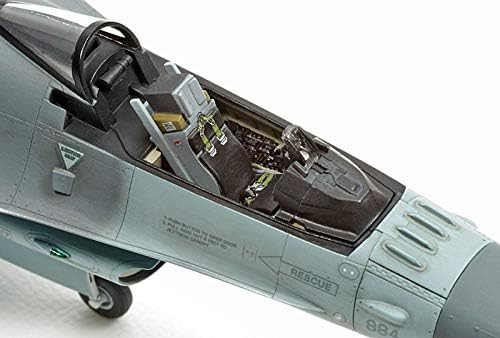
Construction begins in the cockpit. The ACES II ejection seat has genuine structural depth for this scale. The harness straps are omitted from the molding, but the raised instrument panel bezels pop cleanly when dry-brushed. The completed tub drops into the fuselage without interference.
The F-16’s distinctive chin intake went together faster than expected. The trouble is dimensional: the intake trunk terminates at a blanking plate just over an inch inside the mouth. That shallow depth leaves a visible internal seam that is genuinely difficult to sand before assembly closes around it. It is a known cosmetic compromise, engineered to sidestep the severe fit problems common to Kinetic and Hasegawa intakes at this scale.
Then the landing gear sequence lands its first complication. The instructions require inserting the delicate main struts deep inside the wheel bays before a body-colored locking plate seals them permanently into the lower fuselage. There is no workaround. From that point, painting the dark gray airframe around pre-installed white struts means exhaustive masking of two already-tight bays. Capillary action from thin cement is a real hazard at this stage — keep applications minimal and deliberately placed. The model is locked into a gear-down configuration regardless.
The wing-to-fuselage attachment is where Tamiya earns the reputation back. Full-length locking tabs engage with a satisfying, decisive click and hold dihedral without clamps, pins, or patience. The four AIFF antennas — the blade-like protrusions that identify this as a post-CCIP Block 50 airframe — snap onto clean, self-locating attachment points without drama.
The canopy is the build’s most demanding step. Slide-molding captures the omega-profile curvature of the real aircraft’s polycarbonate bubble with absolute fidelity. An unavoidable raised seam runs down the longitudinal centerline. Removing it is non-negotiable. The technique: carefully scrape the raised plastic with the curved edge of a #10 scalpel blade, then wet-sand progressively through micro-mesh pads from 1000 up to 12000 grit, then restore optical clarity with a polishing compound. Skip any stage and the seam will telegraph through every finish coat.
On ordnance: the base TAM60786 boxing includes only two AIM-9M Sidewinders and two AIM-120C AMRAAMs. No underwing pylons, no 370-gallon wing fuel tanks, and — critically for a Wild Weasel build — no AGM-88 HARM missiles and no AN/ASQ-213 HTS targeting pod. The TAM60788 “Full Equipment” boxing addresses this directly. It adds the full HARM loadout, the HTS pod, the AN/AAQ-33 Sniper XR targeting pod, the AN/ALQ-184 ECM pod, AIM-9X advanced Sidewinders, and wing fuel tanks. Builders intending a SEAD combat configuration should factor this into the purchase decision.
Painting, Decals & Finishing
The primary F-16CJ scheme is a three-tone tactical camouflage: FS36118 Gunship Gray on the upper fuselage and wing surfaces, FS36270 Medium Gray on the mid-fuselage flanks, and FS36375 Light Ghost Gray on the undersurfaces — a tight tonal range that rewards precise airbrush control and clean masking lines. One constraint is immediate: the instruction booklet references only Tamiya’s proprietary aerosol line (AS-10, AS-26, AS-27). Builders using Vallejo, AK, or Gunze must manually cross-reference against federal standard color charts before priming.
Surface detail preservation is the critical constraint throughout the painting sequence. The recessed panel lines and rivets are exceptionally fine. A single pass of heavy automotive primer will fill them permanently. Highly thinned lacquers or micro-fillers built up in multiple translucent coats are the only safe approach. The Have Glass V RAM coating scheme (FS36170) presents an additional challenge: the real surface exhibits a gritty metallic sheen that shifts between dark gray and bronze under changing light. Replicating it requires bespoke mixtures — a 50/50 blend of Tamiya XF-24 Dark Gray and XF-56 Metallic Gray thinned 60:40 with Tamiya X-20A thinner produces one reliable approximation; others find a subsequent mist of Alclad Magnesium or specialized Hataka blue-line varnishes achieves a comparable result.
The decals are vibrant and perfectly registered across all three marking options. The carrier film, however, is noticeably thick. Applied to bare plastic, edges will step visibly and silvering is a near certainty. The fix is straightforward but adds bench time: lay a full gloss clear coat over the airframe first, then apply Micro Set on contact, followed by Micro Sol to chemically settle the film down into the engraved lines. The stencils are complex and numerous; rushing them risks tearing or misaligning the carrier directly over the finest rivet detail.
Where the Tamiya 1/72 F-16CJ Really Shines
There is a particular kind of satisfaction the Tamiya F-16CJ produces — the mechanical confidence of knowing every part will find its home without being forced. That is not a universal experience in this hobby at any scale. It is genuinely rare at 1/72.
When the blended wing-body of the Viper starts to emerge from the bench, the silhouette locks in fast. The shape reads immediately and unmistakably as an F-16. No remedial filler passes, no clamps, no prayers for alignment. Tamiya has removed the structural punishment from the learning curve so the modeler’s energy stays where it belongs — on detail, color, and finish.
For a beginner, that experience is genuinely formative. The kit teaches good habits through its design: sequence deliberately, test-fit before cementing, paint sub-assemblies separately when possible. And the result is a shelf-worthy Wild Weasel replica that looks like serious bench work, because it is. The difference is that the engineering worked with the builder instead of against them.
The completed model carries real authority. The F-16CJ is not a trainer or a peripheral airframe — it is USAF combat hardware with a lineage rooted in some of the most dangerous strike missions ever flown. The Tamiya tooling honors that with exacting surface detail, an accurate post-CCIP Block 50 airframe, and a finished presence on the shelf that no competitor at this scale currently matches.
See current pricing and availability on Amazon
Who Should Buy It
Buy It If…
You are ready to graduate from your first or second kit and want a modern USAF jet that rewards careful work without punishing structural mistakes. This is the right pick for beginner modelers who want to move past basic assembly and experience what premium injection molding actually feels like at the bench. It is also an essential choice for 1/72 scale collectors building a modern USAF lineup — no competing tooling replicates the CCIP Block 50 airframe at this accuracy level. Dedicated F-16 enthusiasts wanting a clean parked or air-show configuration will find the base TAM60786 boxing fully sufficient.
Skip It If…
You need an exposed engine compressor tunnel, opened avionics bays, or drooped flaperons — none of those display options exist in this tooling. Builders committed to a fully loaded SEAD combat configuration should budget specifically for the TAM60788 “Full Equipment” boxing rather than sourcing HARM missiles and the HTS pod separately. And if 1/48 scale cockpit depth is what you are after, this 1/72 tooling — excellent as it is — will leave that expectation unmet.

Key Takeaways
- Tamiya’s precision engineering delivers class-leading fit at 1/72 scale, eliminating the need for complex gap-filling or heavy sanding.
- The surface detail is genuinely fine; highly thinned paints are mandatory to preserve the panel lines and rivets.
- Mandatory early landing gear installation creates a real masking challenge — plan the painting sequence before construction begins.
- The base TAM60786 boxing lacks HARM missiles and the HTS pod; the TAM60788 “Full Equipment” boxing is the correct choice for a Wild Weasel SEAD build.
- For beginner modelers ready to step up, this kit sets the benchmark for 1/72 modern-jet construction.