
Is this movie tie-in a legitimate entry point into 1/48 scale jets, or just promotional shelf filler? Here’s what to expect.
The roar of Top Gun: Maverick did more than shatter box office records—it pushed a new generation of enthusiasts toward the workbench, many of them searching for Pete Mitchell’s F/A-18E Super Hornet in kit form. That search almost inevitably leads back to the same dilemma: the intimidating parts count and engineering demands of premium jet toolings versus simplified starter kits that leave experienced eyes cold. Revell’s 1/48 Maverick’s F/A-18E Super Hornet (Kit #85-5871) is a deliberate attempt to bridge that gap.
For newcomers navigating the transition into larger-scale jets, sorting through the best model airplane kits is an exercise in managing expectations. This specific tooling promises the prestige of a fully detailed 1/48 scale subject—built around one of modern cinema’s most recognizable aircraft—without the paralyzing parts count that typically accompanies modern jet kits. What follows is an unvarnished verdict on the kit’s actual buildability, engineering tolerances, and overall value for the aspiring scale modeler.
Brief Overview
| Quick Specs | Revell 1/48 Maverick’s F/A-18E Super Hornet |
| Kit Number | 85-5871 / 03864 |
| Scale | 1/48 |
| Parts | 161 (light gray styrene + clear sprue) |
| Completed Length | Over 15 inches |
| Wingspan | 11.18 inches |
| Skill Level | Level 5 (Advanced/Expert — Revell’s highest) |
| Decals | Cartograf-printed (BuNo 165667 / 165636 markings) |
| Ordnance Included | MK83 bombs, AIM guided weapons, centerline fuel tank |
| Manufacturer | Revell |
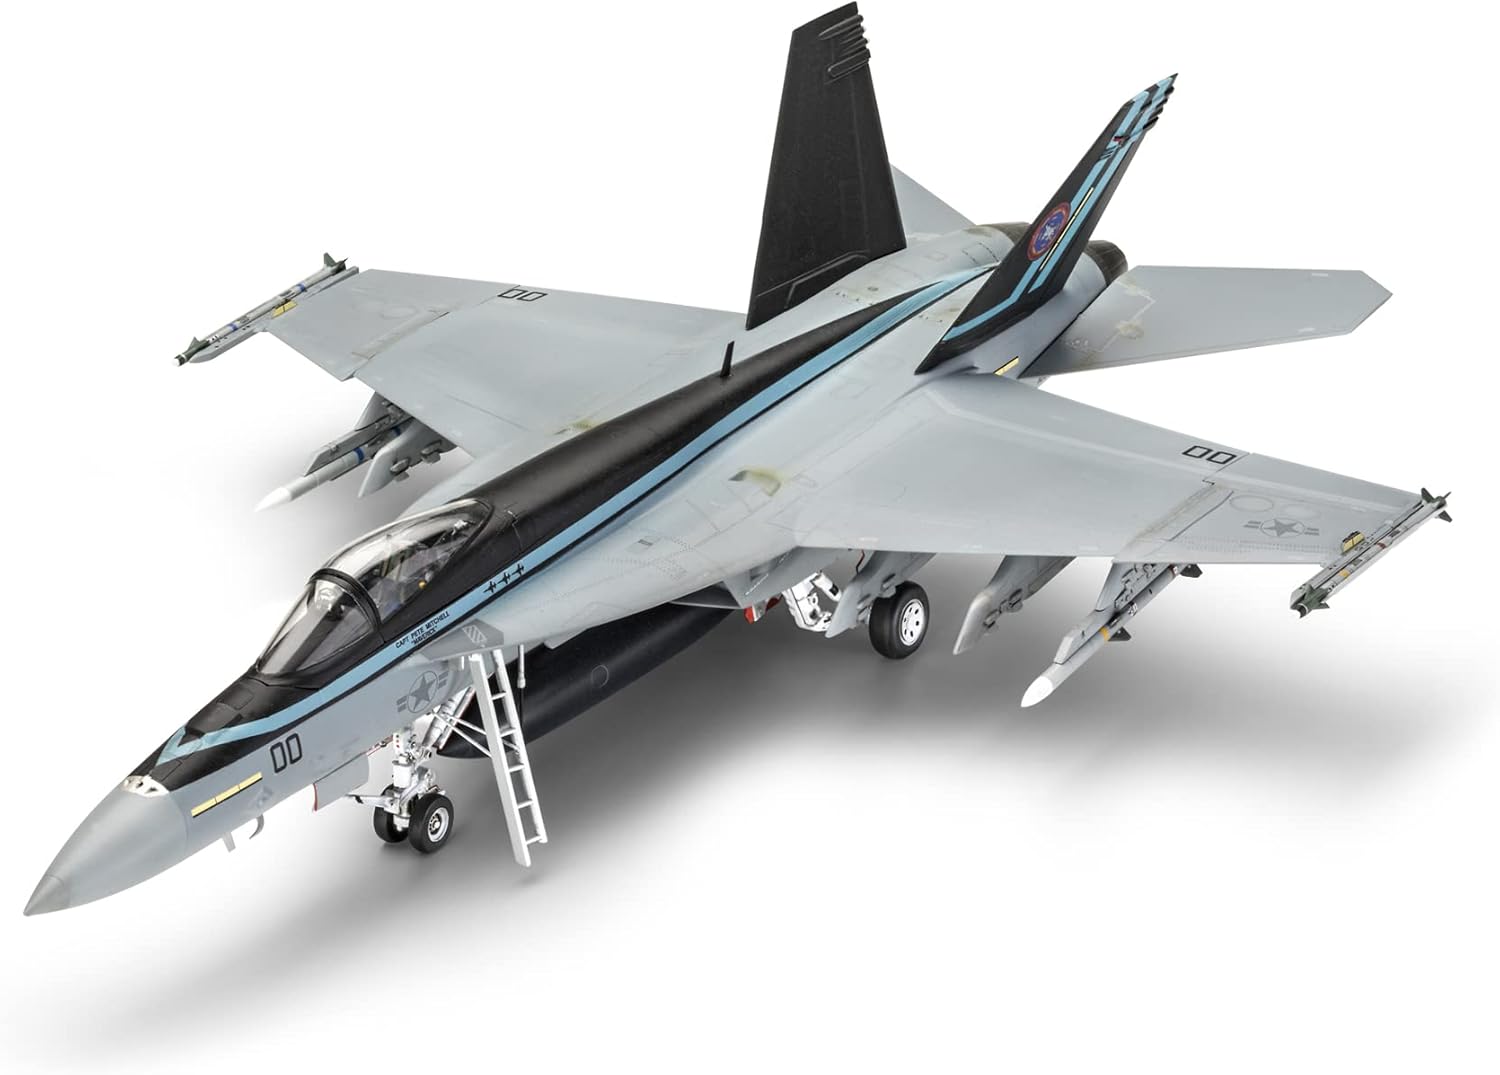
The Revell 1/48 Maverick’s F/A-18E Super Hornet (Kit #85-5871) is a traditional injection-molded polystyrene kit tied directly to the blockbuster film. It replicates the single-seat F/A-18E—the narrative hero aircraft—and delivers a completed model stretching over 15 inches in length with an 11.18-inch wingspan. This is a substantial physical footprint, and the 1/48 scale payoff is immediately apparent straight out of the box.
Despite its official Level 5 rating, this kit is one of the more approachable entries at that tier — a deliberate design choice that makes it a realistic stretch goal for an aspirational beginner or returning intermediate builder willing to invest in a multi-session project. It is the ideal stepping stone for builders graduating from smaller 1/72 scale projects who want a manageable introduction to the complexities of 1/48 scale modern jet aircraft without suffering assembly fatigue or being buried under subassembly overload.
Three Features That Define the Kit’s Appeal
Movie-accurate Cartograf decals. The decal sheet is printed by the renowned Italian firm Cartograf and accurately captures Pete Mitchell’s striking blue-striped livery, MiG-28 kill markings, and BuNo 165667/165636 stenciling. For a beginner, having a premium decal sheet that eliminates silvering and beds cleanly into panel lines with standard setting solutions is not a minor convenience—it is a genuine competitive advantage over kits with substandard decal printing.
A 161-part count that actually works in the builder’s favor. While experienced modelers might reach for kits approaching 300-plus parts, the beginner requires a streamlined assembly process that prevents projects from being permanently relegated to the “Shelf of Doom.” At 161 pieces, the kit avoids assembly fatigue while still delivering a highly satisfying display result. The simplified engineering is a deliberate design choice, not a cost-cutting shortcoming.
Subject prestige at a dominant display scale. At 1/48 scale, the completed Super Hornet demands attention on any shelf. The cultural weight of the Top Gun franchise amplifies that further: building the specific aircraft that Pete Mitchell flew in the film gives this kit a conversational gravity that few entry-tier subjects can match.
Pros & Cons
| Pros | Cons |
| ✓ Premium Cartograf decals perform flawlessly with standard setting solutions; no aftermarket sheet required | ✗ Intake trunking fit is poor; gap-filling with solvent putty, wet-sanding, and panel line rescribing required |
| ✓ Budget-friendly market positioning vs. premium alternatives at a fraction of the cost | ✗ Dorsal spine behind the cockpit molded slightly too flat versus the actual aircraft contour |
| ✓ 161-piece count prevents assembly fatigue; accessible without sacrificing display payoff | ✗ AIM-9 Sidewinder wingtip missiles exhibit soft molding; definition is noticeably inferior to premium kits |
| ✓ Sturdy, molded-in landing gear bay hydraulic lines respond exceptionally well to a simple dark wash | ✗ Integrated inner wing can warp out of the box; clamping during cement cure is mandatory |
| ✓ Instructions are logically sequenced with practical, non-proprietary paint callouts |
Kit Assessment: Under the Hood
Box Contents & First Impressions
Opening the rigid top-opening box reveals sprues molded in light gray styrene alongside a single clear sprue for the canopy. First impressions are generally positive: the plastic is smooth, and the recessed panel lines are engraved with enough depth to accept a pin wash cleanly during the weathering phase. Some minor flash is present along part edges—a thin film of excess plastic caused by imperfect mold alignment—but it is easily trimmed with a standard #11 hobby blade. Nothing here gives pause, and the overall molding quality is consistent with the kit’s market positioning.
Cockpit & Interior
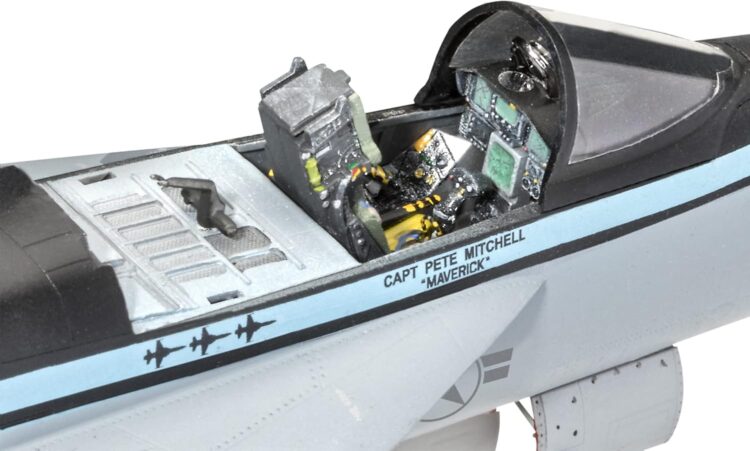
The cockpit is engineered with the novice squarely in mind. Revell forgoes complex photo-etched (PE) metal parts entirely and instead relies on raised plastic details combined with decals for the side consoles and Multi-Function Displays (MFDs). Usefully, the decals include both “on” and “off” screen options, allowing the builder to customize the display state. The NACES ejection seat is a four-part assembly with molded-in harnesses—simple and durable.
An advanced modeler might well reach for a resin aftermarket seat from a supplier such as QuickBoost, or supplement the tub with a Brassin photo-etch set. For a beginner building out of the box (OOB), however, the cockpit paints up convincingly for a closed-canopy display. The simplified approach also carries a practical benefit: it relies entirely on standard plastic cement rather than the cyanoacrylate (CA/superglue) and accelerator combinations that resin and PE integration demand. Attach the clear canopy with PVA-based canopy glue or watchmaker’s cement rather than standard plastic cement or CA glue, both of which will cause crazing — a permanent chemical fogging of the clear parts.
Airframe Assembly & Parts Fit
Airframe assembly is where the real-world utility test reveals the kit’s primary friction points. The joining of the main fuselage halves is largely straightforward. Thin liquid plastic cement—applied by touching a brush loaded with extra-thin solvent to the held-tight seam—wicks cleanly down the joint via capillary action and chemically fuses the polystyrene with minimal drama.
The intake trunking, however, demands patience and technique. Dry-fitting—the essential practice of test-assembling parts without adhesive to check alignment before committing—immediately reveals a distinctly poor fit where the lower intake cowls meet the fuselage. Eliminating these gaps requires the application of solvent-based filler putty. Once cured, the area must be carefully wet-sanded to restore the aerodynamic contour. Because sanding invariably obliterates the surrounding recessed panel joints, the builder must subsequently employ scribing tools to re-cut the lost lines. It is a multi-step remediation process that the product’s entry-level positioning arguably undersells.
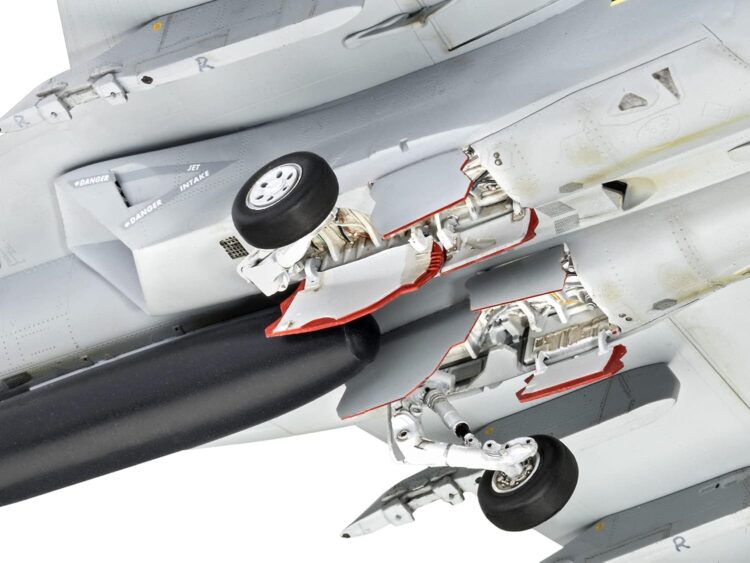
The integrated inner wing design is another watch-out: it can exhibit slight warping straight out of the box. The fix is effective but requires discipline—clamp the wing roots firmly in correct alignment while the plastic cement fully cures. Builders who skip the clamps risk a permanent set in the wrong geometry. The landing gear bays, by contrast, are a kit highlight: sturdy, molded-in hydraulic lines and electrical cabling that look excellent after a single dark wash and will not snap off during handling.
Decals & Markings
The Cartograf-printed decal sheet is the kit’s single strongest asset. It accurately captures the complex blue dorsal striping, national insignia, and the specific BuNo 165667/165636 stenciling of Mitchell’s hero jet—including the “Capt. Pete ‘Maverick’ Mitchell” lettering beneath the canopy rails and the three MiG-28 kill markings referencing the original 1986 film. Before laying down any decals, the entire airframe benefits from a smooth gloss coat — Pledge Floor Gloss (formerly Future) is a proven, inexpensive acrylic option widely used by U.S. modelers as a pre-decal barrier. The carrier film is appropriately thin, and when treated with standard decal setting solutions—Micro Set to prepare the surface and Micro Sol to soften and settle the film—the markings snuggle down into the recessed panel lines precisely. No aftermarket decal sheet is required or recommended.
Instructions
Revell’s instruction manual is logically sequenced and well-illustrated throughout. The paint callouts are practical and avoid the trap of specifying only proprietary mixes or obscure paints from a single brand, which significantly lowers the barrier to entry for newcomers who may not yet maintain a deep paint inventory. Step sequencing follows a sensible build-order logic. For a beginner, this manual is a genuine guide rather than an afterthought.
Where the Revell 1/48 Maverick’s F/A-18E Super Hornet Really Shines
Pull the masking tape from the canopy after the final matte clear coat cures and what stares back is a completed model with a massive, aggressive physical presence. At over 15 inches in length, with the distinctive dark and light blue dorsal stripes cutting across the low-visibility gray airframe and the modex “00” markings correctly placed, the finished Super Hornet dominates its shelf. This is not a model that hides in the corner of a display case. The subject and the scale combine to produce a centerpiece—one that looks considerably more expensive than the kit’s budget-friendly market positioning implies.
For the beginner, this kit delivers something that cannot be overstated: the ability to actually reach the finish line. The engineering choices throughout are deliberately aimed at keeping the builder moving forward. The simplified cockpit removes the anxiety of PE brass and CA glue. The 161-part count prevents the project from sprawling into an indefinite work-in-progress. The landing gear bays—often a nightmare of fragile, fiddly struts in more complex toolings—feature sturdy, molded-in hydraulic lines that look sharp after nothing more sophisticated than a thinned dark enamel pin wash. The instructions do not leave the builder stranded. These are not accidental virtues; they reflect a considered design brief aimed at the precise market this kit serves.
Ultimately, it is the subject that elevates the entire experience. The Boeing F/A-18E Super Hornet is not an obscure prototype or a footnote in aviation history—it is the frontline U.S. Navy strike fighter, tied here to one of the most successful films of the past decade. Building Pete Mitchell’s specific hero jet—with its unmistakable blue-striped livery, kill markings, and modex “00”—gives the finished model a cultural and historical authenticity that a generic gray jet simply cannot match.
Ready to Build? Check Availability on Amazon
Who Should Buy It
Ideal Buyer Profiles
- The brand-new modeler taking a first step into 1/48 scale jets. The manageable 161-piece count, plastic-only assembly, and clear instructions make this a sound introductory platform for builders graduating from smaller 1/72 scale projects.
- The casual builder prioritizing a smooth finish over historical exactness. If the goal is a visually impressive shelf piece achieved in a realistic timeframe—rather than a contest-level build measured in months—this kit is the correct level of complexity.
- The Top Gun: Maverick fan. The Cartograf decal sheet’s accuracy in replicating the specific BuNo markings, kill markings, and blue dorsal striping of Mitchell’s hero jet makes this the obvious choice for franchise enthusiasts who want a physical representation of the film’s centerpiece aircraft.
- The gift buyer. The accessible parts count and highly forgiving decal sheet make this an outstanding gift for a teen or young adult with an established interest in aviation or the film franchise, particularly for builders making the transition from snap-together kits into traditional glued-and-painted styrene construction.
Who Should Look Elsewhere
- Experienced modelers and competition builders. The flattened dorsal spine behind the cockpit and the soft molding on the wingtip AIM-9 Sidewinders will register immediately with experienced eyes. For Best of Show aspirations, the Meng LS-012 or the Hasegawa 07239 toolings are the appropriate premium alternatives.
- “Rivet counters” and accuracy-focused builders. Modelers who require dropped flaps and slats for a carrier-deck configuration, or who plan extensive aftermarket photo-etch and resin upgrades, will find the Revell tooling a limiting foundation. The kit’s fixed flight surfaces and basic cockpit tub are engineering concessions made for the entry-level market, not omissions that aftermarket work can fully compensate for.

Key Takeaways
- Value-to-Performance: Delivers a large-scale, movie-accurate Super Hornet at a budget-friendly price point competitive alternatives cannot match at this entry level.
- Skill-Level Fit: Officially Revell’s most challenging Level 5 tier, but engineered with a streamlined 161-piece count that makes it a realistic stretch goal for committed beginners stepping up from simpler builds.
- Standout Strength: The premium Cartograf decal sheet ensures flawless, film-accurate Top Gun: Maverick markings without the risk of silvering.
- Primary Caveat: Intake trunking fit is the kit’s most significant friction point; expect dedicated putty work, wet-sanding, and panel line rescribing.
- Bottom Line: A rewarding, accessible build for its intended audience. Advanced modelers should consider premium-tier alternatives.