
That ugly gap between the wing and fuselage can undo weeks of careful work—but it doesn’t have to. Here’s the foolproof, step-by-step system for diagnosing and eliminating every size of wing root gap on any plastic kit.
The Gap That Haunts Every Build
You spend weeks on a kit. The cockpit is finished, the fit looks tight during assembly, and you lay down a coat of primer—only to find a shadow running the entire length of the wing root. The gap was there all along, hiding under the bare plastic, and now it’s the first thing anyone sees. If you’ve ever Googled “how to fix wing gaps scale model,” you already know this feeling. And you’re not alone.
Wing-to-fuselage gaps are one of the most common frustrations in plastic scale aircraft modeling, and they stem directly from the physics of how injection-molded kits are manufactured—not from any failure on your part. Even top-tier kits from Tamiya, Hasegawa, Revell, and Airfix carry some degree of built-in dimensional tolerance. The gap is a feature of the process, not a flaw in your technique.
The good news: every size of wing root gap has a reliable, proven fix. By the time you reach the bottom of this guide, you’ll have a complete diagnostic and repair system—from closing microscopic hairline fissures with liquid cement to bridging wide structural gaps with styrene strip. Work through it once, and the approach becomes second nature on every kit that follows.
 Why Wing-to-Fuselage Gaps Form in the First Place
Scale plastic kits are manufactured by injecting molten High Impact Polystyrene (HIPS) into precisely machined steel or beryllium copper molds under extreme pressure. As the polystyrene cools and transitions from liquid to solid, microscopic thermal contraction occurs. This inevitable material shrinkage creates built-in dimensional tolerances, making a perfectly flush wing root fit a mathematical near-impossibility straight from the box.
Older toolings vs. modern kits. The severity of those tolerances depends heavily on when and how the molds were engineered. Toolings from the 1960s and 1970s suffer from mold degradation and the inherent imprecision of analog drafting, which often produces substantial gaps. Modern kits designed using Computer-Aided Design (CAD) and Computer Numerical Control (CNC) milling—like those from Tamiya, Hasegawa, and Eduard—exhibit far superior fitment. No kit, however, is entirely immune to some degree of geometric divergence.
The assembly variable. Beyond manufacturing tolerances, assembler technique is a primary cause. Rushed gluing before the upper and lower wing halves are fully aligned, skipping the dry-fit, or failing to apply adequate clamping pressure during cure all contribute to dihedral distortion and seam separation. These are entirely preventable—and the first step in this guide addresses them directly.
Why it matters beyond aesthetics. On a real aircraft, wing-to-fuselage fairings are precision-engineered to minimize interference drag. The join is smooth, flush, and aerodynamically seamless. A visible gap on a scale replica shatters that illusion, destroying the model’s aerodynamic silhouette and undoing every other detail you’ve carefully built up.
What You’ll Need: Tools & Materials Checklist
Gather these materials before you begin. Having the right product for each gap classification is the difference between a clean repair and a fill that cracks in three days.
For closing hairline gaps:
- Tamiya Extra Thin Cement or Revell Contacta Professional (capillary-action solvent cement)
- Rubber bands, binder clips, or modeling clamps for sustained clamping pressure
For filling medium gaps:
- Tamiya Basic Type Putty (gray) or Squadron White Putty — solvent-based, widely available from US hobby retailers
- Perfect Plastic Putty or Vallejo Plastic Putty — water-based wipe-off option for tight, concave wing roots
For surface skim-coating and micro-filling:
- Surfacer 500 (Gunze/Mr. Hobby) — liquid micro-filler; apply as a final skim coat over sanded putty to fill micro-scratches and pinholes
For bridging wide structural gaps:
- Evergreen Scale Models styrene strip stock — available in 10, 20, and 30 mil thicknesses
- Heavy-gauge sprue or brass tubing — for internal spreader-bar applications
For surface refinement and inspection:
- Sanding sticks in 220, 400, 600, and 800 grit; wet/dry abrasive paper in 1000 grit for final polishing
- Tamiya Fine Surface Primer (lacquer-based) or Mr. Surfacer 1200 — for the diagnostic reveal coat
- Dymo embossing tape or Tamiya masking tape — as a rigid straight-edge guide for panel line re-scribing; dedicated scribing tool (Tamiya scriber, Olfa P-cutter/Olfa 450, Bare Metal Foil scriber, or UMM-USA tool) or a No. 11 blade tip
How to Fix Wing Gaps on a Scale Model: Step-by-Step
Step 1: Always Dry-Fit Before You Glue
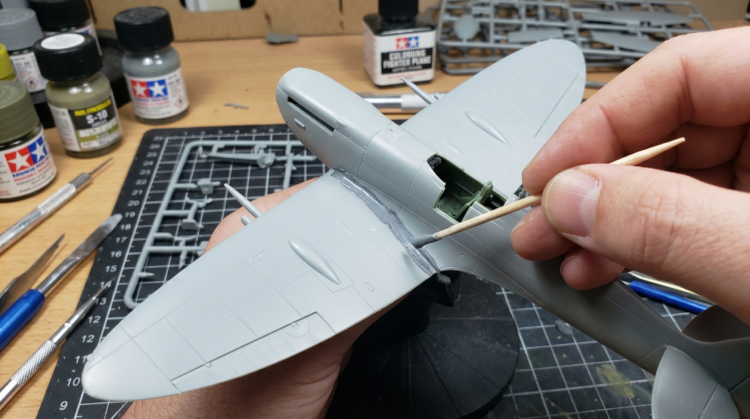
Before a drop of cement touches your kit, mate the wing to the fuselage without any adhesive and examine the full perimeter of the wing root join—upper surface, lower surface, leading edge, and trailing edge. A high-intensity flashlight directed from the opposite side of the join is the most reliable diagnostic tool available: light leaking through the joint reveals the precise location and topology of every gap, including ones you’d never catch under normal room lighting. Most gaps can be reduced substantially, or eliminated entirely, at this stage by adjusting part alignment before any glue is involved. Skipping the dry-fit is the single most common cause of preventable wing root gaps.
Step 2: Classify the Gap
Not all wing gaps are created equal. Selecting the correct intervention agent before you act saves time, materials, and the frustration of watching a fill crack or sink a week later. Measure or visually estimate the gap width and match it to one of three categories:
- Hairline gap (under 0.5mm): A microscopic fissure. Solvent cement and pressure alone will close it.
- Medium gap (0.5mm–1.5mm): Requires the introduction of external volume. Solvent-based putty is the go-to.
- Wide structural gap (over 1.5mm): A severe geometric separation. Requires mechanical shimming or internal spreading before any surface fill can succeed.
Step 3: Close Hairline Gaps with Liquid Cement
Tamiya Extra Thin Cement and Revell Contacta Professional are not adhesives in the conventional sense. They are highly volatile organic solvents—primarily a blend of butyl acetate and acetone—that temporarily dissolve the polystyrene lattice on both faces of the join.
Hold the parts firmly together and touch the brush applicator to the seam. Capillary action draws the fluid rapidly along the entire length of the gap. Apply firm, continuous finger pressure for 30 to 60 seconds. The dissolved plastic faces fuse together; as the solvent flashes off and evaporates, the polystyrene re-hardens into a continuous, seamless weld. Any tiny bead of molten plastic that squeezes out of the joint sands flush cleanly, acting as its own localized filler. Allow the join to cure fully—a minimum of 30 minutes, but overnight is always the safer choice. This technique only works on true hairline gaps. Never attempt to bridge a gap wider than 0.5mm with liquid cement alone.
Step 4: Fill Medium Gaps with Plastic Putty
Solvent-based putties—Tamiya Basic Type Putty, Squadron White Putty, or Squadron Green Putty—are the historical standard for medium gaps. Their chemical base of toluene and acetone bites into the surrounding styrene, creating a highly durable bond. That same chemistry, however, also produces inherent volumetric shrinkage as the solvents evaporate. Thick, single applications will skin over on the surface while the lower strata remain uncured, trapping solvents and ultimately cracking, lifting, or continuing to shrink for days.
The correct technique: massage the tube before use to reintegrate any separated chemicals, then apply a whisper-thin layer directly into the gap using a toothpick or spatula, slightly overfilling. Let it cure fully—overnight is the benchmark. Sand back progressively using 220-grit to remove bulk, 400-grit to establish the final contour, 600 to 800-grit to restore a smooth surface, and a final wet-sanding pass with 1000-grit to polish the plastic to a near-gloss finish before priming. Check your progress periodically with a fingernail dragged across the transition between putty and plastic: it should feel completely seamless.
For tight, concave wing root fillets where sanding access is limited, water-based acrylic putties such as Perfect Plastic Putty (PPP) or Vallejo Plastic Putty offer a compelling alternative. These products are entirely odorless, contain no aggressive organic solvents, and eliminate the risk of damaging adjacent details. Force the putty into the gap with a spatula, then—before the acrylic polymer cures—wipe the excess cleanly away with a water-dampened cotton swab. The result is a self-leveling fill confined entirely within the seam, with no sanding required. Note that water-based putties rely on mechanical adhesion rather than a chemical bond to the styrene, so they can crumble under aggressive dry-sanding or re-scribing. They also exhibit higher volumetric shrinkage as the water evaporates, often requiring a second application for a truly flush finish.
Final skim coat: Once the primary fill is sanded flush, a thin application of Mr. Surfacer 500 over the entire repaired area fills any micro-scratches and minor pinholes left by the abrasives, providing a cleaner surface for the diagnostic primer step that follows.
Step 5: Bridge Wide Structural Gaps
For gaps exceeding 1.5mm, no amount of putty will hold. Applied over that kind of void, solvent putty will crack, sink, or fail entirely as it cures. The geometry of the gap must be mechanically resolved before any surface-level chemistry begins. Several techniques address this reliably, from mechanical bridging to advanced chemical methods — choose based on the geometry of your specific gap.
Styrene shimming. Cut a strip of Evergreen Scale Models styrene stock to the length of the gap. Select a thickness—available in 10, 20, and 30 mil—that fills the majority of the void. Insert the strip edgewise into the fissure. If the gap varies in width along its length, file the strip into a gentle taper for maximum contact surface. Wick Tamiya Extra Thin Cement into the joint via capillary action to fuse the shim to both the wing and the fuselage. Allow a minimum of 24 hours for the solvents to fully outgas before touching the joint. Then aggressively file and sand the protruding styrene flush with the surrounding aerodynamic contours, working down through 220 and 400-grit. Apply a skim coat of Mr. Surfacer 500 over the sanded shim to fill any micro-gaps at the styrene-to-plastic interface, then sand flush again with 600 to 800-grit. The styrene-to-styrene bond is fundamentally stronger than any putty fill, and the shim eliminates the unsupported air gap that causes putty-only repairs to fail.
Internal spreader bar. Wide wing root gaps are sometimes not a wing geometry problem at all—they result from an inward collapse or narrowing of the fuselage halves during the molding or cooling process. In these cases, the optimal fix is internal expansion. Insert a rigid segment of thick sprue, brass tubing, or heavy-gauge styrene rod transversally inside the fuselage, directly beneath the cockpit floor. Through iterative trimming and test-fitting, adjust the spreader bar’s length until the fuselage sidewalls are pushed outward just far enough for the wing root surfaces to meet the fuselage fillets perfectly. Once the correct geometry is achieved, flood cyanoacrylate or solvent cement around the internal bar joints to lock the position permanently. This approach eliminates the external gap entirely without requiring any external filler.
Masking tape release (compound curves). For tight, compound-curved wing root fillets where neither shimming nor spreading is feasible, advanced modelers use a release-agent technique. Apply a strip of glossy transparent tape (Scotch tape) directly over the fuselage fillet. Mate the wing temporarily, then pack the resulting void with solvent putty. Because the putty cannot adhere to the slick tape backing, it bonds only to the wing surface. After overnight cure, gently flex the wing to pop the custom-contoured putty extension free from the taped fuselage. The result is a perfectly molded, zero-sanding wing root extension that matches the fuselage geometry exactly.
Advanced option — Sprue Goo. For deep seams that will require aggressive panel-line re-scribing afterward, experienced modelers use a homemade filler called “Sprue Goo”: chopped HIPS sprue fragments dissolved into a partially depleted bottle of Tamiya Extra Thin Cement over several hours until the mixture reaches a viscous liquid-plastic consistency. When brushed into a gap, the aggressive solvents melt the surrounding kit plastic, initiating a chemical weld. As the solvents evaporate, the deposited material reverts to solid polystyrene—with the exact same Shore hardness as the host plastic. This means scribing tools cut through the fill and the surrounding plastic identically, with no snagging, deflecting, or crumbling.
Step 6: Apply the Primer Reveal Coat
Bare polystyrene mixed with gray, white, and green putties creates a visually chaotic surface that conceals microscopic defects, pinholes, and residual sanding scratches with near-perfect efficiency. The only way to evaluate the true condition of the repaired wing root is to eliminate that optical chaos with a uniform, monochromatic coat of primer.
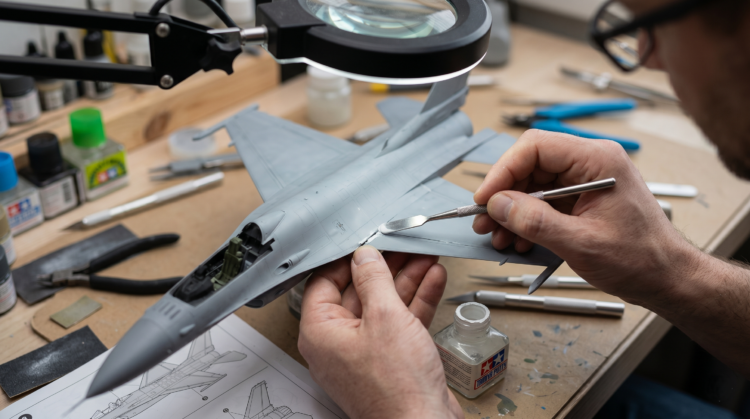
Spray Tamiya Fine Surface Primer or Mr. Surfacer 1200 over the repaired area in light, misty passes. Once dry, hold the model under a desk lamp with the light raking across the surface at a low angle. Cast shadows will expose every remaining divot, sunken seam, and sanding scratch that was invisible under bare plastic. Mark any defects lightly with a graphite pencil, apply a targeted micro-fill—Mr. Surfacer 500 or a focused drop of thin CA—and run another sanding cycle. Repeat this loop until the primer reveals a completely uninterrupted transition from wing to fuselage. One to two primer cycles is standard for beginners; experienced modelers typically need only one.
Step 7: Rescribe Panel Lines Lost to the Fill
Aggressive sanding inevitably eradicates the delicate engraved panel lines and rivet detail adjacent to the wing root seam. Restoring this topology requires scribing tools and strict mechanical guidance. Freehand scribing without a physical guide almost always results in lateral tool deflection—one slip and the surface is ruined. Apply strips of Dymo embossing tape or multiple layers of Tamiya masking tape directly to the model surface and use them as a rigid, unyielding fence for your scribing tool.
The scribing implement you choose determines the quality of the resulting channel. A sewing needle chucked into a pin vise is an inexpensive starting point, but it displaces plastic laterally, creating a V-shaped trench flanked by raised burrs that must be sanded away afterward. Dedicated commercial scribers—the Tamiya scriber, the Olfa P-cutter (Olfa 450), the Bare Metal Foil scriber, or the UMM-USA tool—physically extract a microscopic continuous shaving from the plastic, leaving a clean, square-bottomed or U-shaped channel that accurately replicates the appearance of overlapping sheet metal. Use minimal downward pressure and allow the sharpness of the blade to do the work over three to four light, consecutive passes.
Quick-Reference: Filler Selection by Gap Type
| Filler Type | Gap Size | Shrinkage | Best For |
| Tamiya / Revell Extra Thin Cement | Hairline (<0.5mm) | None — welds plastic | Capillary seam welding |
| Tamiya / Squadron Putty | Medium (0.5–1.5mm) | Moderate | General contouring & fill |
| Perfect Plastic Putty / Vallejo | Tight wing roots | High (water evap.) | Wipe-off applications |
| Sprue Goo (HIPS + Thin Cement) | Deep seams | Low — matches kit plastic | Re-scribing areas |
| CA + Baking Soda | Spot repairs (<0.5mm deep) | None | Structural spot repairs; instant processing |
| Evergreen Styrene Strip | Wide structural (>1.5mm) | None | Bridging large voids |
Pro Tips: Common Mistakes to Avoid
- Don’t skip the dry-fit. The single most common cause of large, preventable wing gaps is rushing directly to gluing without first checking alignment. A five-minute dry-fit and a flashlight check can eliminate 80 percent of gap problems before they start.
- Avoid using superglue (CA) alone to bridge gaps. Cyanoacrylate is structurally weak when spanning any unsupported void, dries significantly harder than surrounding polystyrene—making it difficult to sand evenly—and its outgassing vapors can irreversibly fog adjacent clear parts through a process known as “misting” or “fogging.” Reserve CA for structural spot repairs, not for bridging wing root gaps.
- Never apply solvent putty in thick, single coats. Thick applications skin over on the surface while the lower strata remain uncured, trapping solvents and causing the fill to crack, lift, or continue shrinking for days. Multiple thin layers, fully cured between sessions, are always superior to one heavy fill.
- Don’t sand immediately after applying putty. Uncured solvent putty gums up sandpaper and smears across the surface rather than sanding cleanly. Always wait for full cure—overnight is the safe benchmark.
- Check the lower wing surface, not just the top. Beginners instinctively examine the upper wing root and stop there. The same gap that runs along the top of the wing almost always has a corresponding seam on the bottom. Check both surfaces systematically before priming.
- Always prime before you paint. Surface defects that are completely invisible under the multicolored chaos of bare plastic—pinholes, micro-scratches, residual seam lines—become glaringly obvious under a uniform coat of paint. The diagnostic primer reveal coat is not optional; it’s the step that determines whether your repair is actually done.
FAQ: 5 Questions Beginners Ask About Wing Root Gaps
Q: How do I step-by-step fill a wing root gap on my Tamiya 1/48 scale model airplane?
The correct process for filling a wing root gap on a Tamiya 1/48 kit is to classify the gap first, then match the repair to the gap size.
- Dry-fit the wing before using any cement; use a flashlight to locate every gap around the full perimeter.
- Classify the gap: hairline (<0.5mm), medium (0.5–1.5mm), or wide structural (>1.5mm).
- For hairlines: flow Tamiya Extra Thin Cement into the seam via capillary action and hold with firm pressure for 30–60 seconds.
- For medium gaps: apply Tamiya Basic Type Putty in multiple thin layers, curing overnight between sessions, then sand progressively through 220, 400, 600, and 800-grit, finishing with a wet pass at 1000-grit before priming.
- Spray a thin reveal coat of Tamiya Fine Surface Primer over the repair; inspect under a raking light; address any remaining defects before final painting.
Q: What is the best putty to fill gaps on a plastic model airplane kit?
The best putty for filling wing root gaps depends on the gap size and your working preference—these four options cover virtually every scenario.
- Tamiya Basic Type Putty or Squadron White/Green Putty: Solvent-based, chemically bonds to styrene, excellent sandability and machinability. Best for medium gaps of 0.5–1.5mm where structural integrity matters. Apply in thin layers; allow full overnight cure.
- Surfacer 500: Liquid filler ideal as a final skim coat over sanded putty. Fills micro-scratches, pinholes, and minor surface irregularities simultaneously. Also useful as a stand-alone filler for very tight seams.
- Perfect Plastic Putty or Vallejo Plastic Putty: Water-based, odorless, and sanding-free via the wipe-off technique. Best for tight concave wing root fillets where sanding access is restricted. High shrinkage rate means a second application is often needed.
- CA + baking soda (for structural spot repairs requiring instant cure): Pack the gap with dry baking soda, brush away excess, then wick water-thin CA into the powder. The result cures rock-hard in seconds and can be sanded within 10–15 minutes. Sand promptly — the material becomes very difficult to level after that window closes. Note: not recommended for bridging wide structural gaps; best for small, deep spot repairs; substituting talc (baby powder) for baking soda reduces the heat of the reaction and gives you a slightly longer window to work the compound before it locks up.
Q: What is the exact process for using styrene strip to fix a large gap where the wing meets the fuselage?
Styrene strip shimming is the definitive technique for wide structural gaps exceeding 1.5mm, where putty alone will crack or sink.
- Select the appropriate Evergreen styrene strip thickness (10, 20, or 30 mil) to fill most of the gap width.
- Cut the strip to length and insert it edgewise into the fissure. If the gap varies in width, file the strip into a taper for full-length contact.
- Wick Tamiya Extra Thin Cement into the joint to fuse the shim to both the wing and the fuselage. Allow a minimum of 24 hours of full cure.
- File and sand the protruding styrene flush with the surrounding surface, working through 220 and 400-grit.
- Apply a skim coat of Mr. Surfacer 500, sand flush at 600–800-grit, then confirm the repair with a diagnostic primer coat.
Q: How do I rescribe panel lines after I’ve filled and sanded a gap on my plastic model aircraft?
Rescribing panel lines lost to gap-filling requires a rigid straight-edge guide and the right scribing tool—freehand scribing almost always results in surface damage.
- Use a guide fence: Dymo embossing tape or multiple layers of Tamiya masking tape applied directly to the model provide a rigid, unyielding straight-edge that prevents lateral tool deflection.
- Select the right tool: Dedicated commercial scribers (Tamiya scriber, Olfa P-cutter/Olfa 450, Bare Metal Foil scriber, UMM-USA tool) physically extract a microscopic shaving, producing a clean, square-bottomed channel. A sewing needle in a pin vise is a budget alternative but leaves a V-shaped trench with raised burrs that must be sanded away.
- Use minimal pressure: Apply light downward force and allow the sharpness of the blade to do the work. Three to four light consecutive passes produce a better, more controlled result than a single heavy cut.
- Scribe before your final primer coat, so the primer reveal step confirms both the surface repair and the rescribed panel line quality simultaneously.
Q: Why does my model putty keep cracking or shrinking after I use it to fill wing gaps?
Putty cracking and shrinkage are caused by applying too much material at once, sanding before full cure, or using the wrong product for the gap size.
- Over-application: Solvent putties contain toluene and acetone that must fully evaporate as the filler cures. A thick application skins over on the surface before the lower strata are dry, trapping solvents beneath. As those trapped solvents eventually escape, the fill cracks or continues to shrink unpredictably. Apply multiple whisper-thin layers rather than one heavy fill.
- Insufficient cure time: Sanding before solvent putty is fully cured gums up the abrasive and smears the still-soft material. Let each layer cure fully—overnight is always the safe choice—before picking up a sanding stick.
- Unseparated tube chemicals: Solvent putties in tube form can separate over time. Always massage the tube thoroughly before squeezing out product to reintegrate the filler substrate and solvent carrier.
- Wrong product for the gap size: Any putty—solvent-based or water-based—will crack or sink if asked to bridge a structural gap exceeding 1.5mm without a mechanical shim beneath it. Match the technique to the gap classification; putty is a surface-leveling agent, not a structural filler.

Key Takeaways
- Always dry-fit the wing and use a flashlight to map the precise location and size of every gap before any cement is introduced.
- Match the repair to the gap: liquid cement for hairlines under 0.5mm; solvent putty for medium gaps of 0.5–1.5mm; styrene strip shimming or an internal spreader bar for wide structural gaps over 1.5mm.
- Apply solvent putty in multiple thin layers and allow full overnight cure between sessions; thick single coats shrink, crack, and fail.
- A diagnostic primer reveal coat (Tamiya Fine Surface Primer or Mr. Surfacer 1200) is non-negotiable—it exposes pinholes, sanding scratches, and residual seams that are invisible under bare plastic.
- Rescribe any panel lines lost to filling using Dymo tape or Tamiya masking tape as a rigid guide fence, and a dedicated commercial scriber for clean, extraction-cut channels.